Jonathan Andre is a lead ABAP developer at IT Partners. Jon has over 10 years experience with SAP, with a concentration on ECC SD, MM, and IS-OIL modules. Jon’s focus has been in the areas of ABAP OOP, ABAP Web Dynpro, and ABAP for HANA and RESTful ABAP development. He can be reached at [email protected].
During this month’s blog, we begin the process of building our Sale to Tweet application utilizing the BTP. For our first step, we want to address the first problem we identified when discussing how to extend SAP functionality in the Cloud:
Problem: 1. If the BTP is completely separate from the SAP system, how can we react to business events in a timely and reliable fashion?
The answer to this question for SAP ERP systems is almost always by using the SAP Event Mesh. During this blog we will go over how to configure and test the SAP Event Mesh to accommodate our Sale to Tweet application. Before doing that, let’s cover some important terminology:
Event Driven Architecture (EDA): A design method where the components of a solution (consumer) are driven by and entirely designed around business events. A central event source (producer) broadcasts events, internally or externally, and the separate components of the solution can respond when and however is required to meet an ancillary business need. Benefits of this approach are loose coupling of solutions, scalability and flexibility.
SAP Enterprise Event Enablement (EEE): This is SAP’s approach to enabling the SAP ERP system to become the event producer in an EDA. SAP EEE allows business events to be published to a “channel”, where they can be received and placed in a queue by an “event broker”. While the event broker in the EDA model can conceptually be any external message management system, for SAP EEE the event broker MUST be the SAP Event Mesh. SAP EEE is configurable to support multiple channels, and 1 or more types of business events can be published to any channel.
SAP Event Mesh: This is the Event Broker if you want to utilize SAP ERP event channels. This subscription service is available on the BTP in various incarnations, including Event Mesh, Integration Suite, with Event Mesh, and Advanced Event Mesh. This blog will focus on working with regular old, vanilla Event Mesh to cover the basics.
With the terminology out of the way, let’s show how this works in practice by configuring our SAP S/4HANA system to publish Sales events to our Event Mesh instance.
Creating an Event Mesh Instance 
Prerequisites:
- You have assigned the appropriate Event Mesh entitlements from you Global Account to your desired subaccount.
- Within your subaccount, you have subscribed to the Event Mesh Subscription Service
- This is the application that allows you to manage message clients.
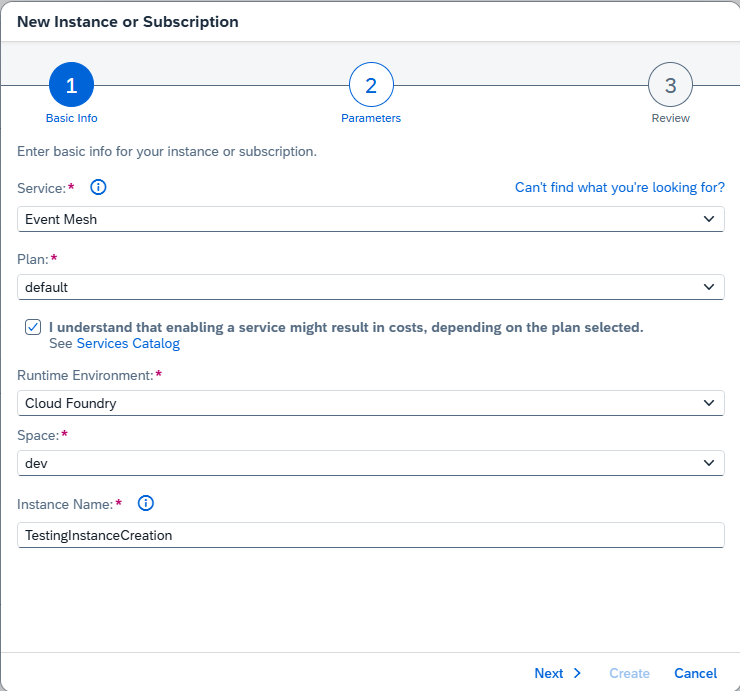
- Step 1: Create an event mesh instance.
Some Details about what we selected…
For Service we selected Event Mesh – This is the particular service we wish to create an instance of
For Plan we selected Default – Many services have different plans to meet a users needs. Here we select the “Default” plan
For Runtime Environment we selected Cloud Foundry – The environment out Event Mesh will run in .We would select other environments, like Kyma, etc., but our example uses Cloud Foundry for Integration Suite and ABAP Environment, so it makes sense for Event Mesh as well
For Space we selected Dev – This is the name of our “Space” within our Cloud Foundry environment. This is where you can break solutions into sequential stages like Dev, System test, Prod, etc.
For Instance Name we selected TestingInstanceCreation – This is just the name of the event mesh service instance that will show up on the BTP. Other than uniqueness, naming conventions for this aren’t too important
Next we Fill the JSON Service Descriptor configuration file. After clicking next, you’ll see an editable screen containing an Event Mesh configuration template file in JSON format.
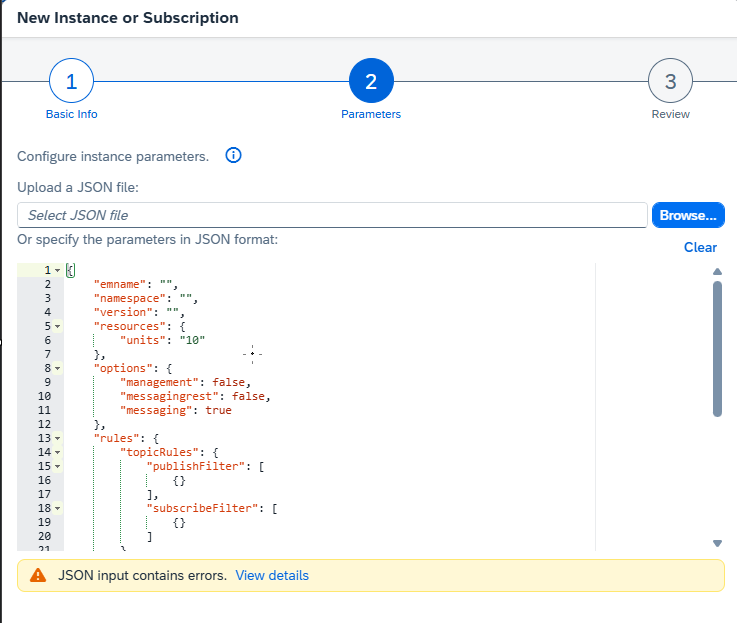
The Above is only a template. Please see the below as to the different parameters and their meanings
EMNAME – Name of your message client. This is a free text field and can be anything. The system type in your migration (DEV/TEST/PROD) is one possible option, but any alphanumeric string is acceptable.
NAMESPACE – SAP recommends the following pattern: “<yourorgname>/<yourmessageclientname>/<uniqueID>” The three segments are REQUIRED. Note the URI-style namespace. This is important to consider when creating multiple message clients, because these queues will be accessed via RESTful calls. (Ex: ITP/SALES/DEV)
VERSION – For purposes of this blog, we have chosen version 1.1.0. If the plan is to eventually use this in a productive environment, you will want to research all the versions, including cost and benefits.
FILTERS – This allows you to restrict the namespace of resources your message client subscribes to or publishes to. Based on any filters, you can restrict your message clients to specific topics and environments (Sales, Billing, DEV, etc). For our blog the ${namespace} string indicates a variable, so all of our Inbound and Outbound bindings will match our namespace.
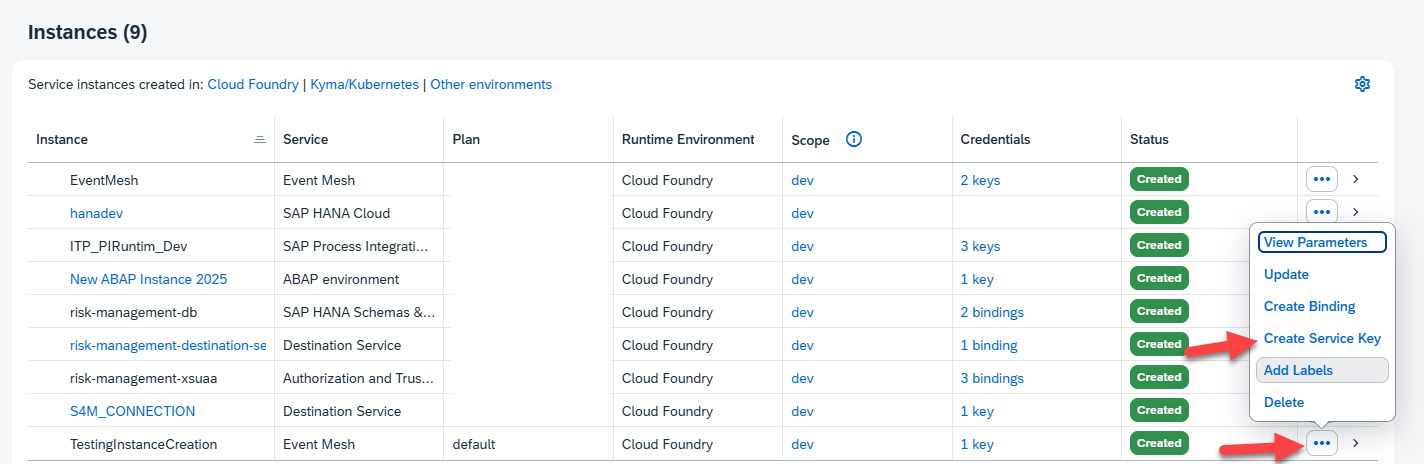
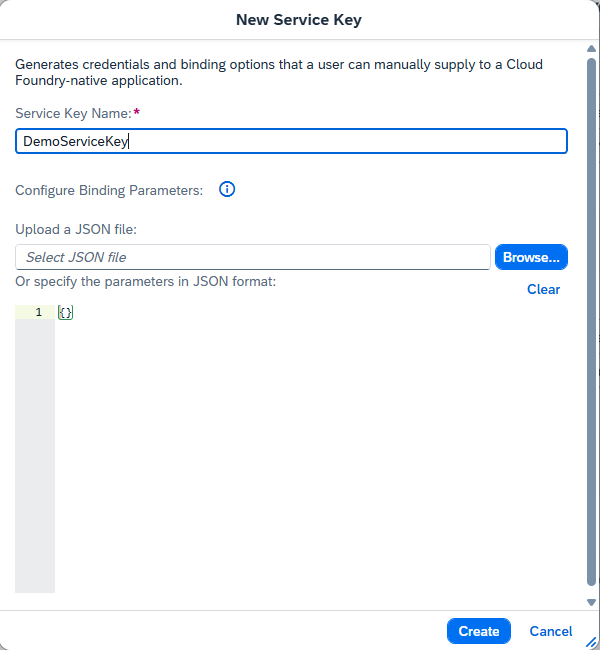
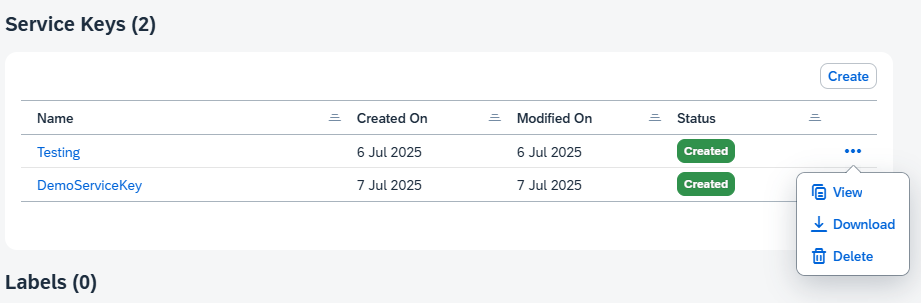
Finally, click create and retrieve Service Key – After a short time, you should see your newly created Event Mesh instances within your subaccount. The name of this instance will match the name provided in Step 1.
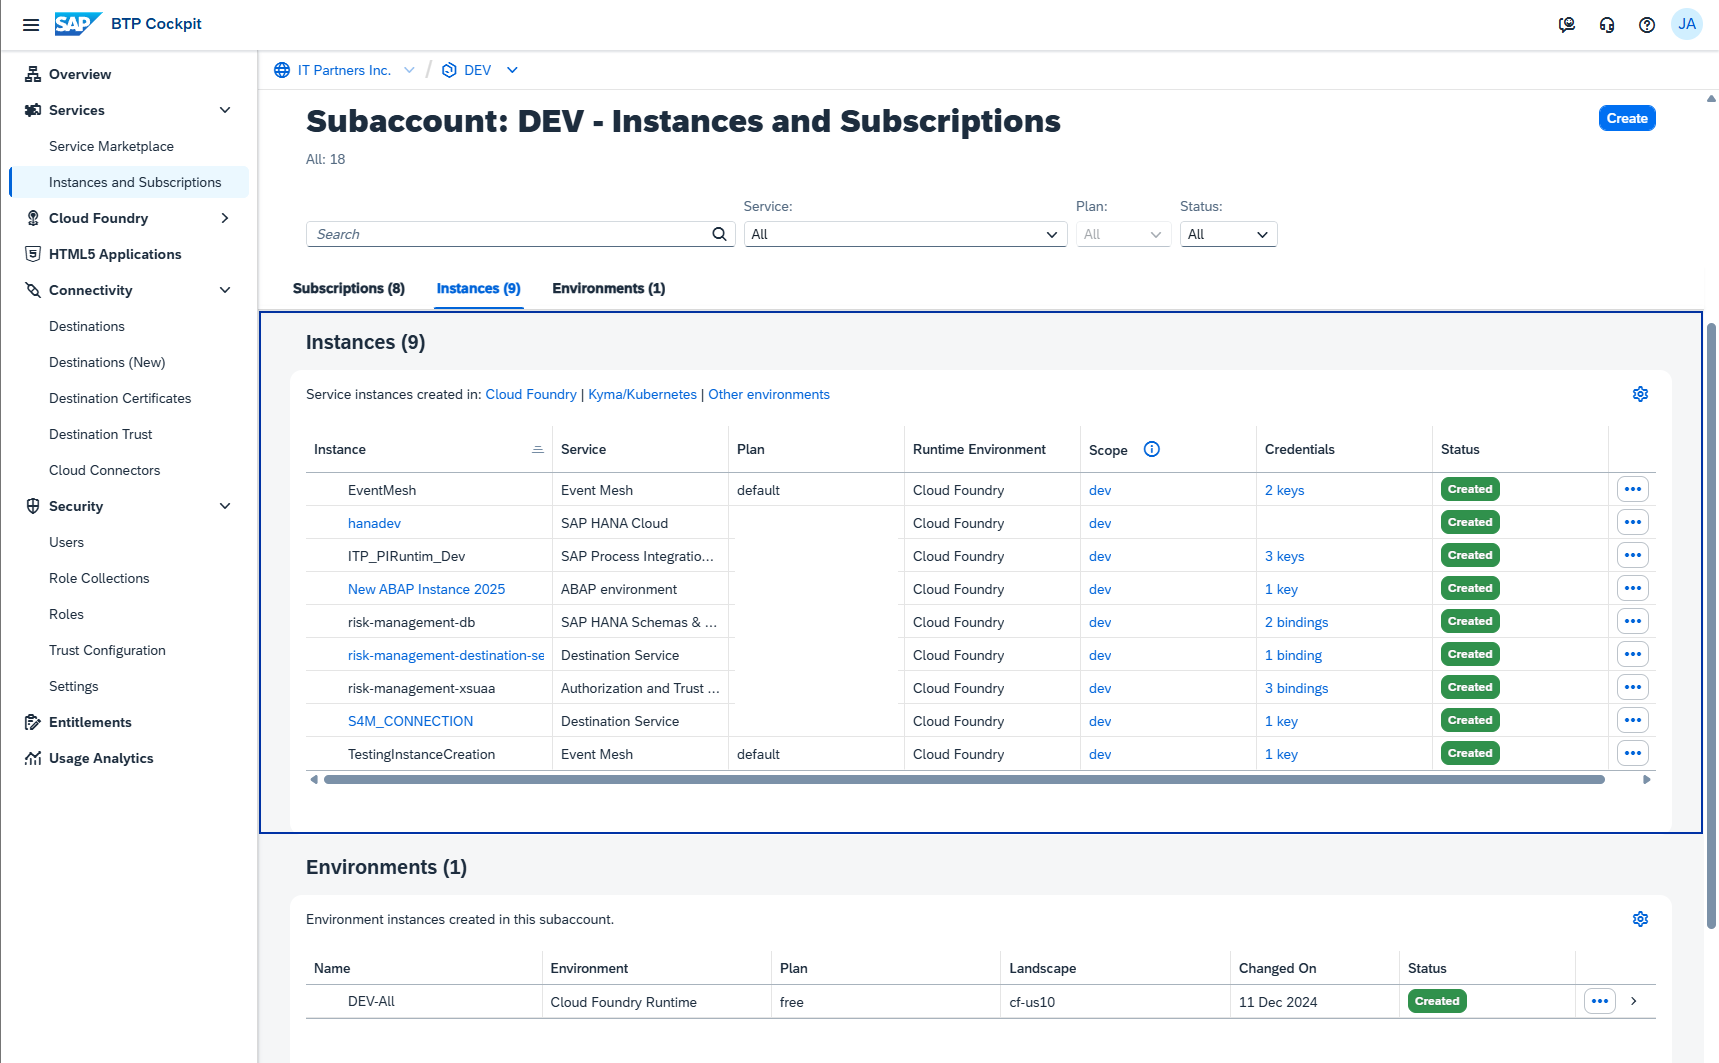
Next, we’ll need to grab our Service Key for our Event Mesh service. To do that, we can click the options button next to our service instance, provide a unique name for our credentials, then copy/download the generated JSON. Make sure to store this somewhere safe, as this JSON has all the required information to access your message client, in addition to a unique set of access credentials. For the next steps, we’ll take a break from the BTP and switch over SAP to get things prepared on that system.
SAP Enterprise Event Enablement
 Note that the following section involves configuring an S/4HANA on-premise or S/4HANA private Cloud system. For S/4HANA Public Cloud, you can follow the directions here (https://help.sap.com/docs/abap-cloud/abap-integration-connectivity/integration-with-sap-event-broker)
Prerequisite:
Before beginning, there are some prerequisites. There are steps involving setting up the BTP system as a “Destination”, Configuring the Daemon to perform EEE related tasks, etc. You can find the initial set up steps here(https://help.sap.com/docs/SAP_S4HANA_ON-PREMISE/810dfd34f2cc4f39aa8d946b5204fd9c/fbb2a5980cb54110a96d381e136e0dd8.html). For this blog, we will assume this has all been completed and move onto the Channel Creation and creation of Outbound Bindings.
One important prerequisite I should identify is the requirement to have Workflow and Workflow events enabled. Not only is the workflow requirement a critical step in preparing your system for EEE, but it reveals a bit of the design behind event enablement. The events produced and sent to the event mesh are the very same events that drive workflows within the same SAP system. So, the EEE software listens for specific events and places them on the appropriate Outbound channels. These channels are what the Event Mesh monitors, and relevant messages are placed in the appropriate event queues. Understanding this is not only helpful when configuring your system for EEE, but is also useful later when testing and troubleshooting our channels.
Enterprise Event Enablement can be fully configured from SPRO following the path SAP Netweaver -> Enterprise Event Enablement ->* to configure the various options and view logs related to our EEE components. For this blog, we will focus on the two mandatory transactions:
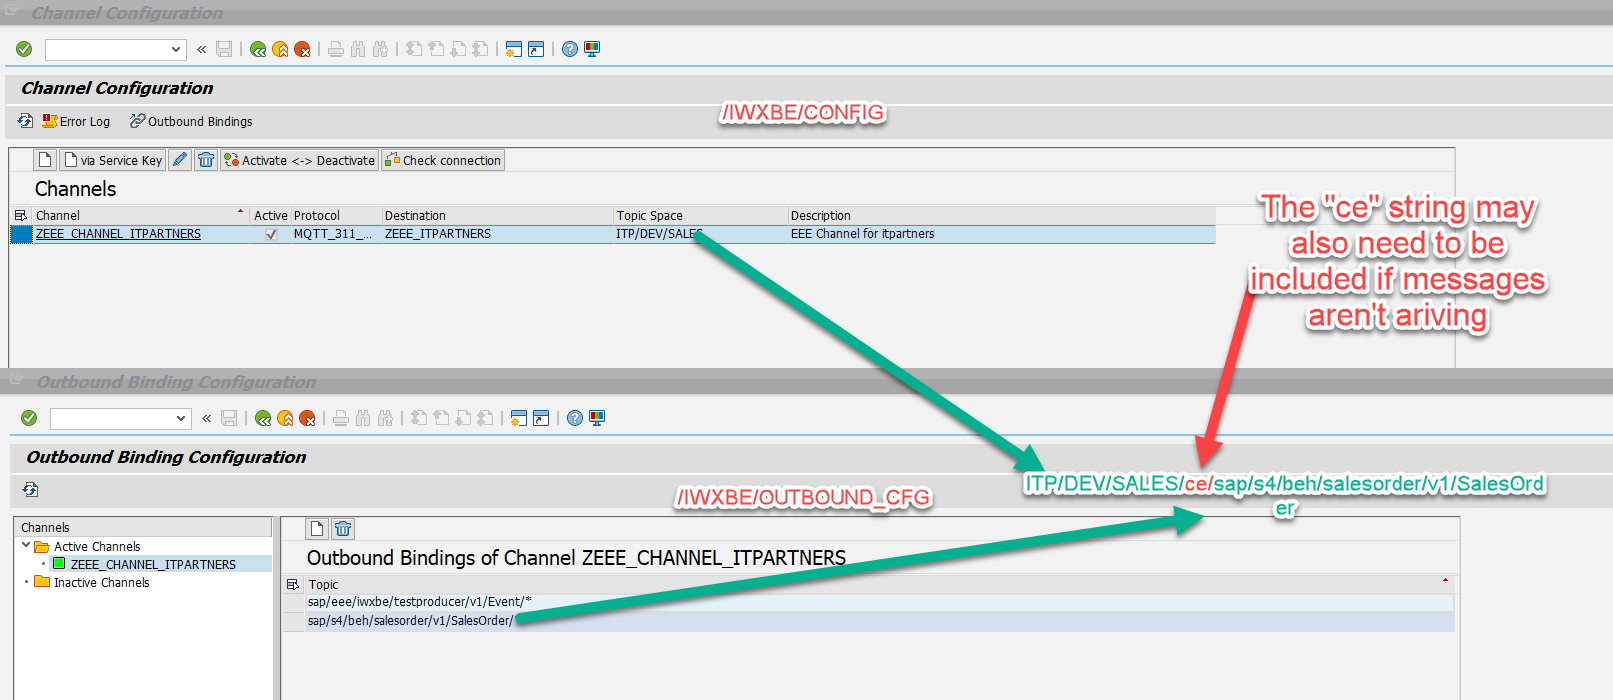
- T-code: /IWXBE/CONFIG
- SPRO: SAP Netweaver -> Enterprise Event Enablement ->Administration->Channel Connection Settings->Manage Channels and Parameters
- T-code: /IWXBE/OUTBOUND_CFG
- SPRO: SAP Netweaver -> Enterprise Event Enablement ->Configuration->Maintain Outbound Event Topics
OK, lets break this down into steps:
Step 1 – Create a new Channel via /IWXBE/CONFIG – Creating a new Channel is actually pretty simple, thanks to our Service Key that we generated back in the BTP. Click the “via Service Key” button in the top left of the screen, then paste in the JSON service key we downloaded in Step 3 of the Event Mesh creation steps. Enter a descriptive and unique name and description. Finally, choose a destination, making sure it is the correct destination to target your BTP system. Then click the save button:
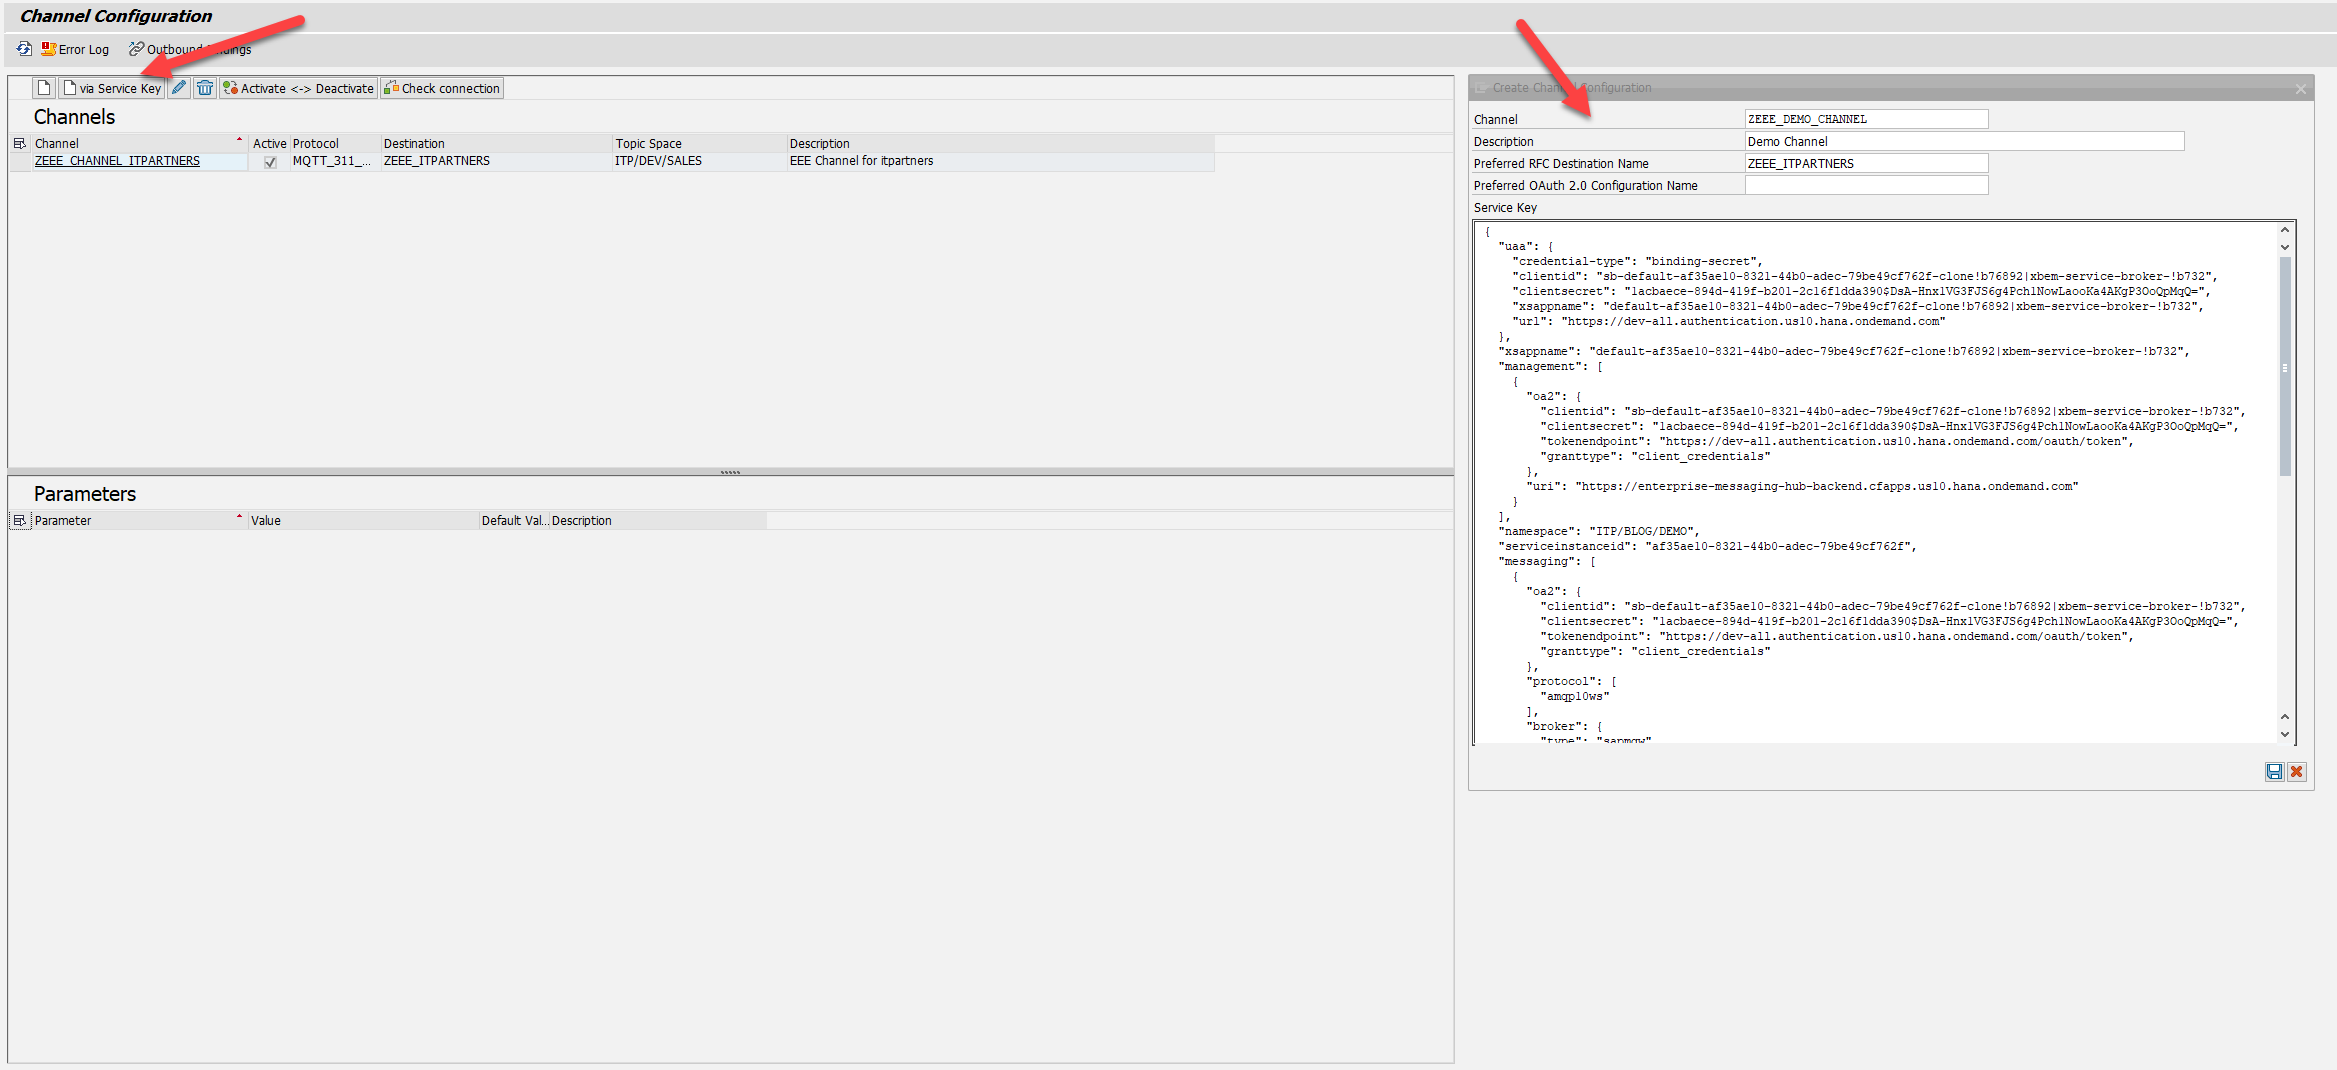
Step 2 – Validate Channel Connection and Activate – Once your channel has been created, click the validate button up top to confirm a successful connection. Once verified, click the activate button to activate the channel.
Step 3 – Bind topics to our Outbound channel via /IWXBE/OUTBOUND_CFG – With the Channel connected and validated, our last remaining step is to add topics to our channel. We can either select our channel and click the “Outbound Bindings” button, or just navigate to /IWXBE/OUTBOUND_CFG directly. The topics available, as hinted towards in the prerequisites section, are just Business Objects listed in the plain language form. BUS2012 is just listed as “Purchase Order”, for example.
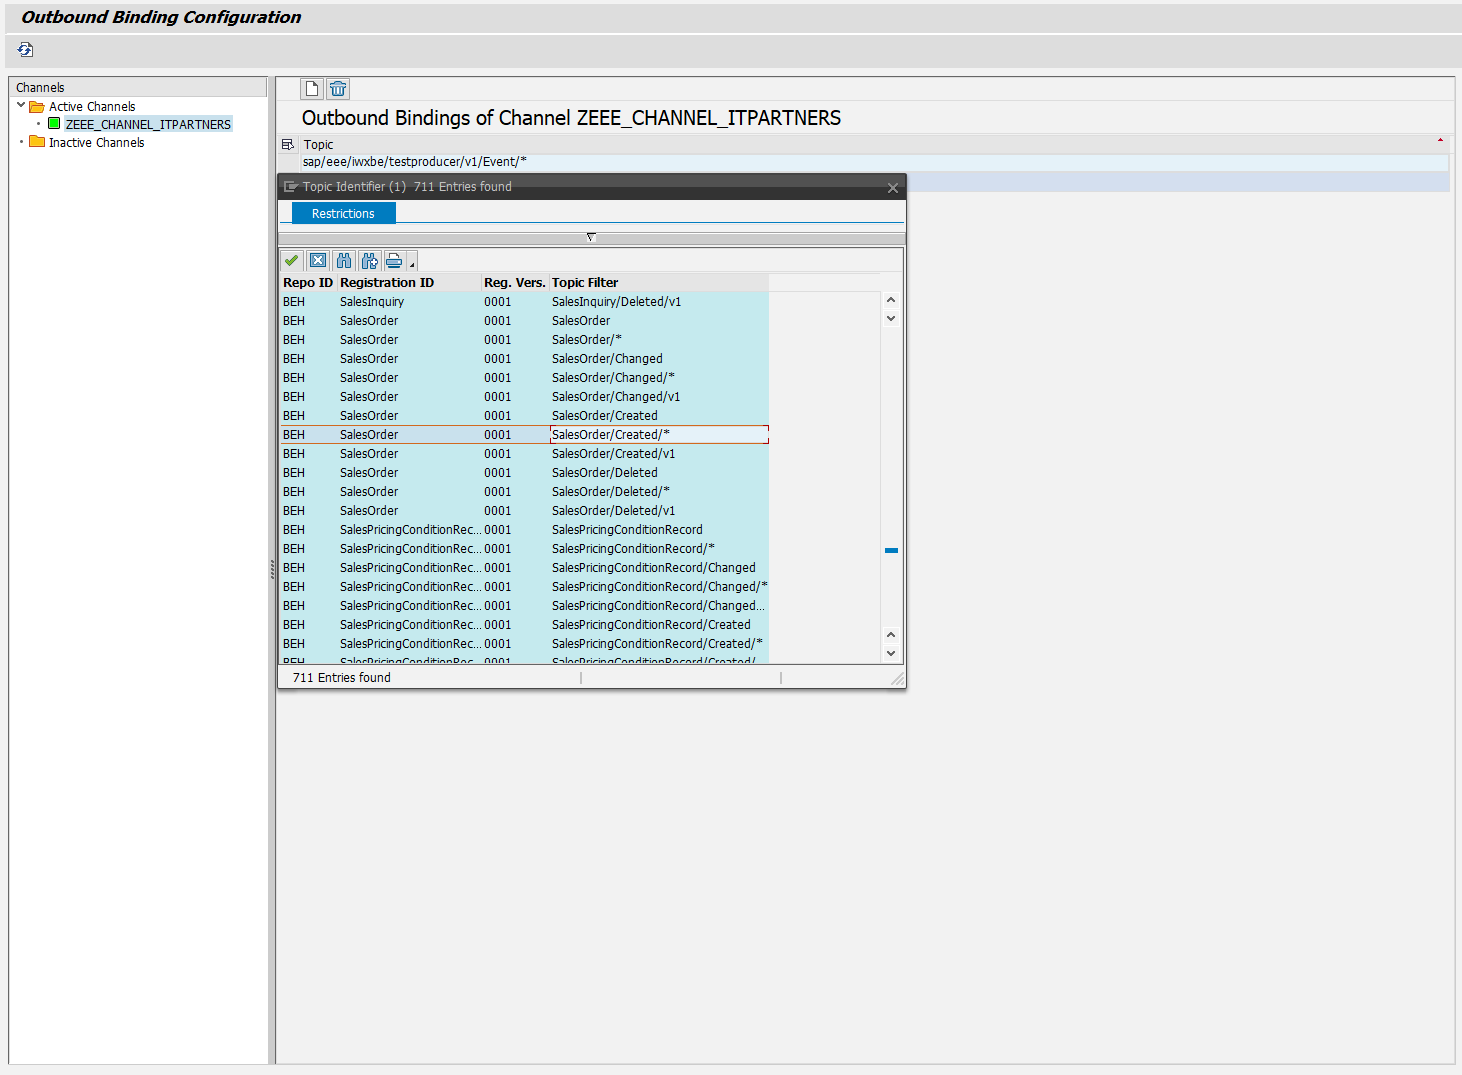
In our demo, we only required the sales order created event, but it is possible to select as many topics as you’d like. Click the save button once you have selected your topic(s), and you should see a success message in the status bar. And that’s it! You have now successfully created a channel and assigned a topic to it! Events subscribed to (if you have followed all the prerequisites as well) will now be published to the Event Mesh! We’ll cover some testing steps for EEE at the end of the blog. For now, we will head back to the BTP for the final configuration steps.
Configure Access and Queues
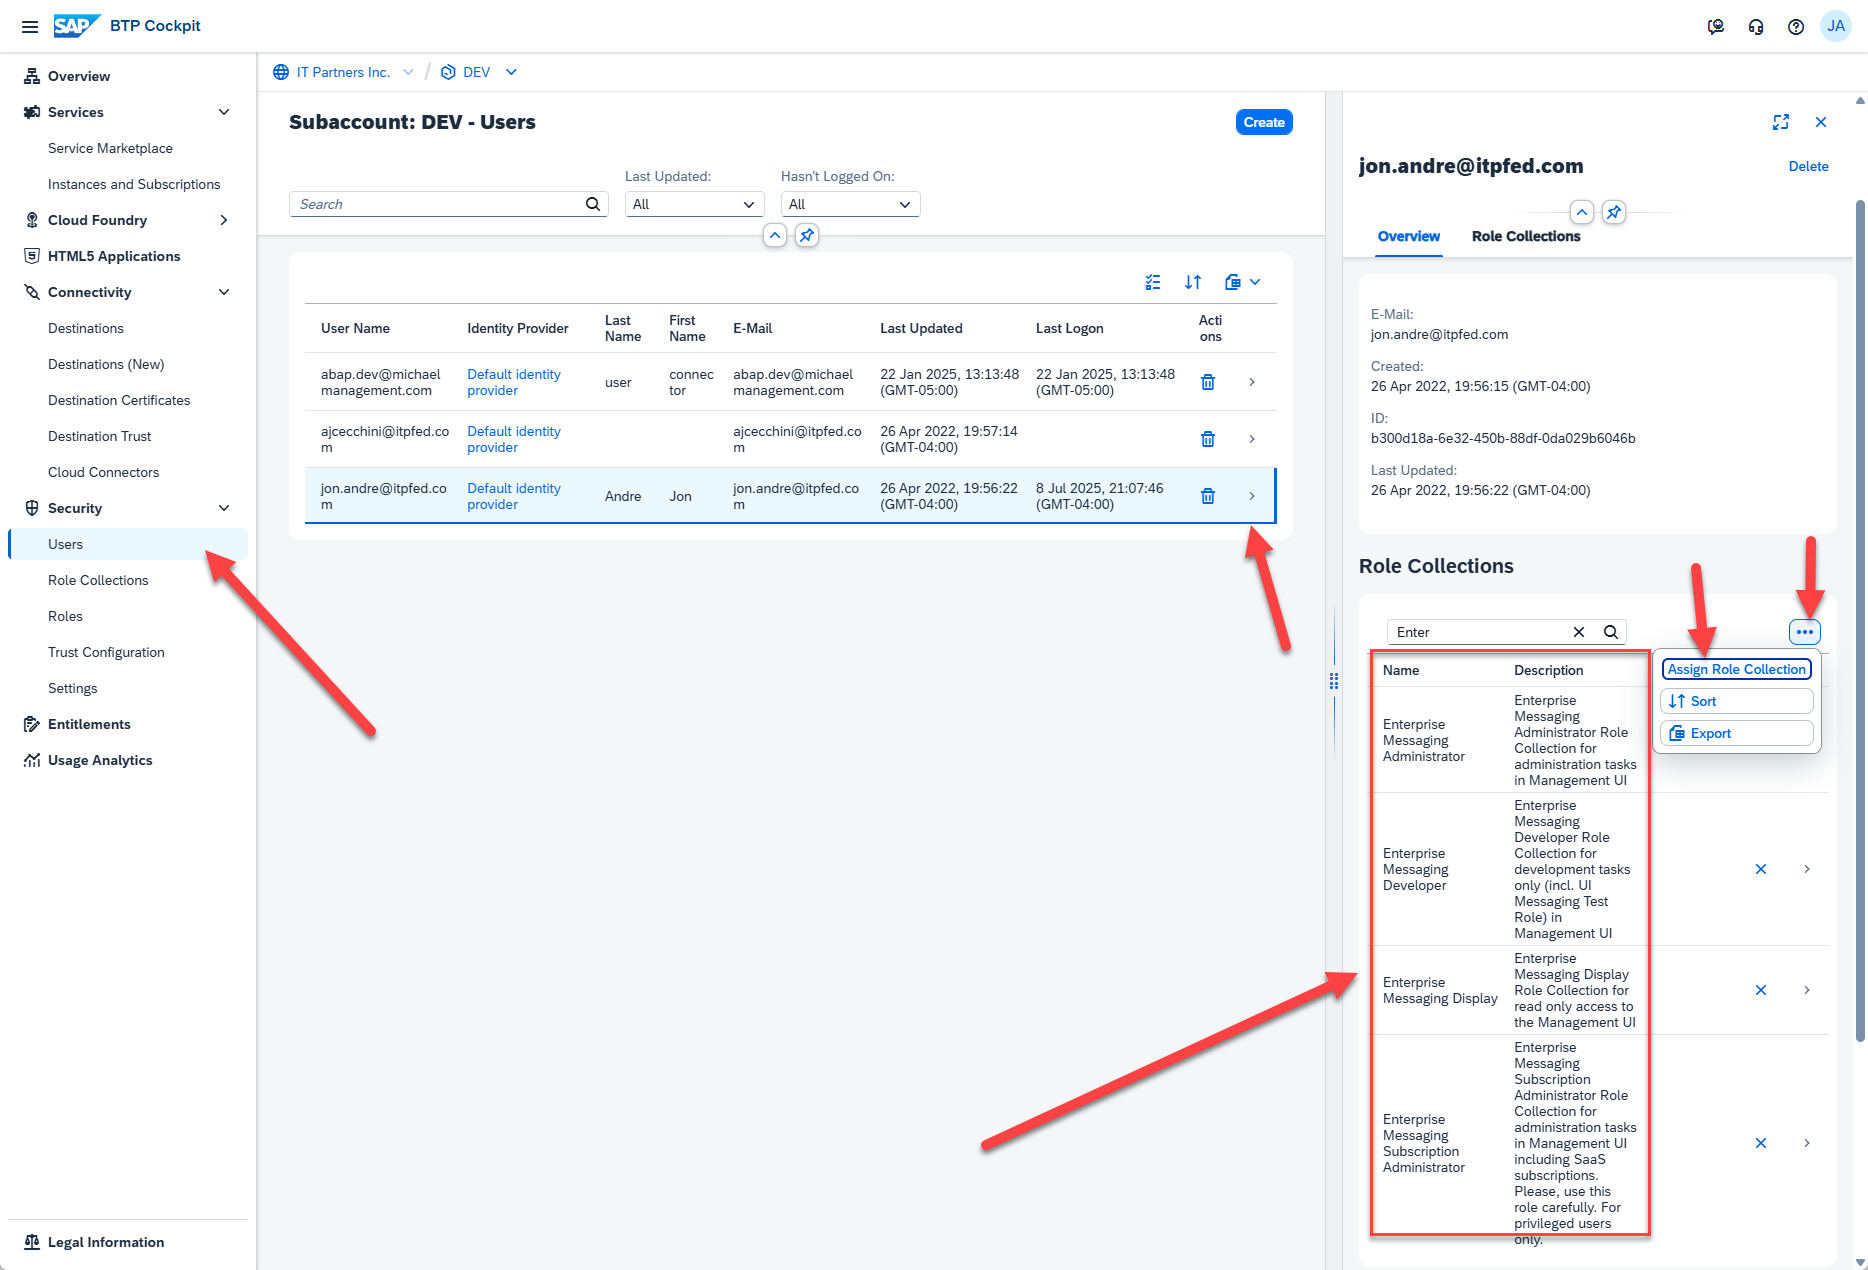
The next step of the process involves creating Queues and subscribing queues to our desired topics, produced by one or more channels. To perform these steps, we will use the Event Mesh application. Before we can access the Event Mesh application, however, we need to assign the appropriate roles to our administrator user.
These new roles are only available after the Event Mesh application has been created, roles need to be added every time a new application is created. To properly configure and test our Event Mesh instance, we require our user to have the following role collections:
- Enterprise Messaging Administrator
- Enterprise Messaging Subscription Administrator
- Enterprise Messaging Developer
To assign these roles, we follow the path Users->(Name of User that will Configure EM)->Click the three option dots under Role Collections->Assign Role
With the roles assigned, we can open up our Event Mesh application to confirm the remainder of the details. The Event Mesh application allows us to monitor and manage our Event Mesh Instances/Message Clients. We can click the “Go To Application” button next under the Subscriptions section:

Notice the EMNAME and NAMESPACE we provided on the configuration JSON appears on the tiles. This page lists all active message clients/ instances that are part of this subaccount. From here, we can fine tune, test, and allocate resources for our message clients.
Our next step is to configure a new queue and subscribe. Before doing that, we’ll first define what a queue is in the context of Event Mesh/EDA and how they are used. Below are a summary of important facts to consider when naming and designing around the queue concept:
- Consumer applications only interact with the queue itself. While we have gone through creating messaging clients, channels, etc. it is from the queue that the actual messages are consumed.
- Reading from a Queue is the equivalent of “popping” a message off. By this I mean that there is no way to “peek” at a queue message and leave it there for another application. Reading IS removing, and so any application that reads the queue becomes solely responsible for processing that information.
- Queues can read from any channel. If only a subset is required, this can be specified by modifying the subscription URI to a more specific target. There are some limitations when it comes to using wildcards as well. The following link goes over these rules in more detail(https://help.sap.com/docs/event-mesh/event-mesh/syntax-for-naming-queues-topics-and-topic-patterns)
- Queues can be exclusive or non-exclusive. The exclusive scenario is more obvious, however if you are concerned about scalability and parallel processing, using a non-exclusive key will allow multiple (often identical) programs to process a queue simultaneously. Due to fact two above, no additional considerations need to be made to avoid duplicate reads of the same message.
- If multiple programs need access to the same queue, it’s possible to make duplicates with the same topics. They will receive the same messages, but reading a message from Queue 1 has no impact on Queue 2.
To configure our first queue, from the Message Clients page we click the respective tile, navigate to the Queue tab, then click “Create Queue” :
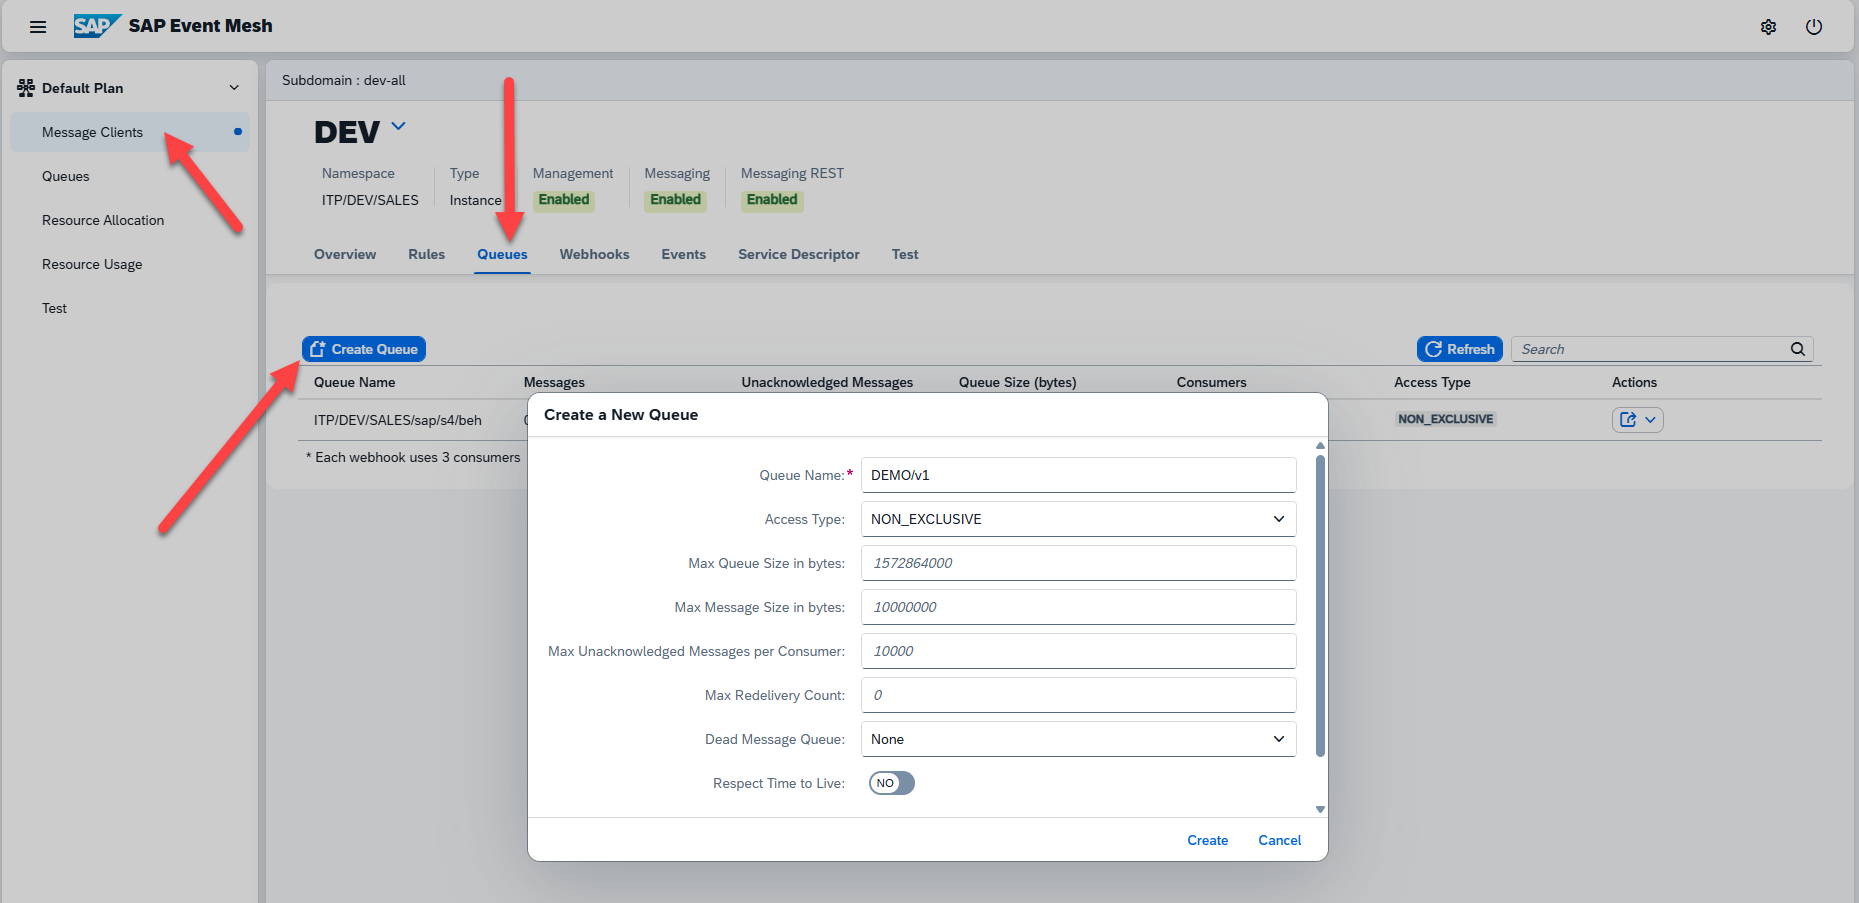
There are a few self-explanatory options listed in the pop-up. For now, we’ll just enter the basics of Queue Name (“DEMO/v1”) and leave the default “NON-EXLUSIVE” option selected. Click create the create the queue, then we can move on to subscribing to topics. Note that whatever names was picked for the Queue Name, the entire name will be {namespace}/{queue name}.
To subscribe a queue to a particular topic, click the “Actions” dropdown to the right of the Queue and select “Queue Subscriptions”.
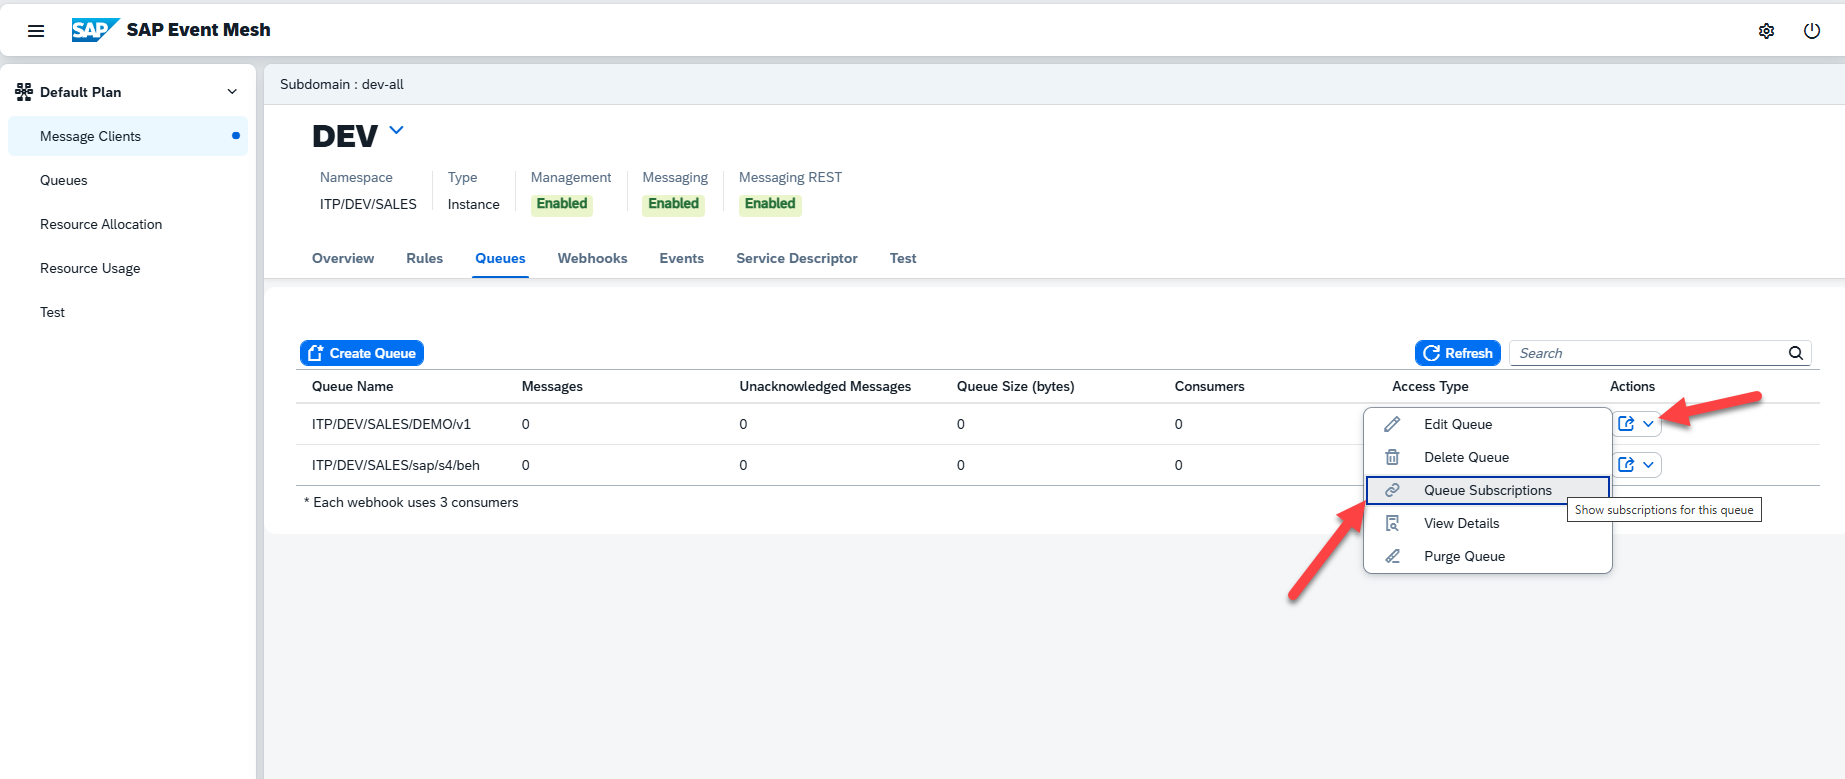
This next screen allows free text to be entered that specifies a queue. Be warned that this needs to be exact, but as long as the queue name matches the pattern that was entered in the “subscribeFilter” pattern in the Service Descriptor JSON (Step 2 of creating Event Mesh above), it will be accepted.
The events we are looking for to drive our application logic are the the Sales Order creation events from our SAP system. To specify our target, we will use the “Topic Space” string from our SAP system (which should match our EM space name) and the additional URI location from our channel (from t-codes /IWXBE/CONFIG and /IWXBE/OUTBOUND_CFG respectively. In our situation, since we only Sales Order create events and no others (change, delete, etc.), we will add an additional URI level to specified “Created” events only:
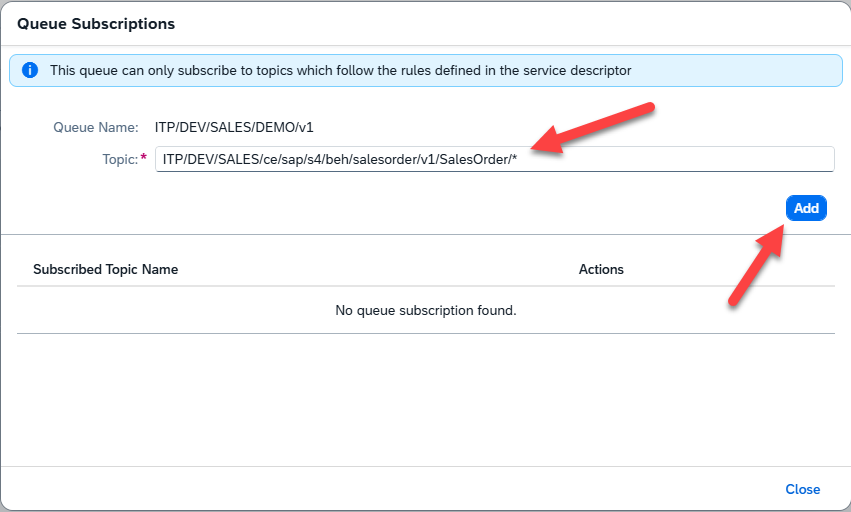
Click add and close, and that’s it! Your Event Mesh system will now place all “Sales Order Created” messages received from our SAP system into the DEMO/V1 queue. For our last section, we’ll go over some testing approaches to make sure our Event Mesh is fully operational.
Testing Our EDA
Our last step in this process is to test that our solution actually works. Fortunately, we can leverage many existing BOBJ event transactions to test and monitor our events. Here are a could of the more useful transactions below, and how they can be used to test your solution:
1. /IWXBE/CONFIG – Before doing anything else, it is worth returning to this transaction and testing the connection to Event mesh. Things change, especially if this is within a demo or practice system. So its worth verifying that the connection to the instance is actually up and running. Select your channel and click “Check Connection” to test.
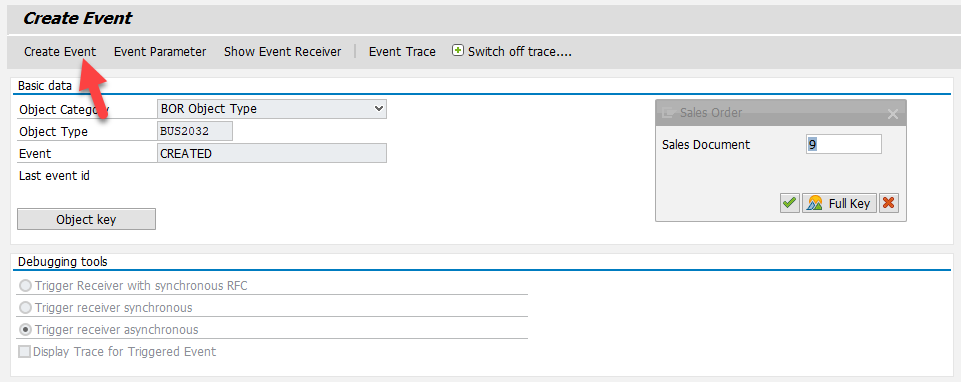
2. SWUE – This is perhaps the most useful transaction on the SAP side. This transaction allows you to trigger a specific business event directly without having to actually perform the business transaction. Simply enter the Object category (BOR Object), Object Type (BUS2032 for Sales Orders), and the required event. No actual action is performed in this transaction, but be careful because workflows or linkages waiting on this event may fire when testing!
If you only know your object by description and not by object type, TOJTB can be useful in mapping some descriptions to the Object Type Identifier:
As an added bonus of SWUE, you can also see what receivers exist for a particular event. When using Business Event Handler (BEH) topics, for instance, you should see the BEH as a receiver of your particular event
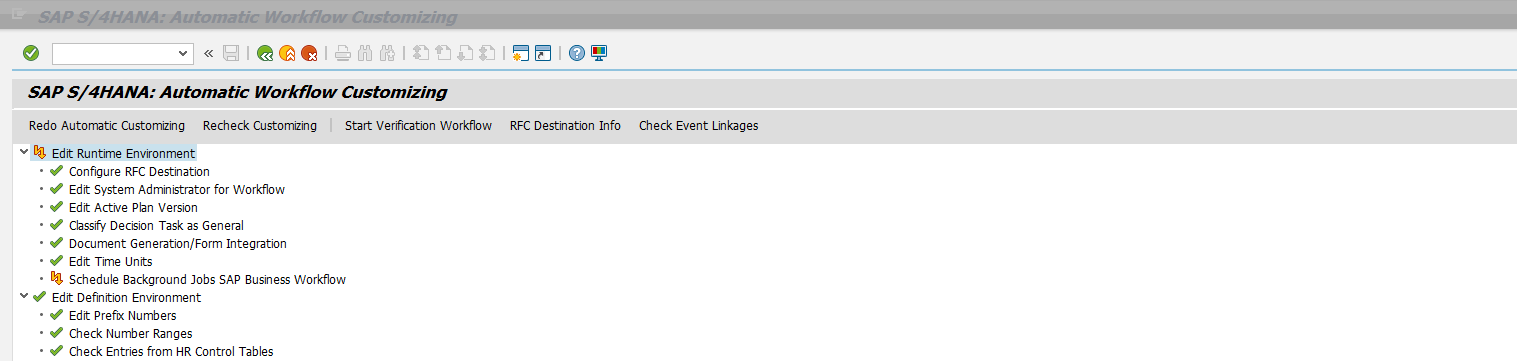
3. SWU3 – If you are sure you have configured your channels correctly, it may be worth having a look at SWU3, especially if this is a demo or practice system. As stated before, Workflow needs to be fully configured to work correctly. SWU3 provides a check list of steps to complete for workflow, and a red stoplight will appear when a step is incomplete. If your messages aren’t working and you’re seeing red here, this is most likely the cause:
4. Event Mesh “Test” Options – To validate that you are receiving your messages in the Event Mesh, the simplest and fastest way is to go to the Queue monitor in the Event Mesh application and check if new messages have arrived. Whether you see your messages come in or not, it is also a good idea run a quick test using the “Test” functionality read at least once message off of the queue. That way you can verify the received JSON matches what is expected.
If you happen to not be receiving your messages at all, you can also subscribe to the most general topic for that channel ( {Topic Space}/* , in this case it would be “ITP/DEV/SALES/*”). This approach, when you are not receiving your message, serves as a catch all for ALL messages coming from that Topic Space channel. You can then receive your message, then view the “Topic” under the “Message Properties” to determine the Topic SAP believes applies to this message:


Summary
With these tools, you should be able get your Event Mesh instance up and running! We will stop here for this month’s blog. For the next blog in this series, we will start building out our custom ABAP application in the BTP. This application will serve as the core logic processor, and will be coupled with our Event Mesh Queue and SAP S/4HANA OData service to retrieve the Sales Order details. Thanks for reading!