 Anthony Cecchini is the President of Information Technology Partners (ITP), an SAP consulting company headquartered in Pennsylvania. ITP offers comprehensive planning, resource allocation, implementation, upgrade, and training assistance to companies. Anthony has over 17 years of experience in SAP R/3 business process analysis and SAP systems integration. His areas of expertise include SAP NetWeaver integration; ALE development; RFC, BAPI, IDoc, Dialog, and Web Dynpro development; and customized Workflow development. You can reach him at [email protected].
Controls Technology – What Every ABAP Developer Needs to Know……
In this months blog I will begin to take a look at the SAP Controls Technology and how we can use this advanced control technology in our development.
Lets start out by defining a control of the Controls Technology. Controls are independent binary software components that are installed on a local PC (the presentation server). When you install a local SAP GUI on your machine, the system also installs the appropriate controls. The SAP GUI functions as a container for controls at the front-end. Controls can either replace or work alongside classical ABAP components, and can either be ActiveX controls or JavaBeans.
Typical examples of Controls Technology controls are:
– Picture controls, which allow you to display any picture (.BMP, .JPG, or .GIF format) on the SAP R/3 screen
– Tree controls, which are used to display and work with a tree structure
– Text-edit controls, which allow you to implement editors for viewing and maintaining texts
– HTML viewer controls, which allow you to display HTML pages and graphics in your transactions
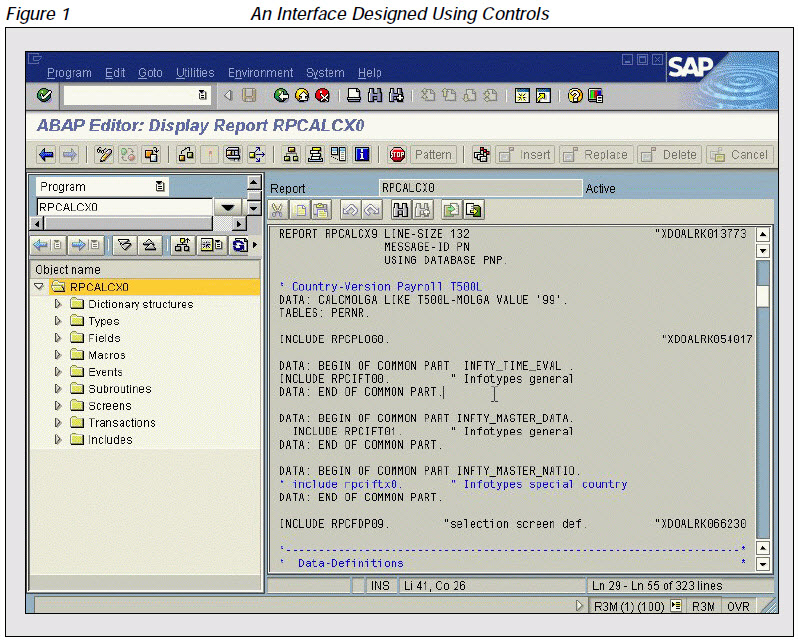
Lets take a look at the transaction SE80 below
Figure 1 above shows the Object Navigator(SE80), which is used to display the contents of an ABAP program. Tree and textedit controls were used from the Controls Technology to design this interface. On the left, you can see the tree control, which allows you to navigate quickly through the various components of a program. On the right is the textedit control, which allows you to implement the functionality that a typical ABAP Editor provides. Starting as far back as Release 4.5, these types of Controls Technology controls came with the SAP GUI, and you could access them through ABAP Object classes.
What does an ABAP developer need to know to take advantage of the Controls Technology, and what’s the best way to get started? That’s what this blog series will address. I am assuming the reader has practical ABAP experience and a basic understanding of ABAP Objects.
Controls Technology: Some Brief Background
Let’s review some of the technical aspects of controls technology:
-The SAP Control Framework
-The Automation Queue, and the issues surrounding “flushing” it
-Event handling
-Error handling
Including Controls Technology controls on the front-end establishes a client/server relationship between the application server and the controls on the presentation server.
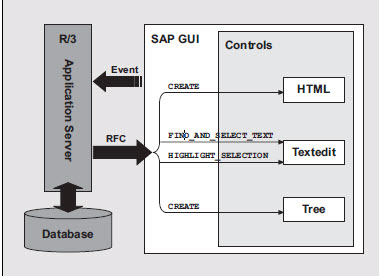
The application server (the automation client) drives the controls (automation server) at the presentation server by calling functions (methods) that they provide. Take a look at the diagram below.
The application logic runs on the application server. The application server transfers methods to the front-end by means of a Remote Function Call (RFC) and then executes them. The communication between the control and the application logic (on the application server) is administered by the SAP Control Framework
ABAP Objects are used to implement controls in programs. Each control has a global “wrapper” class in ABAP Objects. The table below summarizes the most common controls and their respective wrapper classes.
In order to work with Controls Technology controls on your screen, you simply create objects of these wrapper classes, call their methods, and react on their events.
The real “art” of controls programming lies in selecting the control that best fulfills your requirements and then calling the appropriate methods that its wrapper class provides.
Each wrapper class provides us with methods to modify the control properties, and thus influence the behavior of the control. For example, the class CL_GUI_PICTURE_CONTROL provides the method load_picture_from_url, which enables us to display a picture on the screen.
The user of an application program triggers control events by performing specific actions (for example, double-clicking). You can decide which events you want to catch in your ABAP program and then register these events for the relevant control. For example, the class CL_GUI_SIMPLE_TREE provides us with the NODE_DOUBLE_CLICK event to notify the program that a tree node has been doubleclicked.
A triggered event is then transferred from the SAP GUI to the application server. In response to this event, you can then influence the behavior of the control with additional method calls. For example, when the user tries to expand a tree node by clicking or double-clicking on it, you can add further nodes to the tree by calling the method CL_GUI_SIMPLE_TREE=>add_nodes.
Navigating Through the Control Classes in the Controls Technology
All controls in the Controls Technology are encapsulated in a wrapper class. A wrapper class is a global ABAP Objects class that encapsulates the complete functionality of the control, making it easy for developers to reuse the functions that they provide. Before coding, it’s always a good idea to become familiarized with the structure of the wrapper class.
To do this you could use SE24 (Class Editor), or an easier tool would be SE80 (the Object Navigator).
1. Enter transaction code SE80 (Object Navigator) in the command field.
2. Enter the name of the class in the “Class” input field on the Object Navigator initial screen and choose “Display.”
3. A tree structure appears for the class you have chosen.
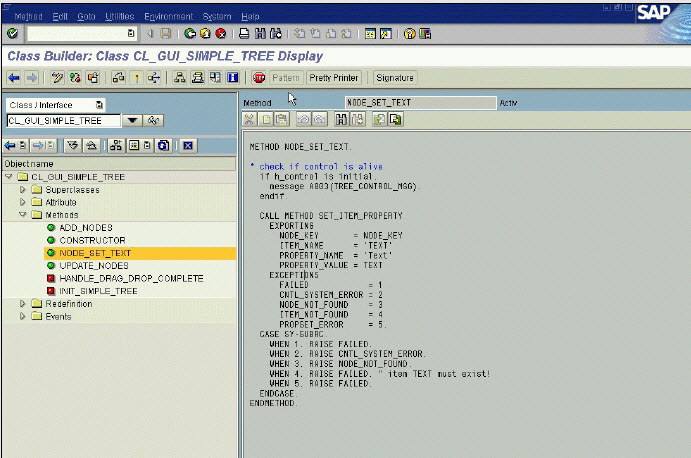
You can see from the figure below, that I have called up the “CL_GUI_SIMPLE_TREE” wrapper class. You can see the expanded wrapper class and its sub-objects. I clicked on the “Methods” node, and then double-clicked on “NODE_SET_TEXT” to view the source code of that particular method.
You can click on the root node to view all the sub-objects of the wrapper class, and then go further and expand the child nodes to view the list of items in that particular category.
Typically, the Object Navigator provides you with the following information:
Superclasses: Under the superclasses category, you will find the complete inheritance hierarchy, which lets you see all the classes from which the control has been derived — e.g., the class CL_GUI_SIMPLE_TREE is derived from the class CL_TREE_CONTROL_BASE, which is further derived from the class CL_GUI_CONTROL, and so on. The interface of the class CL_GUI_SIMPLE_TREE also includes the public methods of the classes CL_TREE_CONTROL_BASE and CL_GUI_CONTROL.
Attributes: This is the set of data that the class encapsulates. Attributes may be properties of a control, establishing things like the shape, size, or position of an element on the screen. They may be static (defined for all objects), private, or public. Event IDs of specific events (e.g., click, double-click) are also included in attributes. For example, the class CL_GUI_SIMPLE_TREE has the attributes WS_VISIBLE and EVENTID_NODE_DOUBLE_CLICK.
Methods: These are operations that can be performed on a control. There may be methods to change the appearance of a control, to set values of its attributes, etc. One special method, the constructor, allows you to create (or construct, as its name implies) objects. For example, class CL_GUI_SIMPLE_TREE gives us methods like GET_WIDTH, COLLAPSE_ALL_NODES, and so on.
Events: The events that are listed by the Object Navigator tell you what specific events the control may be able to respond to. All events have a meaningful name. The class CL_GUI_SIMPLE_TREE, for example, has events RIGHT_CLICK and NODE_DOUBLE_CLICK.
Containers in Controls Technology – Linking Controls with Containers
Every control that needs to be displayed on the screen must be linked to a container, which is linked to a screen area. A container in the Controls Technology has the following features:
-It provides a physical area where the controls can be displayed.
-It manages controls in a logical collection.
-It behaves like the parent of the control within it.
-It can contain other controls (for example, a tree control, a picture control, an HTML viewer control, and so on). Remember, a container is also a control inside the Controls Technology.
-All controls in the Controls Technology live in a container. (The lifetime of a container should always be greater than the lifetime of the controls within it.)
-If a parent is not visible, its children are also not visible.
-The default size of a control is the same as the size of its container. It can be changed at the time the control is instantiated.
-Containers can be nested, thus you can place one container within another container.
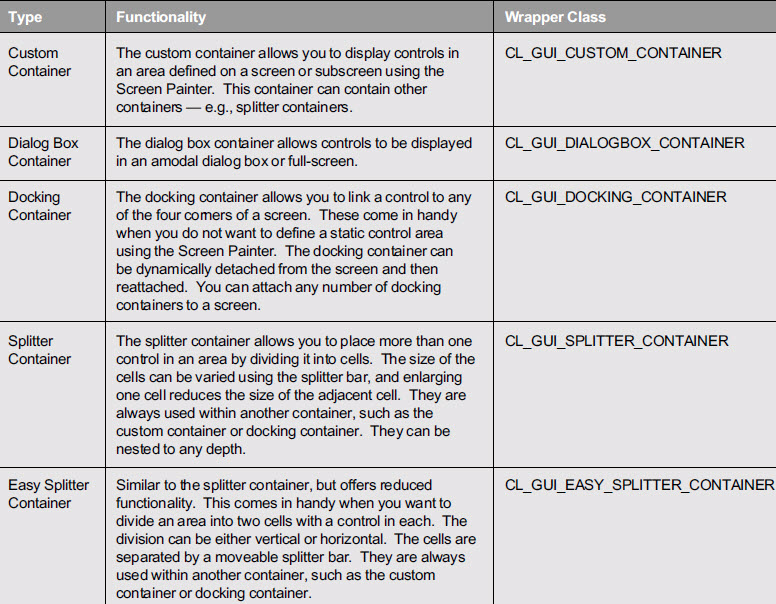
SAP provides you with five kinds of containers for use in the Control Technology. The table below lists the SAP-provided containers, along with their wrapper classes.
Containers are instances of special global control classes. Each kind of container is wrapped in a separate class of ABAP Objects. Like other control classes of the Control Technology, container classes are derived from the class CL_GUI_CONTROL.
You choose the container that best suits the type of functionality you would like to implement. Linking a control to a container on a screen involves a few easy steps. Suppose we want to place a tree control on the screen. In order to do this, we must first create a custom container, then link it to accommodate the tree control. Take a look at the following steps:
1. Create a screen on which to place the control. Create a screen area CONT for your custom container control using the Screen Painter.
2. We then need to define a reference variable for the container in which to place our control:
DATA: mycontainer TYPE REF TO cl_gui_custom_container.
and then define a reference variable for the tree control:
DATA: mytree TYPE REF TO cl_gui_simple_tree.
3. The classes of containers provide constructors for creating the container objects. The constructors are called by using the CREATE OBJECT statement as follows:
CREATE OBJECT mycontainer
EXPORTING
container_name = ‘CONT’
EXCEPTIONS
cntl_error = 1
cntl_system_error = 2
create_error = 3
lifetime_error = 4
lifetime_dynpro_dynpro_link = 5.
The above code creates a container for one tree control, and the container is linked to our control with the name CONT on the dynpro (exporting parameter
container_name).
4. Finally, we create a tree control object and place it in the container that we have just defined. We use the constructor that the class CL_GUI_SIMPLE_TREE provides us:
CREATE OBJECT mytree
EXPORTING
parent = mycontainer
EXCEPTIONS
cntl_error = 1
cntl_system_error = 2
create_error = 3
lifetime_error = 4
lifetime_dynpro_dynpro_link = 5.
We have successfully created a screen, added a customer container screen control, created an object for the controls container referencing the screen area, and finally created an object for the tree control and linked it back to the container.
That was a brief overview of the Controls Technology Framework. In the next blog we can look closer at the Automation Controller, and Automation Queue.


