
Jonathan Andre is a lead ABAP developer at IT Partners. Jon has over 10 years experience with SAP, with a concentration on ECC SD, MM, and IS-OIL modules. Jon’s focus has been in the areas of ABAP OOP, ABAP Web Dynpro, and ABAP for HANA and RESTful ABAP development. He can be reached at [email protected].
In this month’s blog, we are continuing the development of our Sale to Tweet BTP extension. Last month, we completed our first step towards this task by configuring the Event Mesh to receive sales creation events and storing them within a queue to be consumed.
This month we will use the BTP ABAP Environment to detect when a Sales event occurs in our SAP system, and subsequently execute custom logic in response to these events. The ABAP environment, if you’ll recall, also served to solve two of our main problems when considering how to move our extensions to the cloud:
Problem 2: Even if we receive synchronous notifications, the point of side-by-side extensibility is to enhance the OTB SAP solution. How can we do that if the data resides in SAP?
Problem 3: Custom solutions require custom logic. If my ABAP system is on the ERP system itself, how can I execute any logic without an SAP environment?
Our ABAP environment, with the use of OData services, will address both of these problems as you’ll see shortly.
Our custom ABAP extension will be split up into three main tasks, two of which we will code in this month’s blog:
- Receive Sales events from the Event Mesh, store event data in a custom database table, and trigger follow on actions
- Once triggered by the event in step 1, reach out to our SAP On-Premise system to retrieve further details about the sales event, using OData services.
- (Saved for next blog) Craft and transmit our “Tweet” to our X/Twitter iFlow, which will create tweet with Sales information on our Twitter account.
You may notice that all three of the listed steps require connection to remote systems and/or applications. This fact highlights the most important differences when coding ABAP in the Cloud versus coding solution on-premise; components of our solution do not reside on the same machine/ cluster of networked machines. This means that communication via any “local” means, such as memory storage, local function calls, or similar methods are not possible.
Instead, the separate components of our solution communicate using RESTFul HTTP APIs, allowing the components to live and interact from decentralized locations completely remote from our core logic, and yet still operate as one distributed solution. Remote communication, however, adds an additional layer of complexity to our solution, since we now must maintain credentials, authentication protocols, etc. Fortunately, SAP provides an elegant solution to this problem for our cloud components in the form of Communication Scenarios/Communication Arrangements. We will explain how and where to configure these artifacts later. For reasons that will be clear shortly, we will first log into our BTP ABAP environment and configure the basic details of our solution.
Developing our Custom Solution 
Getting our BTP ABAP environment up and running requires a few steps, but is mostly very similar to configuring any other service in the BTP. I have included an additional FAQ section at the end of the blog for complete novices, but we will start this section of the blog as if we have a BTP ABAP environment up and running and have connected to our system via the Eclipse IDE.
Logging into our Eclipse IDE system and connecting to our ABAP BTP repository, it might feel a bit daunting trying to determine our next step. We understand that we have an Event Mesh instance out there somewhere, but the question now becomes how do we connect to this instance, listen for only our particular event, and then react to this event be executing some custom code.
SAP provides a GUI-heavy guided approach that helps up do just that in our ABAP BTP instance, and it does this by leveraging two generated artifacts:
- Event Consumption Model – The event consumption model leverages an AsyncAPI file data to generate source code, data definitions, behavior definitions, ultimately an Inbound service that allows our ABAP system to listen for and process business events.
- Communication Scenario – This artifact links the inbound and/or outbound services that will be utilized in a particular “scenario”. This abstract concept allows us to loosely couple our event processing to the backend cloud system we are expecting this event from. We’ll create and loosely cover this below within our Eclipse/ADT portion of the guide, but this concept will be much clearer after we reach the ABAP administrative portion, where we will utilize this scenario to connect to our system.
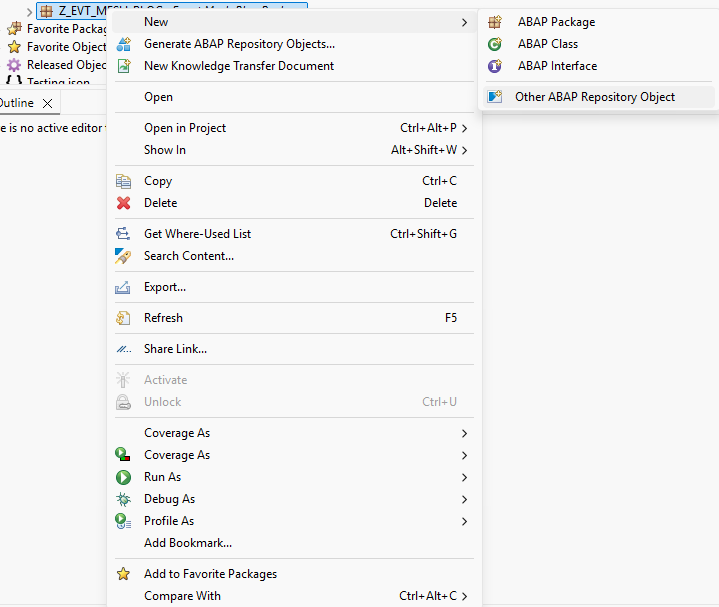
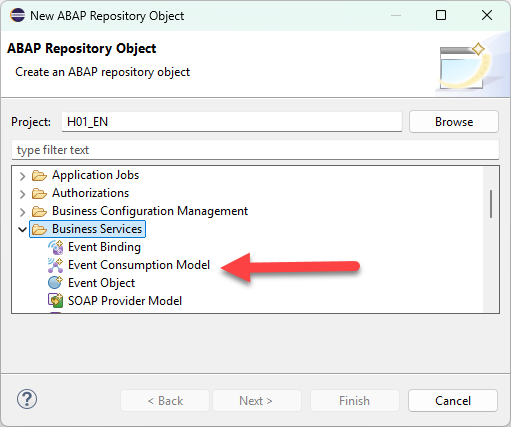
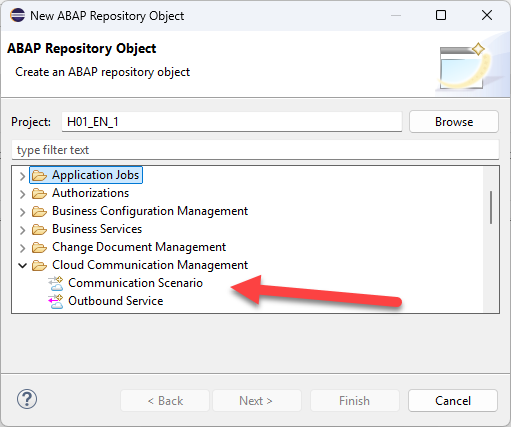
Let’s first start off by creating our event consumption model. To do this, follow the following menu path shown in the screenshot below:
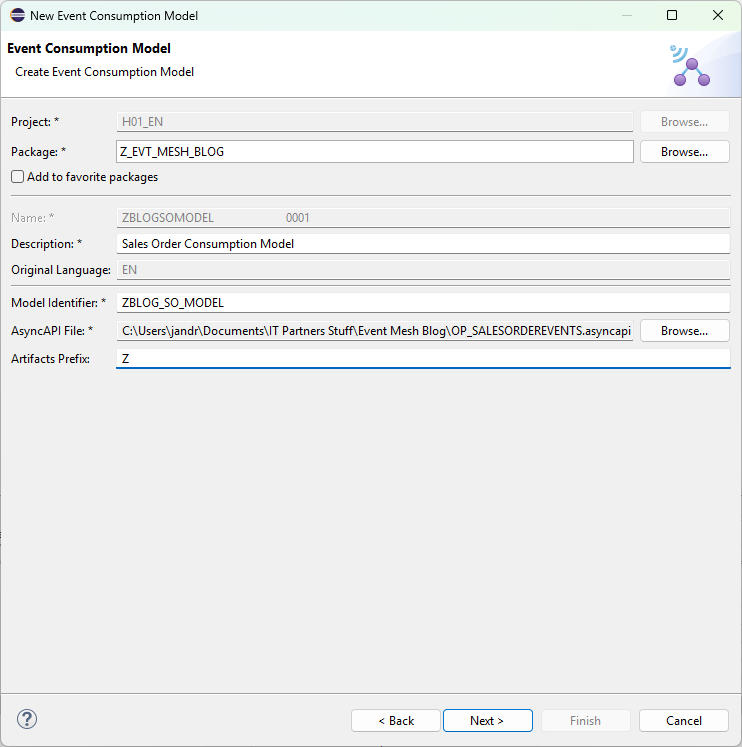
When you get to the model creation screen, populate the details as required. Two things that we want to pay attention to here are the Artifacts Prefix, and the AsyncAPI file. The artifacts prefix can be whatever you would like, as long as it matches the customer namespace. This is the Z* Y* patterns ABAP developers are used to. Be careful, as Eclipse does not warn you until you attempt to generate the artifacts that there is an error.
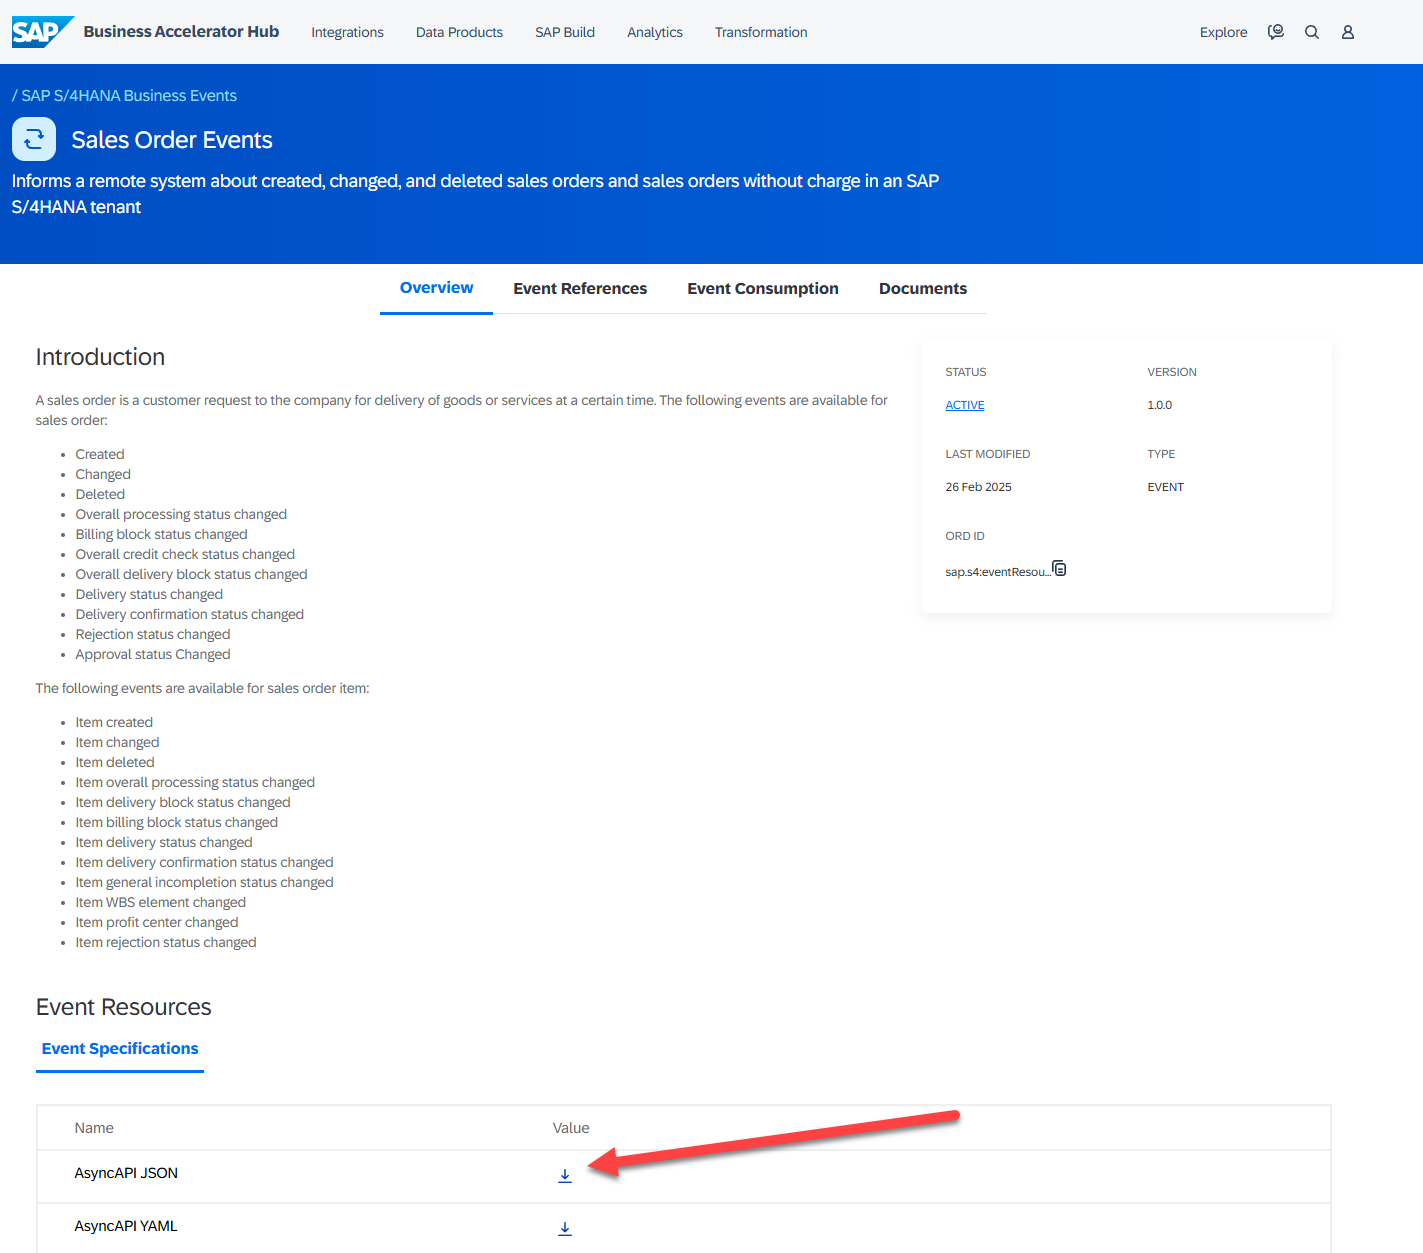
The most important part of this process is the AsyncAPI file. This file contains all of the details to generate our object correctly, so it is important to get metadata information correct. Fortunately, we can download this AsyncAPI file directly from the SAP Business Hub! To do this, navigate to http://api.sap.com , search for “Sales Order Events”, then filter your results by “Event Objects”. Once we find the appropriate result, we can click that result and fine the AsyncAPI JSON at the bottom of the page.

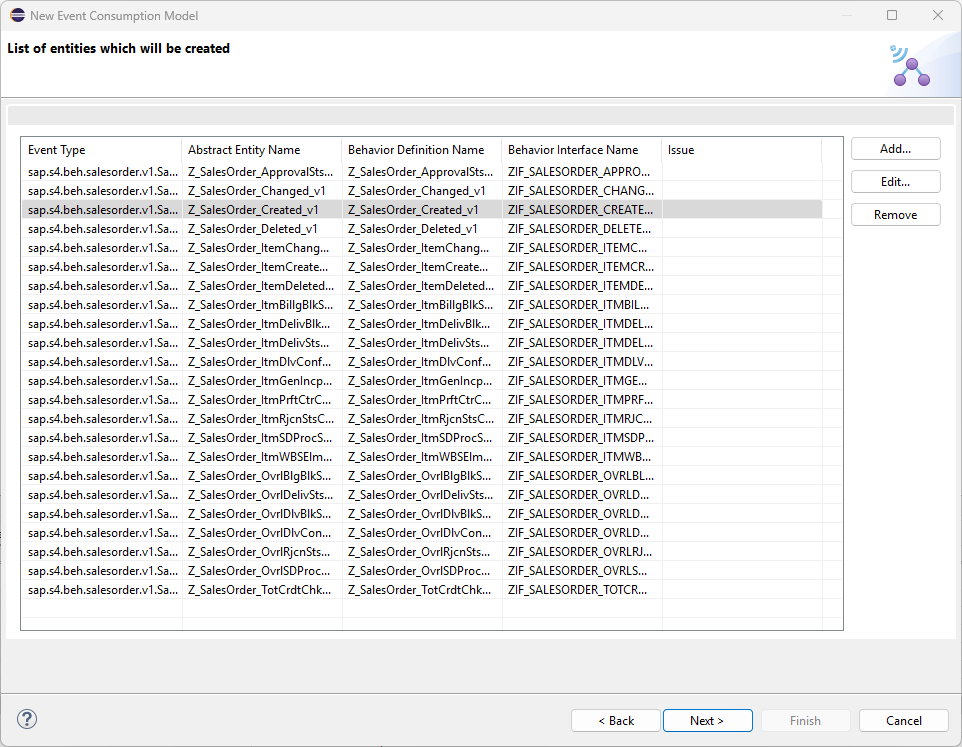
Back in Eclipse, we can select our JSON that we have downloaded to our PC and proceed with the next steps. Over the next few screens, you’ll see a list of various components SAP generates for you based on the AsyncAPI file. On the next page, you’ll see the “Entities to be created”. In some scenarios you may not need all of the various events that come with a particular business object. That would be the case with this blog, for instance, since we only need the “Created” event. However, for purposes of illustration, we will leave all the entities as-is and proceed through the setup guide.
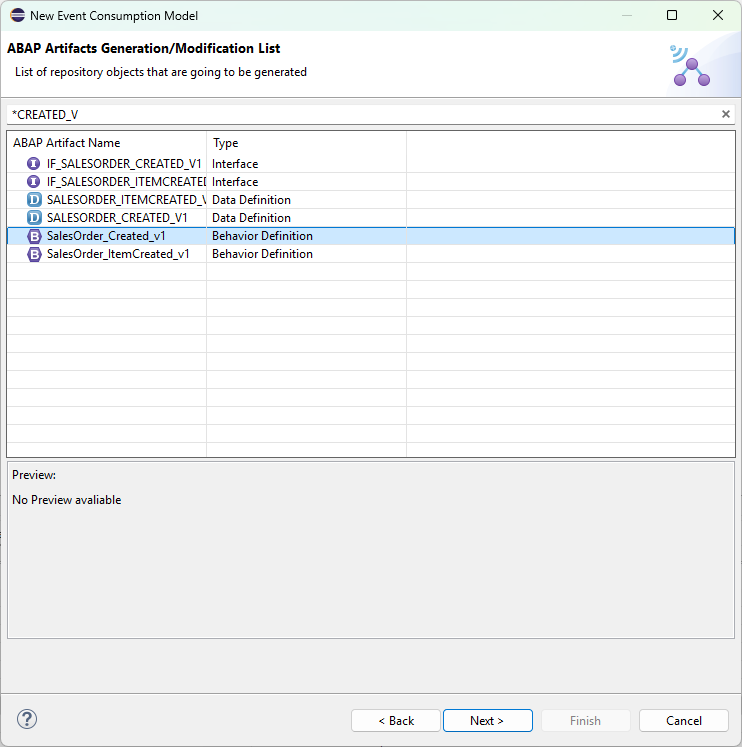
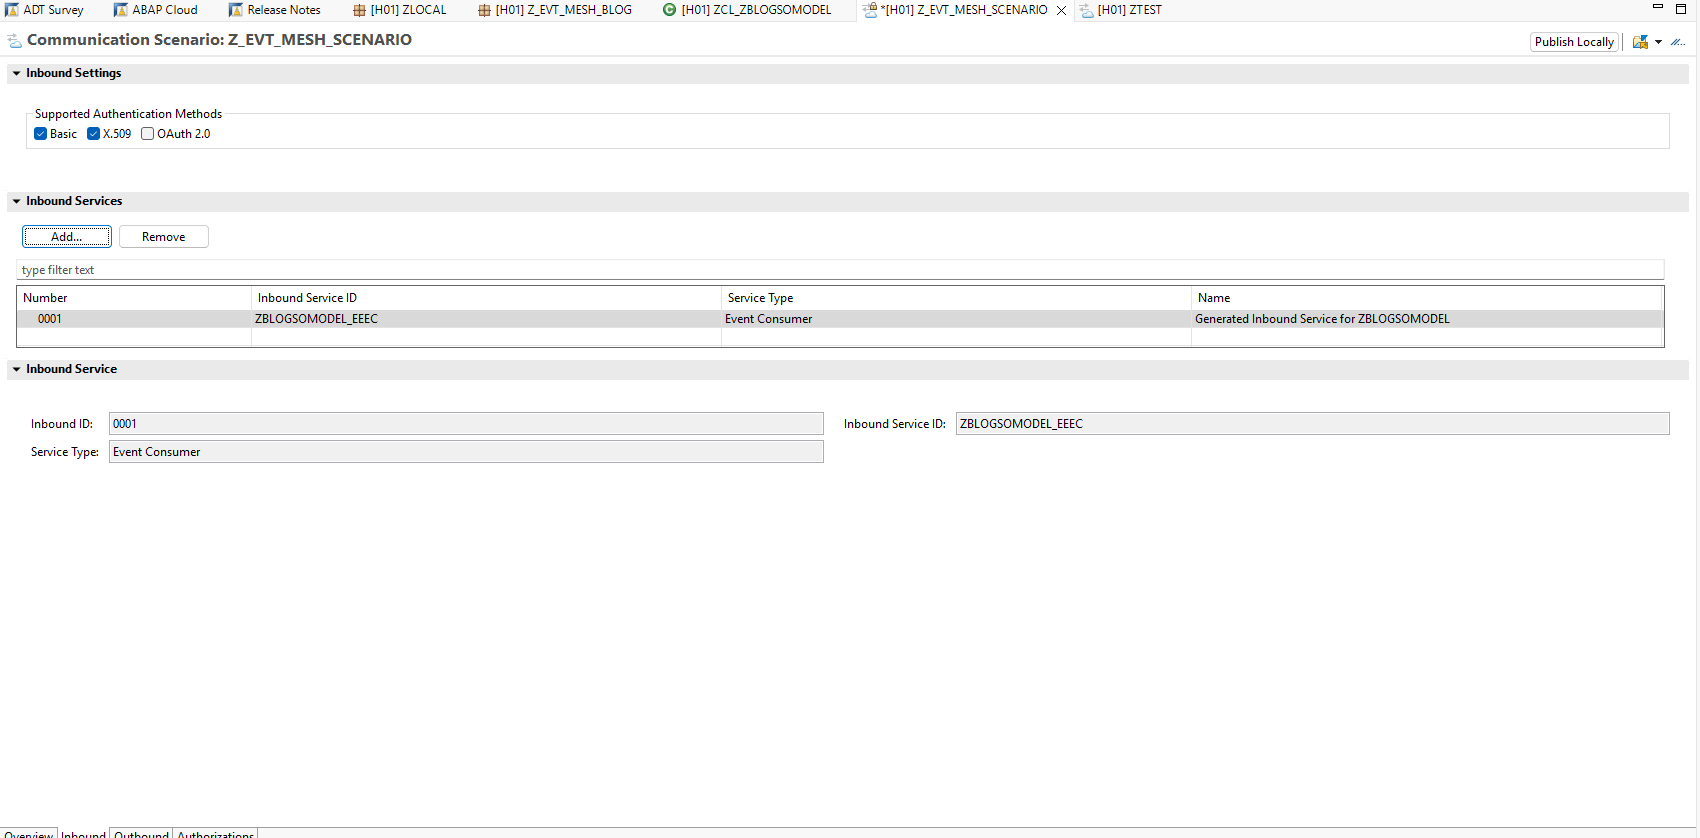
The final screen before generation shows us all the classes, data definitions, and behavior definitions to be generated. In addition to this, we see the Inbound Interface that we will need for our next step. Complete the setup guide and, after a few moments, you should see that these new objects have been added to our package. Take note of the generated classes but, for now, we won’t begin coding just yet. Instead, we’ll move on the next part of the process: creation of our Communication Scenario.
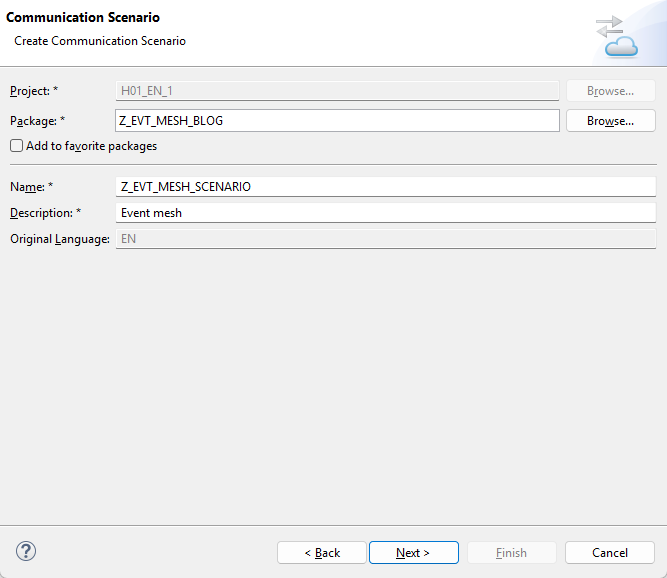
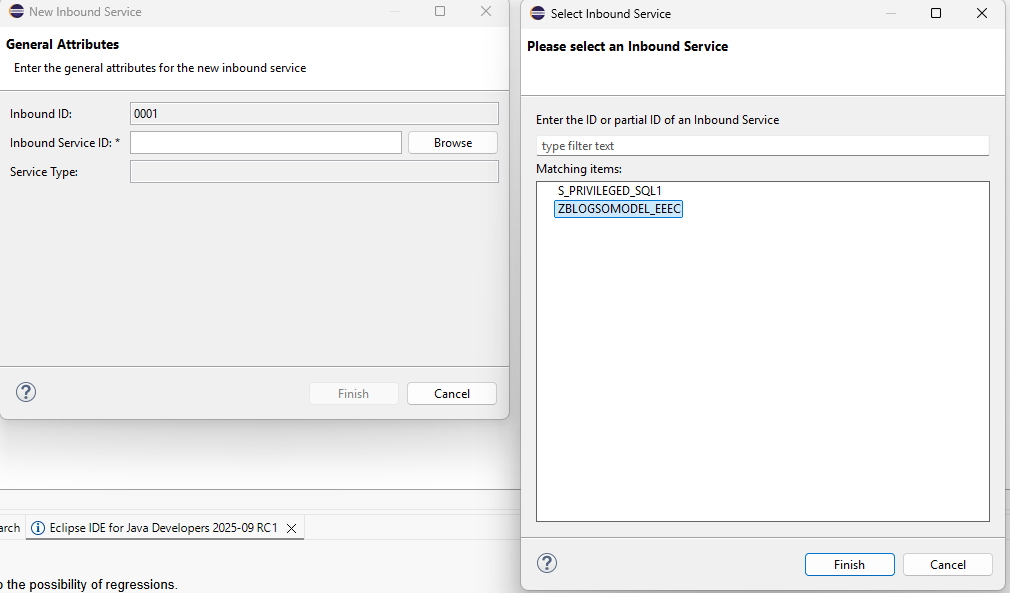
The Communication Scenario only has name, description and package as mandatory parameters. After entering the required transport information, we can click finish and should be presented with the Communication Scenario Overview tab. The tab we are actually concerned with here is the Inbound tab. Click that, then click the “Add” button within this tab. Search for the Inbound Service we created during the Event Consumption Model generation, then click save. Finally, click the “Publish Locally” button to allow the Communication Scenario to be used within our Communication Administration dashboard:
Next, we’ll need to access our Administrative Dashboard for our ABAP BTP system. To do this, we right click on our top-level ABAP Cloud Project and click the “Properties” option. When the properties window opens, we navigate to ABAP Development->System URL to open our ABAP System’s administrative Fiori app.
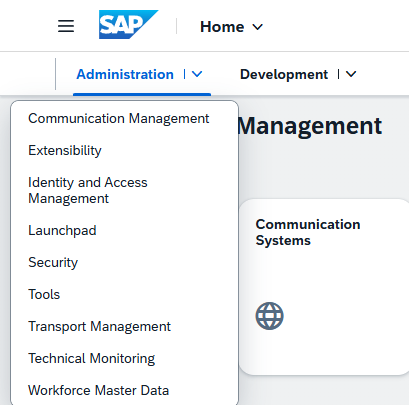
When the dashboard opens, make ensure you are displaying the “Communication Management” tab by using the drop down next to the administrator option.
You should be presented with a screen like this one.
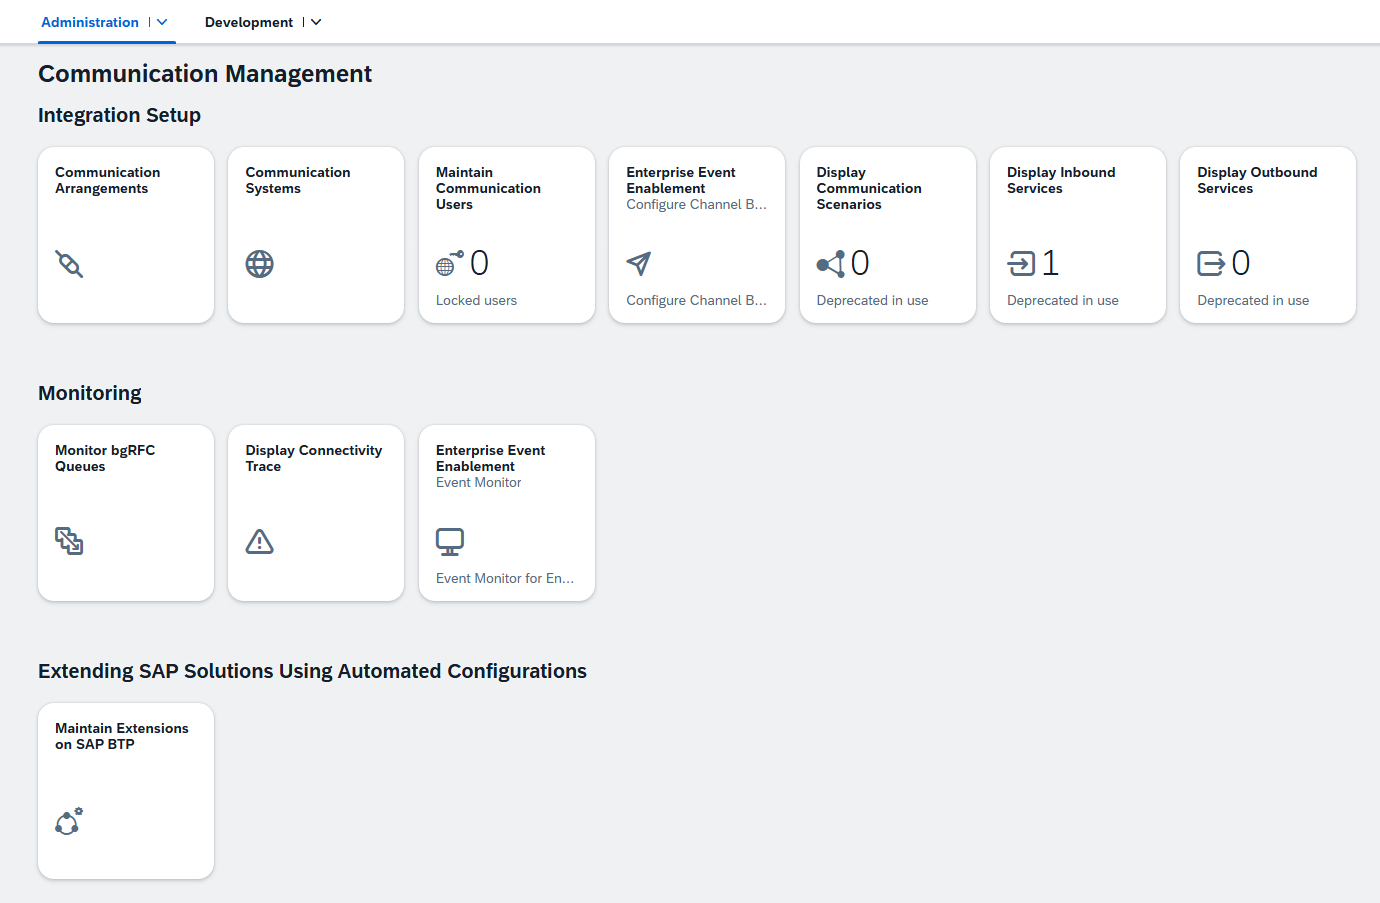
We’ll continue the development of our app in a moment, but first we need to highlight some of the components that will help aid us in our integration to the Event Mesh:
Communication Scenario: A collection of Inbound and Outbound interfaces (APIs) that forms an integration. When you’re considering creating an integration, the Communication Scenario is the “what” that we are trying to connect. We created a custom Communication Scenario in Eclipse, but there are many standard SAP Communication Scenarios, one of which we will use in our end-to-end integration.
Communication Arrangement: The is the “how” of the our end-to-end integration. The Communication Arrangement connects our Communication Scenario with the Commuication User and the Communication System.
Communication User: This is like a batch user or background user within our scenario. This user would need the required roles/ privileges to run our program.
Communication System: The Communication System artifact contains all of the information required to connect to an external system. This includes URIs, information authentication protocols and credentials, the type of system, etc. Note that his does not necessarily need to be a physical system. It can cloud applications like the Integration Suite or, in this case, the Event Mesh instance where our Queues reside.
With that out of the way, we can move onto creating the first piece of our Communication Arrangement, the Enterprise Eventing Integration. To do this, we click the “Communication Arrangement” tile on the “Communication Management” dashboard. The new will click “New” to begin creating our new arrangement.
As stated before, we can use both custom Communication Scenarios, or we can use SAP managed ones. For this portion of the arrangement, we want to create a special type of scenario called Enterprise Eventing Integration, which is scenario SAP_COM_0092. This Communication Arrangement is meant to create an event mesh communication system, which can later be used by other Communication Scenarios.
You’ll notice that as soon as we input that scenario, the input screen automatically adjusts by adding two additional input fields, one for communication user and one for our Service Key. If an appropriate communication user exits, we can simply enter that username here. If one does not, we can click the “New” link and follow steps to create a new user and password. For the Service Key, we will need to go back to our BTP Cockpit, locate our Event Mesh service instance, and then generate/ copy a new Service Key. If you have been following along with this blog series, this is the same exact process we followed to generate our Event Mesh service key in the Event Mesh blog. For security reasons, make sure to use a new key per system. Lastly, keep in mind that the Communication Arrangement name provided here will also serve as the Communication System/Event Channel name.
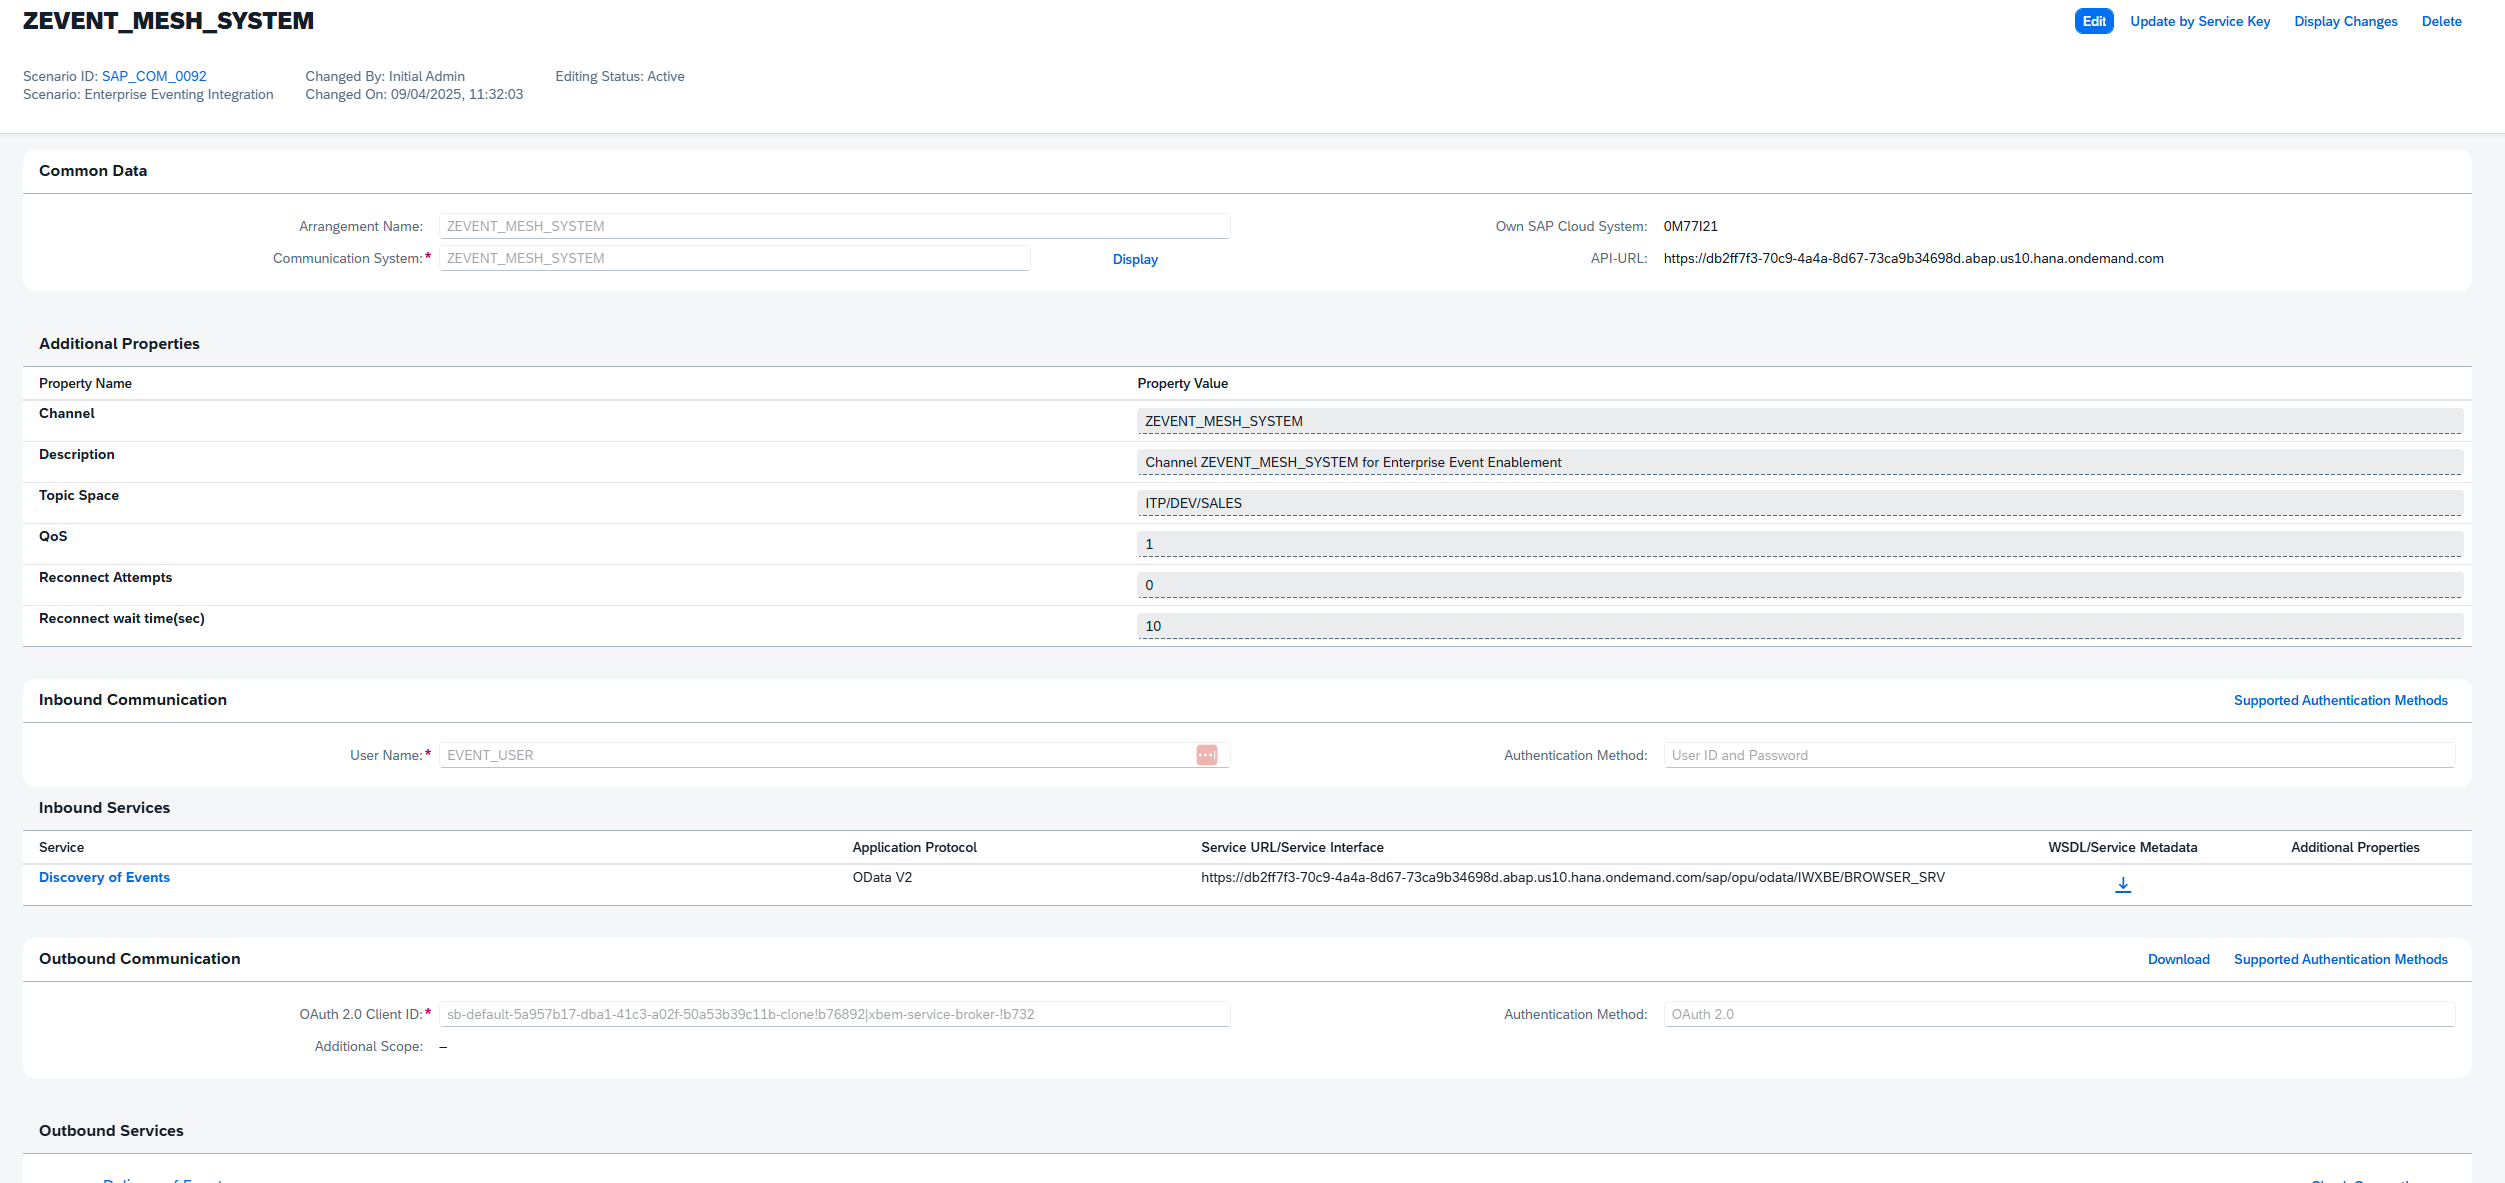
This process has now created a channel that can be consumed by other Communication Scenarios.
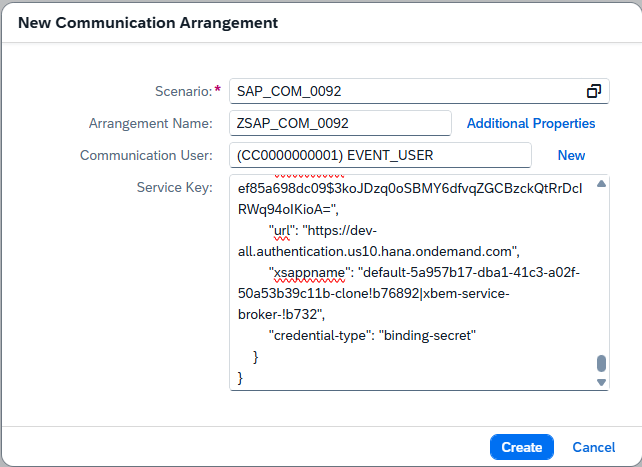
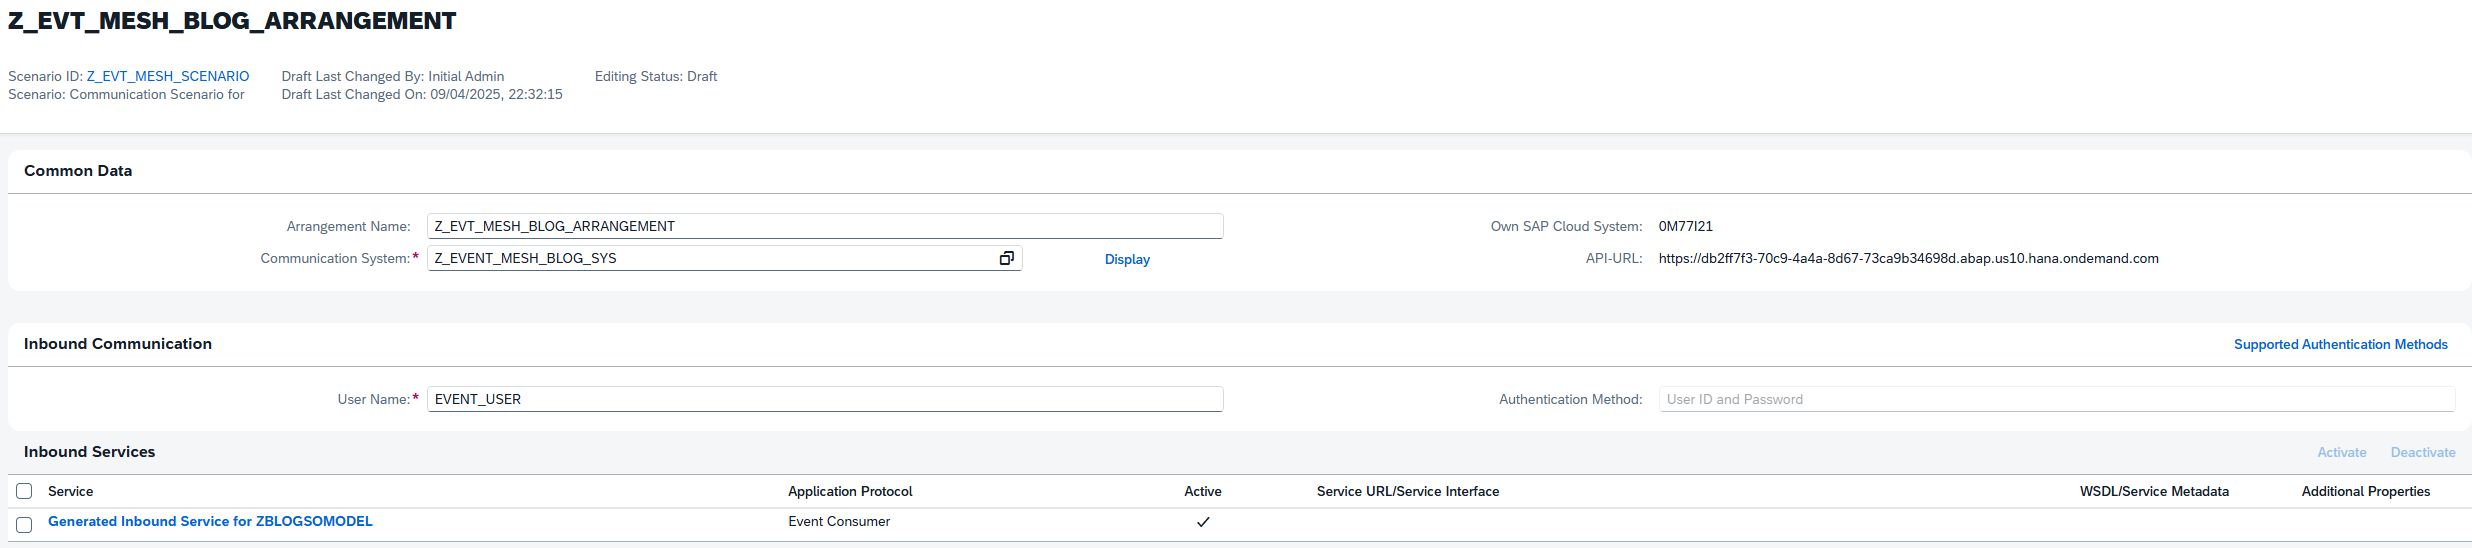
Next, we want to connect our custom Communication Scenario to our Event Mesh system. To do that, return to the Communication Management tab and once again click the Communication Arrangement tile. Click new, then in the scenario input box we enter the name of our custom scenario from Eclipse and unique name for our Communication Arrangement:
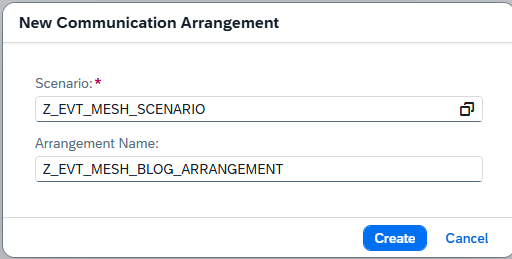
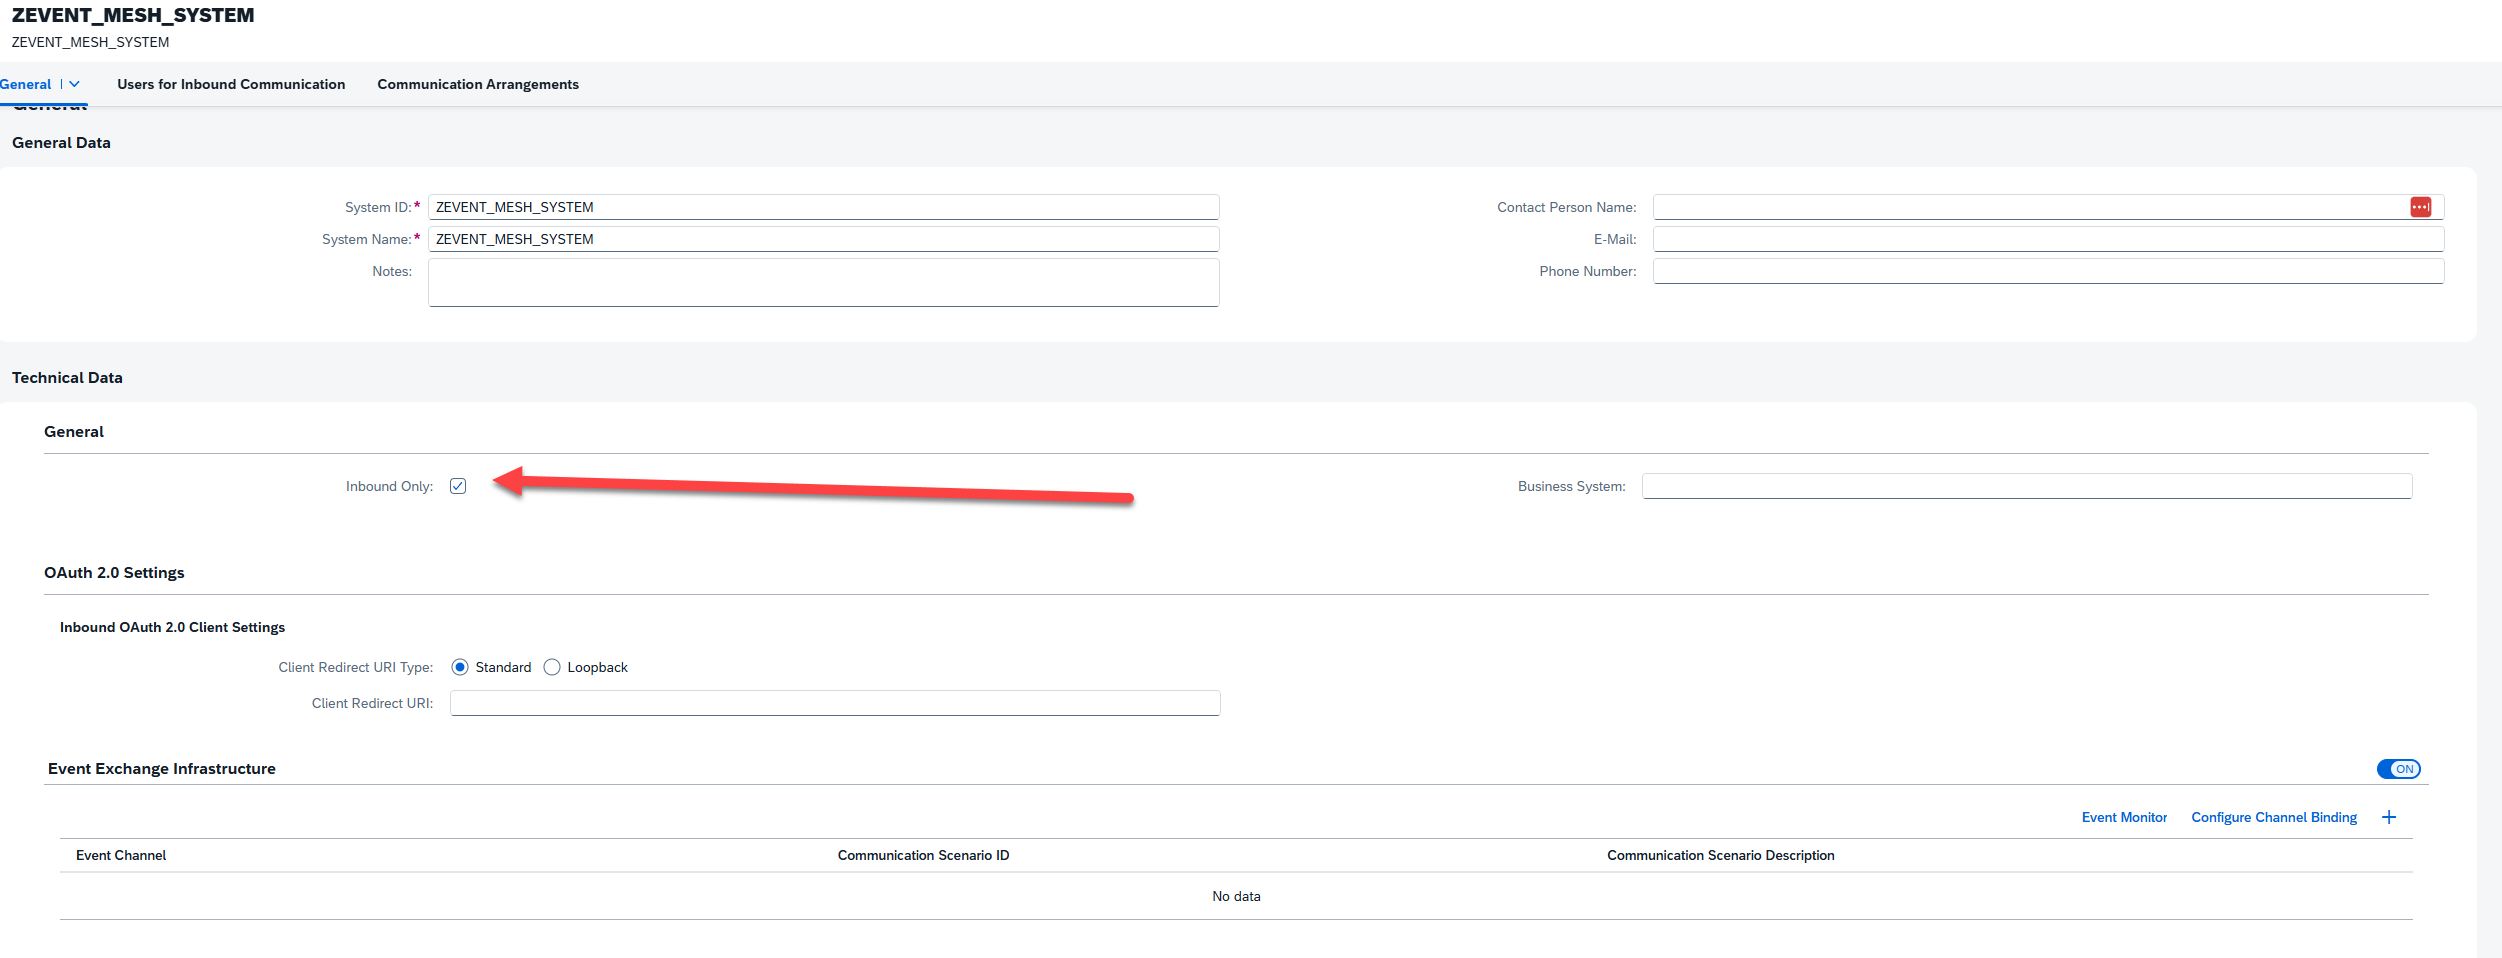
On the configuration page, we’ll want to create a new “system” to associate with this new arrangement. This system, unlike a normal system targeted as the Communication System, is a derivative system based off of the Event Mesh one we created in the previous step. It will use the same user and security details, and restrict the available events to fit this particular arrangement/scenario. Click the “New” link next to communication systems and enter an appropriate name:
On the Communication System page, the first thing we’ll need to do is click the “Inbound Only” flag, since we only care about receiving events as part of this interface. Next, we’ll turn the “Event Exchange Infrastructure” flag on, and then click the “+” icon to add a new channel. In the pop-up window, we’ll select the Channel we created in the previous step.
Next, we click the “Configure Channel Binding” button in the Event Exchange Infrastructure subsection, where we’ll specify our queue subscription. On the next page, enter edit mode and click “Create” within the subscriptions section. The configuration screen will request you enter Subscription Address, which is just the queue name for the queue we want to receive events from. If you don’t remember this, you can always return the Event Mesh dashboard and find/create the appropriate queue:


Return to the Communication System configuration screen, remembering to save where available to set the current version of the configuration to active. Before saving the Communication System configuration itself, scroll to the bottom of the screen to the section labeled “Users for Inbound Communication”. You can either create a new, unique user for this scenario, or use the same user we created for the Enterprise Event Integration step:

Finally, return to the Custom Communication Arrangement and input our newly created system in the Communication System field. This should automatically populate the user field with the systems Inbound user. Click save, and we’re finished. Our integration between our ABAP Event Consumer object and the Event Mesh is now complete.
Our next step is to test whether our integration is working. The best way to test this is to head over to our SAP system and check whether our Sales event makes it to our ABAP system. To do that, we can use the transaction SWUE to generate a sales event (covered in previous blog). Once we’ve done that, we can follow the path Administrator->Communication Management->Enterprise Event Enablement Event Monitor to check whether the event was detected:

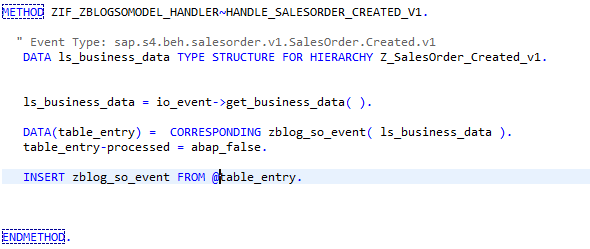
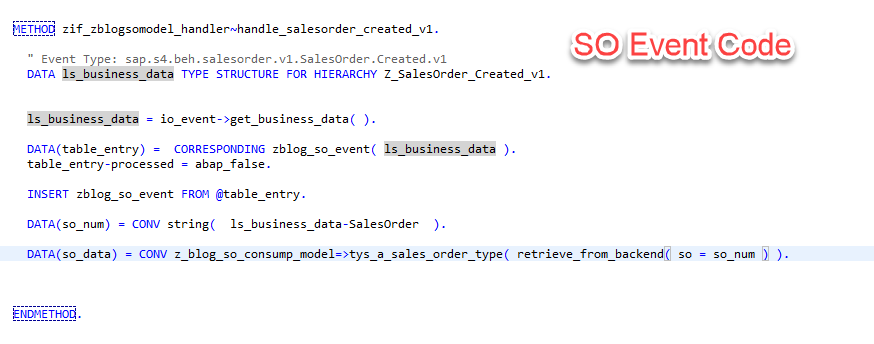
With this all tested, we can head back over to Eclipse and continue development of our custom extension. Locate the generated extension class for your Event Consumption Model, which will be one of two classes if your package only contains your generated ECM code. Within this generated class, we are looking for the CREATED method for our event, which will be triggered every time our system receives the created event in our event mesh queue.
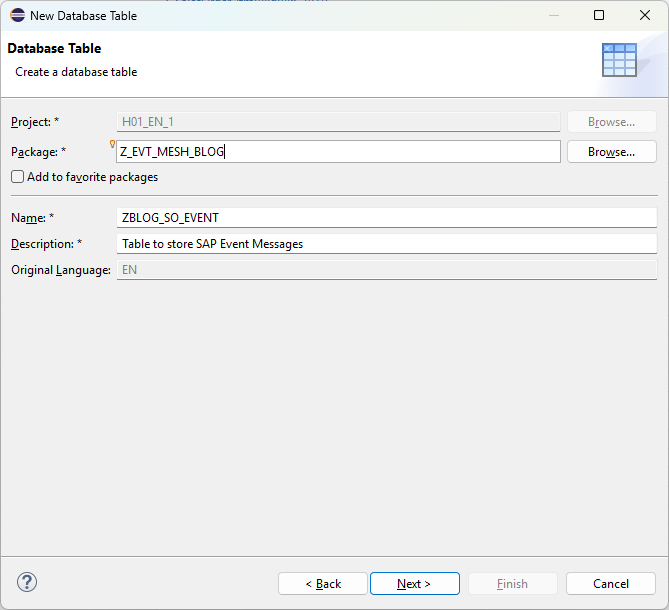
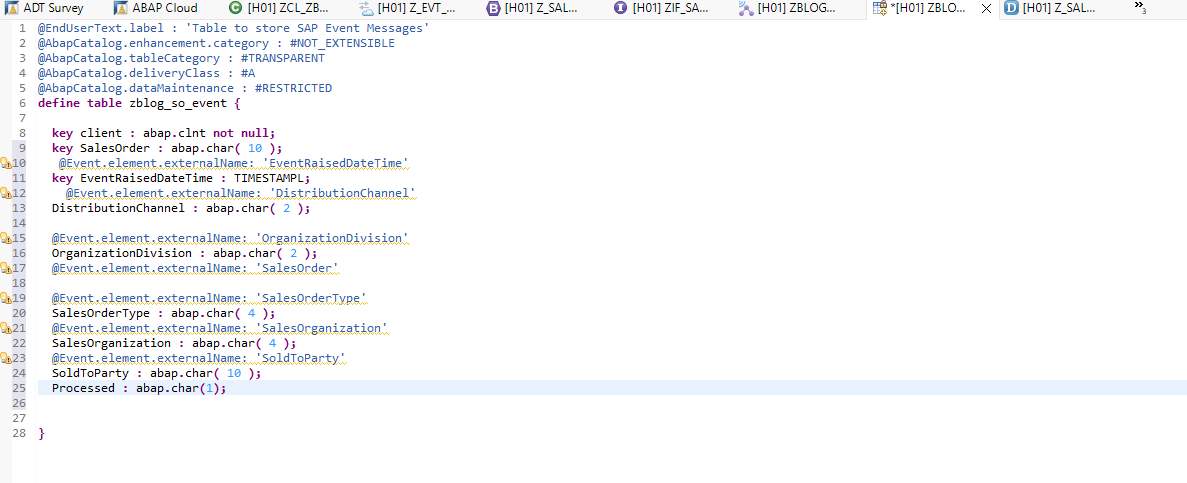
As a very quick, final step of handling our received events, we would like to store these events in a database table before we start processing them. To do this, we will create a table with a simple structure matching our message structure, and immediately populate this table upon receiving a message using the code below:
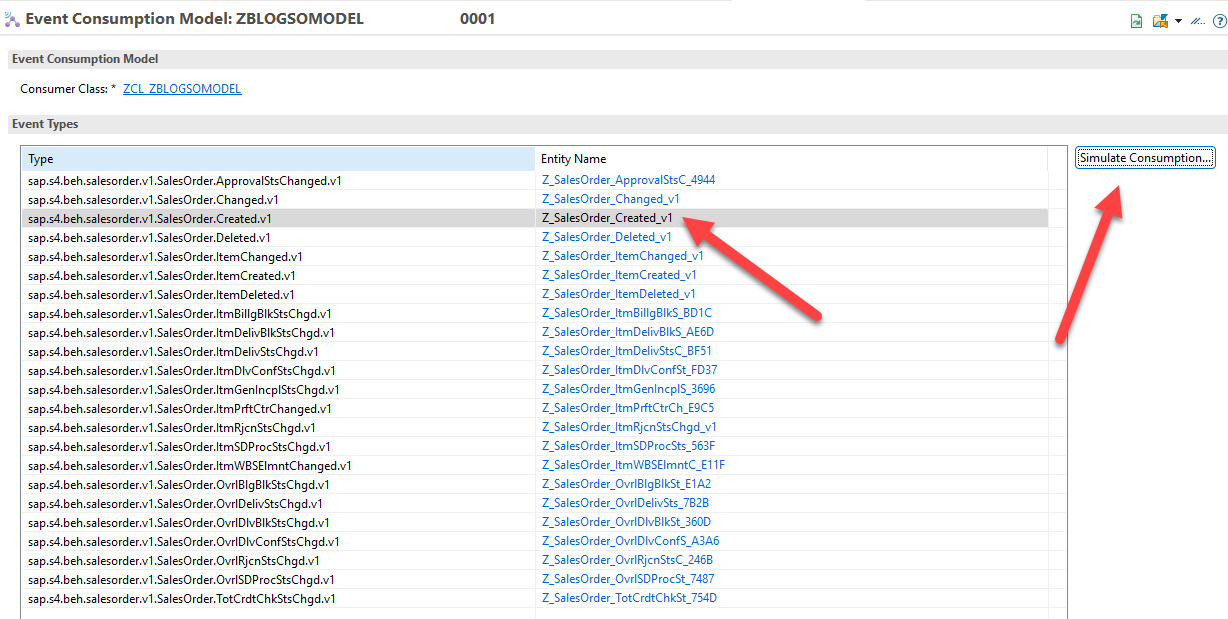
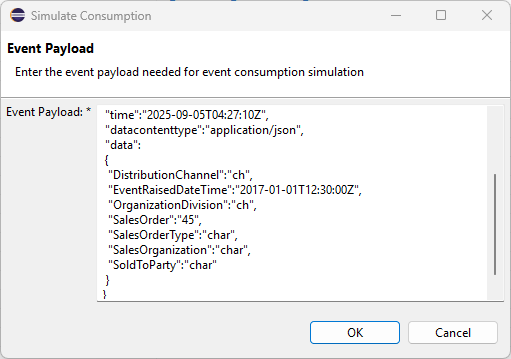
Once again, we can use the SWUE transaction in our SAP system to test our integration. As another option, however, we can also use the “Simulate Consumption” feature of our Event Consumption Model artifact to mock a generated event. This option provides you an input field to modify an event template, or paste in a re-usable JSON file:
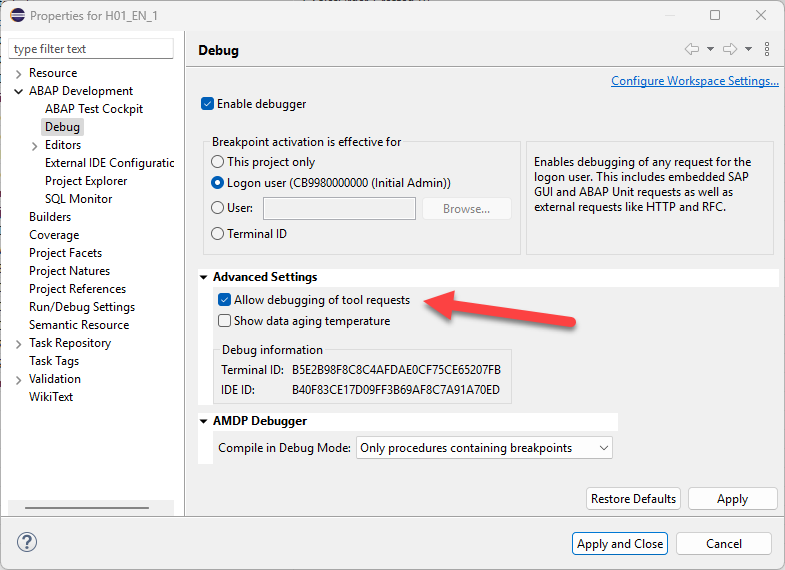
Note that you can debug this process, especially if you are having trouble with the code logic itself. If you would like your breakpoints to trigger, however, you need to switch on an advanced ABAP Debugger setting that is turned off by default. The path can be found below, after first right-clicking your project and clicking the properties button:
Now that the event handling portion of our solution is tested and complete, complete one last piece of our solution before calling for this month. As was discussed in the previous blog, the business event messages are meant to be small, quick, and have a low impact on resources. They are, by design, not intended to provide all the information required for most processes. Because of that, when we do determine our message is relevant and actionable, we would like to connect to our backend system to retrieve the remaining details to execute our business logic.
To accomplish this last task, we will utilize yet another ADT artifact called a Service Consumption Model. The process of creating Service Consumption Model is very similar to the Event Consumption Model we created earlier in the blog.
Download the metadata file from the SAP Business Accelerator Hub. SAP will often offer two different types of interfaces:
-
- A2X – Application to X – Based used in situations where synchronous communication is required. These are not meant for batch input, etc.
- A2A – Application to Application – Asynchronous types of interaction where speed and responses are not required. Ideal for batch processing of business transactions.
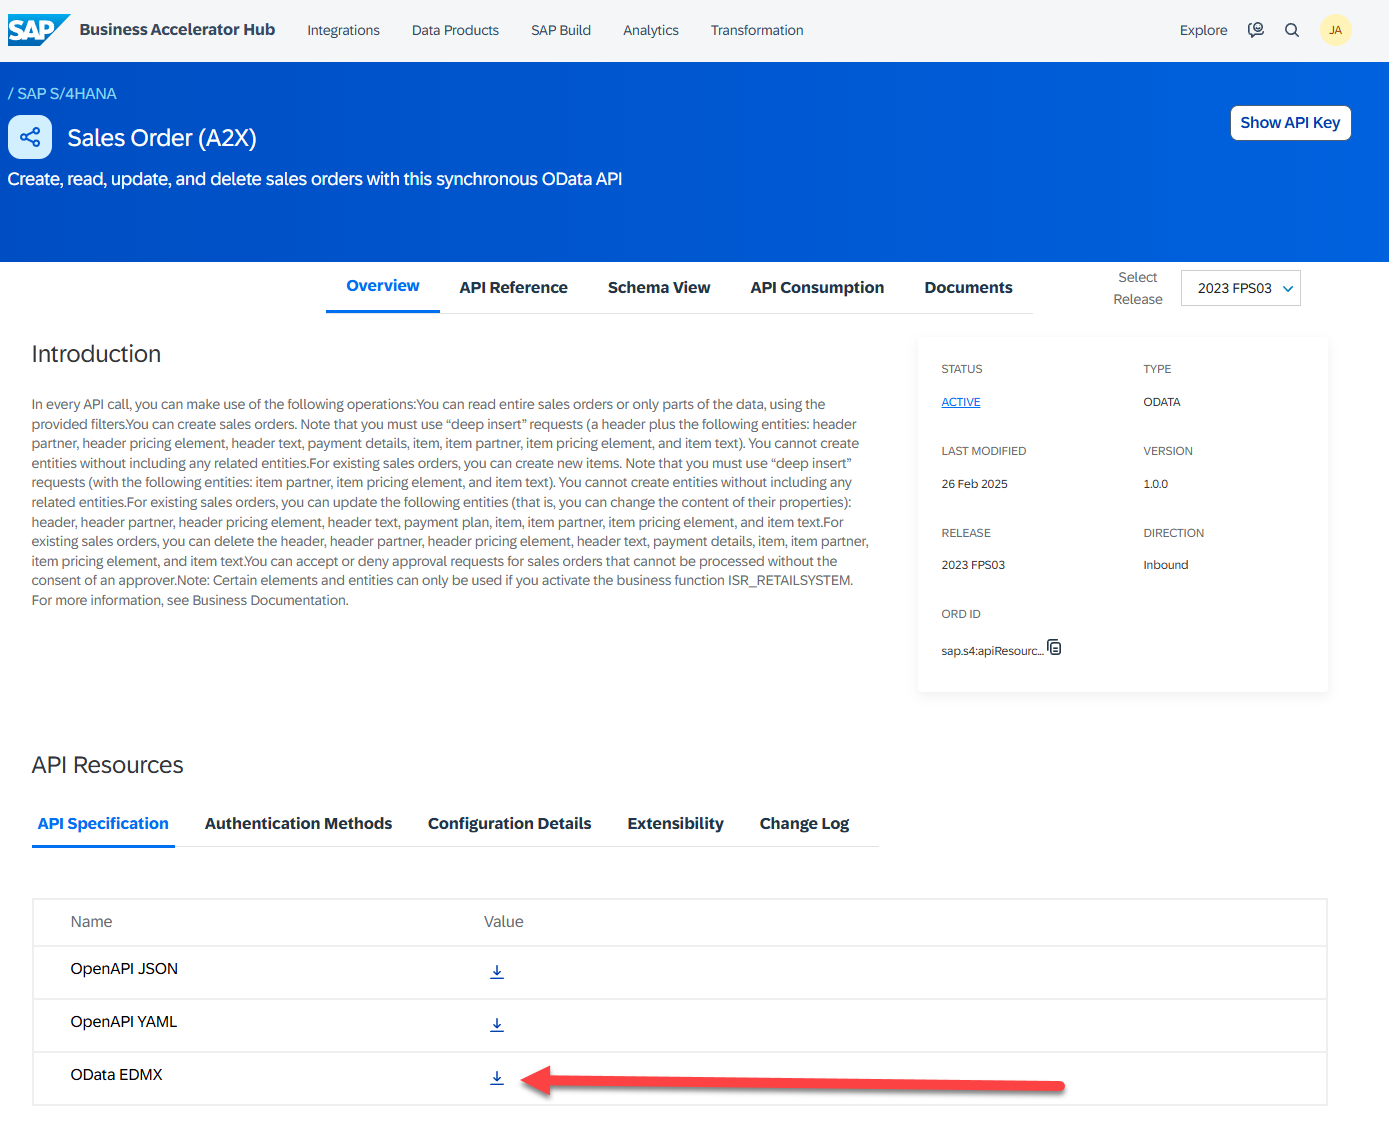
SAP also offers various interfaces based on the backend system time. Since we ultimately want to grab information synchronously from our backend, on-premise SAP system, we opt for the A2X S/4HANA OData V4 version of the Sales Order interface. It is important to grab the EDMX version of the specification, since it is whats require for our ADT Service Consumption Model:
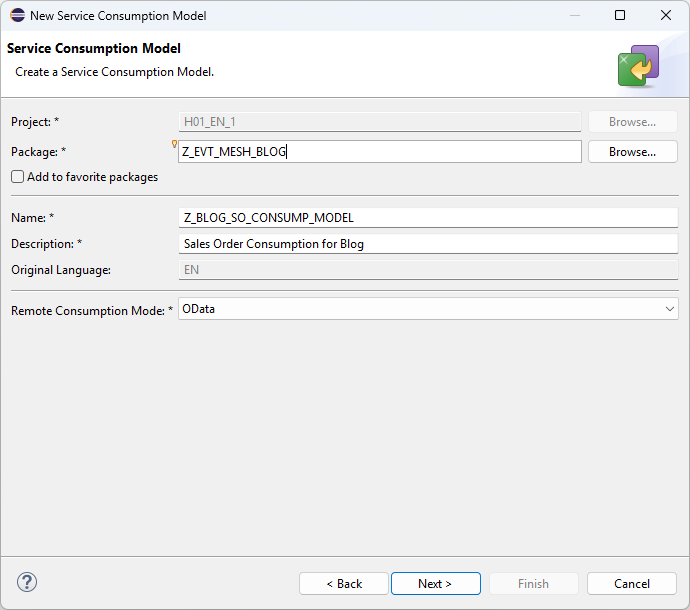
Once we have downloaded the appropriate EDMX, head back to Eclipse to create a new Service Consumption Model. Naming conventions should, of course match our customer namespace:
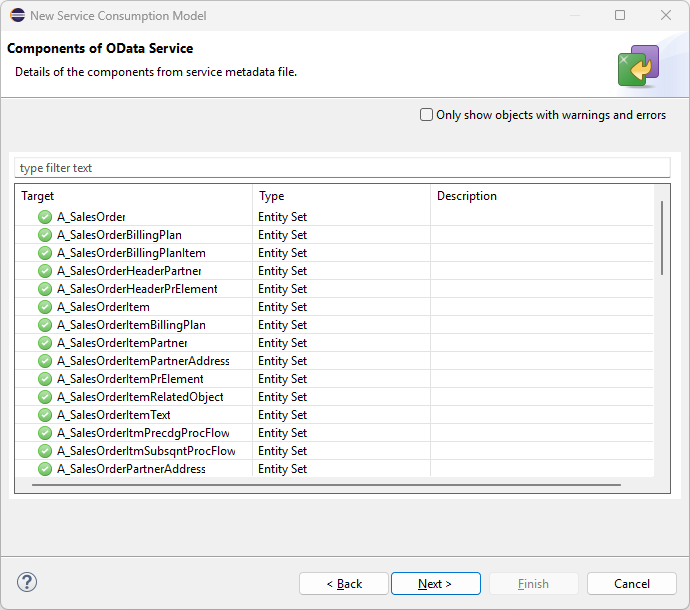
Next, we need to locate the appropriate generated code. When you look at the system generated code on the Service Consumption Model, you’ll see that the code is broken into entities, and then further differentiated by the available CRUD operations for each entity. For this blog, we want the Sales Order – READ operations, so we will use the drop entity list and drop down to select this subset of the code
 Quick Note on the Generated Code and Destinations, Before Proceeding
Looking over the generated code, you’ll notice that everything has been generated and looks active outside of the first of the code. The portion of the code has been commented out and relates to determining the destination when consuming the Sales Order service. This is because, based on whether our system is a cloud system or an on-premise system, the way we connect will be very different.
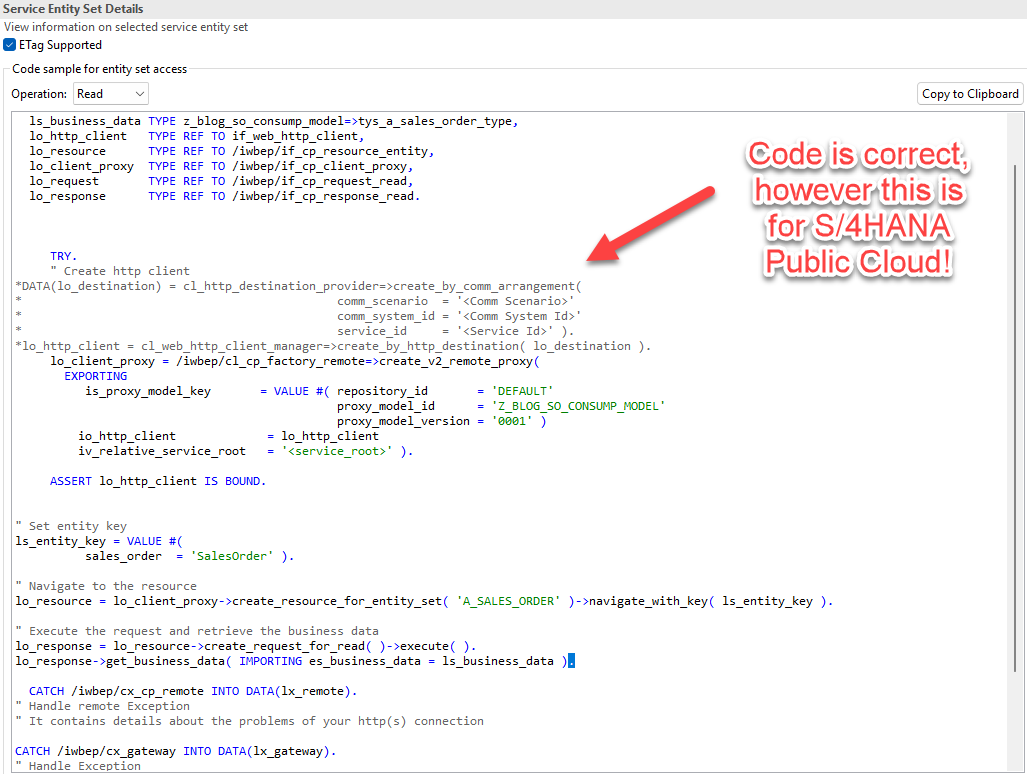
In the generated version of the code you see here, where it indicates we will be using a Communication Arrangement as we did with the Event Mesh system, the commented section is meant for S/4HANA Public Cloud instances. So, in those scenarios, we could go to our Administrative Dashboard, create the appropriate Communication Scenario (which is done PER SCENARIO, so one for Sales Order, another for Business Partner service, etc), and enter the details of that arrangement to retrieve our backend connection to the S/4HANA Public Cloud system.
However, since we are connecting to an on-premise system, we require a different approach. Instead, our on-premise backend system needs to be connected using a Cloud Connector and by creating a Destination in our BTP Cockpit pointing to this system. The purpose of the Cloud Connector is implied by its name. The Destination registration serves the same purpose as registering a Communication system, which is to store credentials and authentication methods for this particular system. Configuration of these two steps is beyond the scope of this blog, but below is an SAP guide outlining how to do both:
Cloud Connector and Creating a Destination – https://discovery-center.cloud.sap/card/f3ec479d-0aa3-4672-b7fa-94cac0ce0607
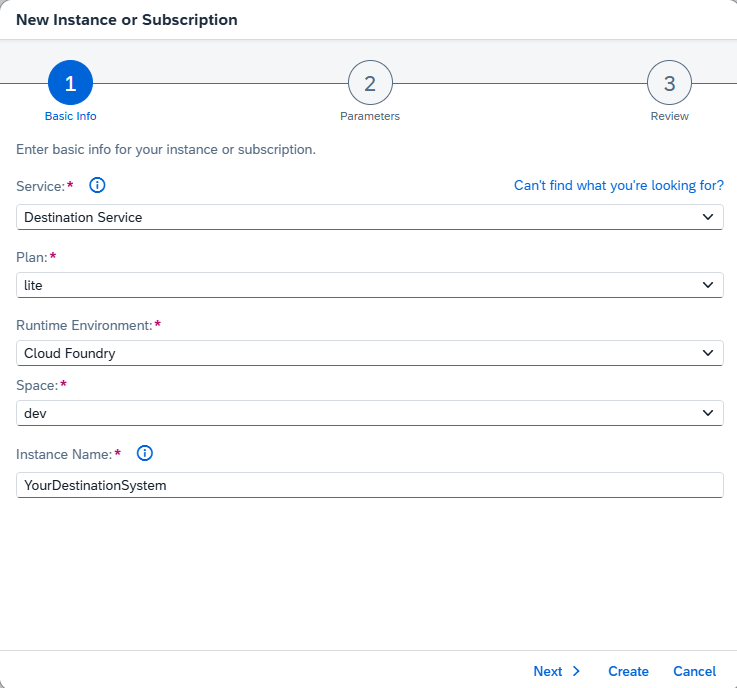
Assuming that the Destination for our on-premise S/4HANA system has been created, our next step is to create a destination service within our subaccount. At this point in the blog, creating this service should be a very straightforward process. Here is the screenshot of the one and only step required. This one service is the only one required to connect to ALL registered Destination systems:
With our Destination created and the Destination Service up and running, we can complete our solution and use this service to retrieve additional Sales Order information from the backend system. To execute our data retrieval, we will create a new METHOD within our Event Consumption Class called RETRIEVE_FROM_BACKEND. This method will do nothing more than take a Sales Order number as a parameter, call our backend service using the generated code. Two small modifications are made to SAPs generated code: we will need to modify our code to retrieve our on-premise Destinantion from the Destination service, and we will need to enter the correct URI to target our Sales Order service. The results of the RETRIEVE_FROM_BACKEND method, the sales order data, will then be returned to our Sales Order Created method, where it be utilized in our next and final blog to send our Tweet:


Finally, to test our solution up until this point, we can use the same testing method that we used to test our Event Consumption Model. This concludes our blog for this month. Next month, we will add the final step of this over process, which takes our retrieved details and generates a tweet with Sales Order details. This process will leverage another external system, The Integration Suite, to create a consumable API that generate Tweets for applications within our BTP Environment.
As we wrap up this month’s blog, it’s clear that transitioning to an ABAP environment in the cloud demands a shift in how we approach extensibility, connectivity, and integration. By using tools like Event Consumption Models and Communication Scenarios, we’re able to build solutions that not only bridge our cloud and on-premise SAP systems, but also unlock new possibilities for distributed, scalable business logic. The journey may introduce complexities—from remote APIs to credential management—but with SAP’s robust frameworks, those challenges become manageable. Keep following along as we continue to innovate; next time, we’ll complete the final step and send our sales event “Tweet” out into the world.