
Jonathan Andre is a lead ABAP developer at IT Partners. Jon has over 10 years experience with SAP, with a concentration on ECC SD, MM, and IS-OIL modules. Jon’s focus has been in the areas of ABAP OOP, ABAP Web Dynpro, and ABAP for HANA and RESTful ABAP development. He can be reached at [email protected].
In this fourth and final entry in our BTP /Event Mesh blog series, we will be completing the final step to configure our “Sales to Tweet” extension. In this step, we need to create a connection to “Twitter”/”X” to allow our ABAP extension to post tweets.
To create this integration, we will be utilizing the Integration Suite, and creating a very simple iFlow. Once created, we will use a service key and our ABAP extension to bring the whole solution together.
Creation of our iFlow solves the fourth and final question: Problem 4: A business’ primary function is to interact with parties that are external to our software ecosystem. How can we communicate with partners if don’t have a PO/PI system?
Creating The iFlow 
To get started, we’ll need to create an instance of the Integration Suite. Same process as always, picking the appropriate plan for your usage. Also, we’ll need to make sure we have the appropriate roles to create iFlows. The first time Integration Suite is set up, it requires a multi-step role provisioning process. This is because before we first need to choose which features of the Integration Suite we want to utilize before we can actually assign the appropriate roles for those components. Initially then, we will only assign the Integration Provisioner role and will come back later to fully provisioner our developer user.
After assigning the Integration Provisioner role (and making sure to log out and log back in to allow it to take affect!) we can click the Integration Suite link from the subscriptions section of our subaccount. This will open a rather bare Integration Suite landing page:

This is blank because we have not yet added any capabilities to our Integration Suite. To do so, we can click the “add capabilities” button and proceed through the guided steps to configure out IS environment. There are a wide range of options in the IS, from integrations, to integration guides. There’s even an included Event Mesh instance (if you prefer to house the event mesh here instead of a standalone environment). For our purposes, we only select the following options in the screenshot, then follow this step with the additional options below:

With the capabilities added, we can now add the remaining roles required to create our iFlow. To do this, return to the BTP Subaccount dashboard and add the following roles to your user:
PI_Integration_Developer
PI_Administrator
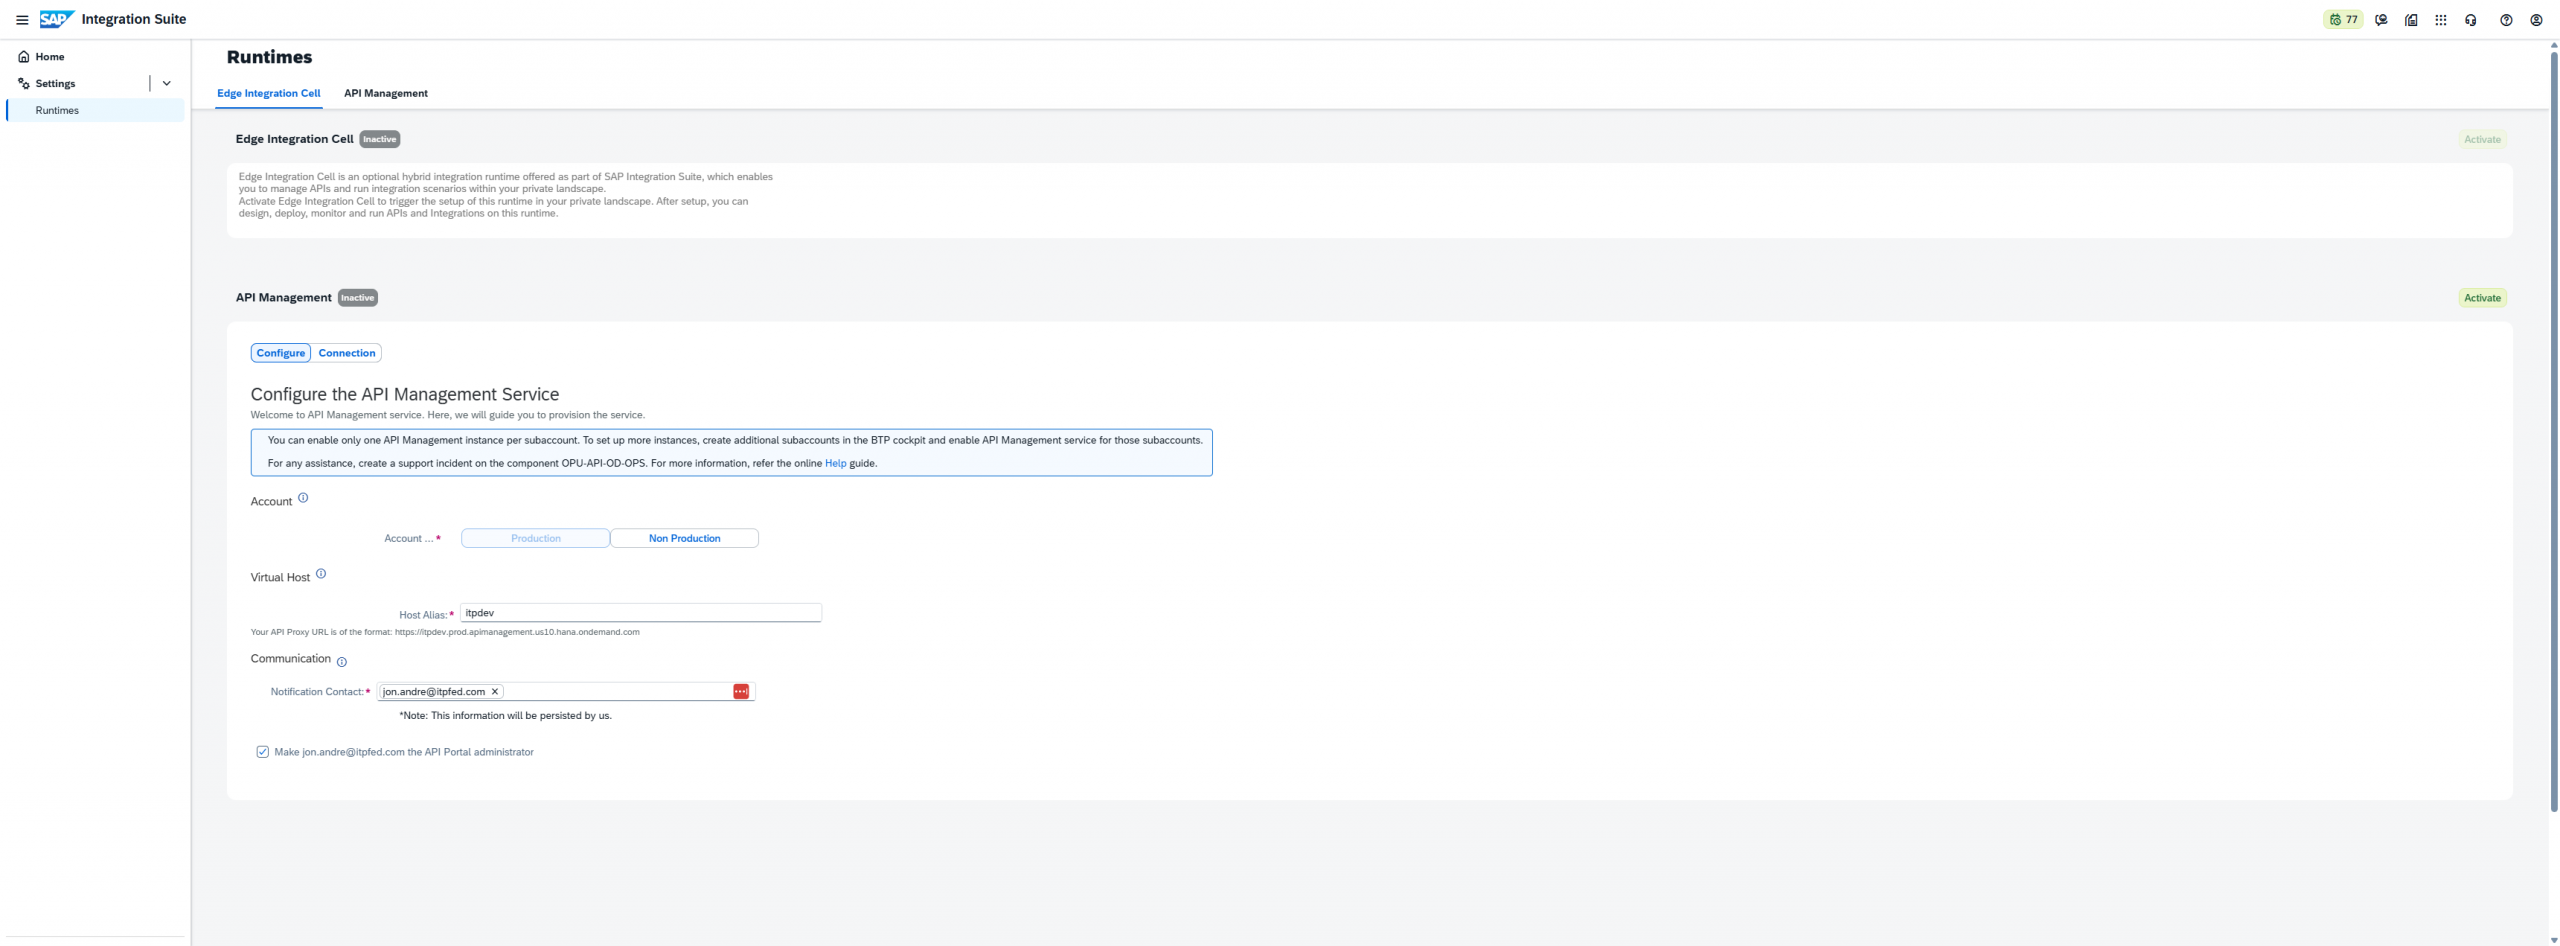
With those roles assigned, we can return to our Integration Suite instance and generate our Runtime. To do this, click the dropdown next to the “Settings” option and Select “Runtime”.
For here, I picked “Non-Production”, picked an appropriate Virtual Host, and entered my own email as the IS admin. Then finally, click “Activate” to begin the activation process:
.
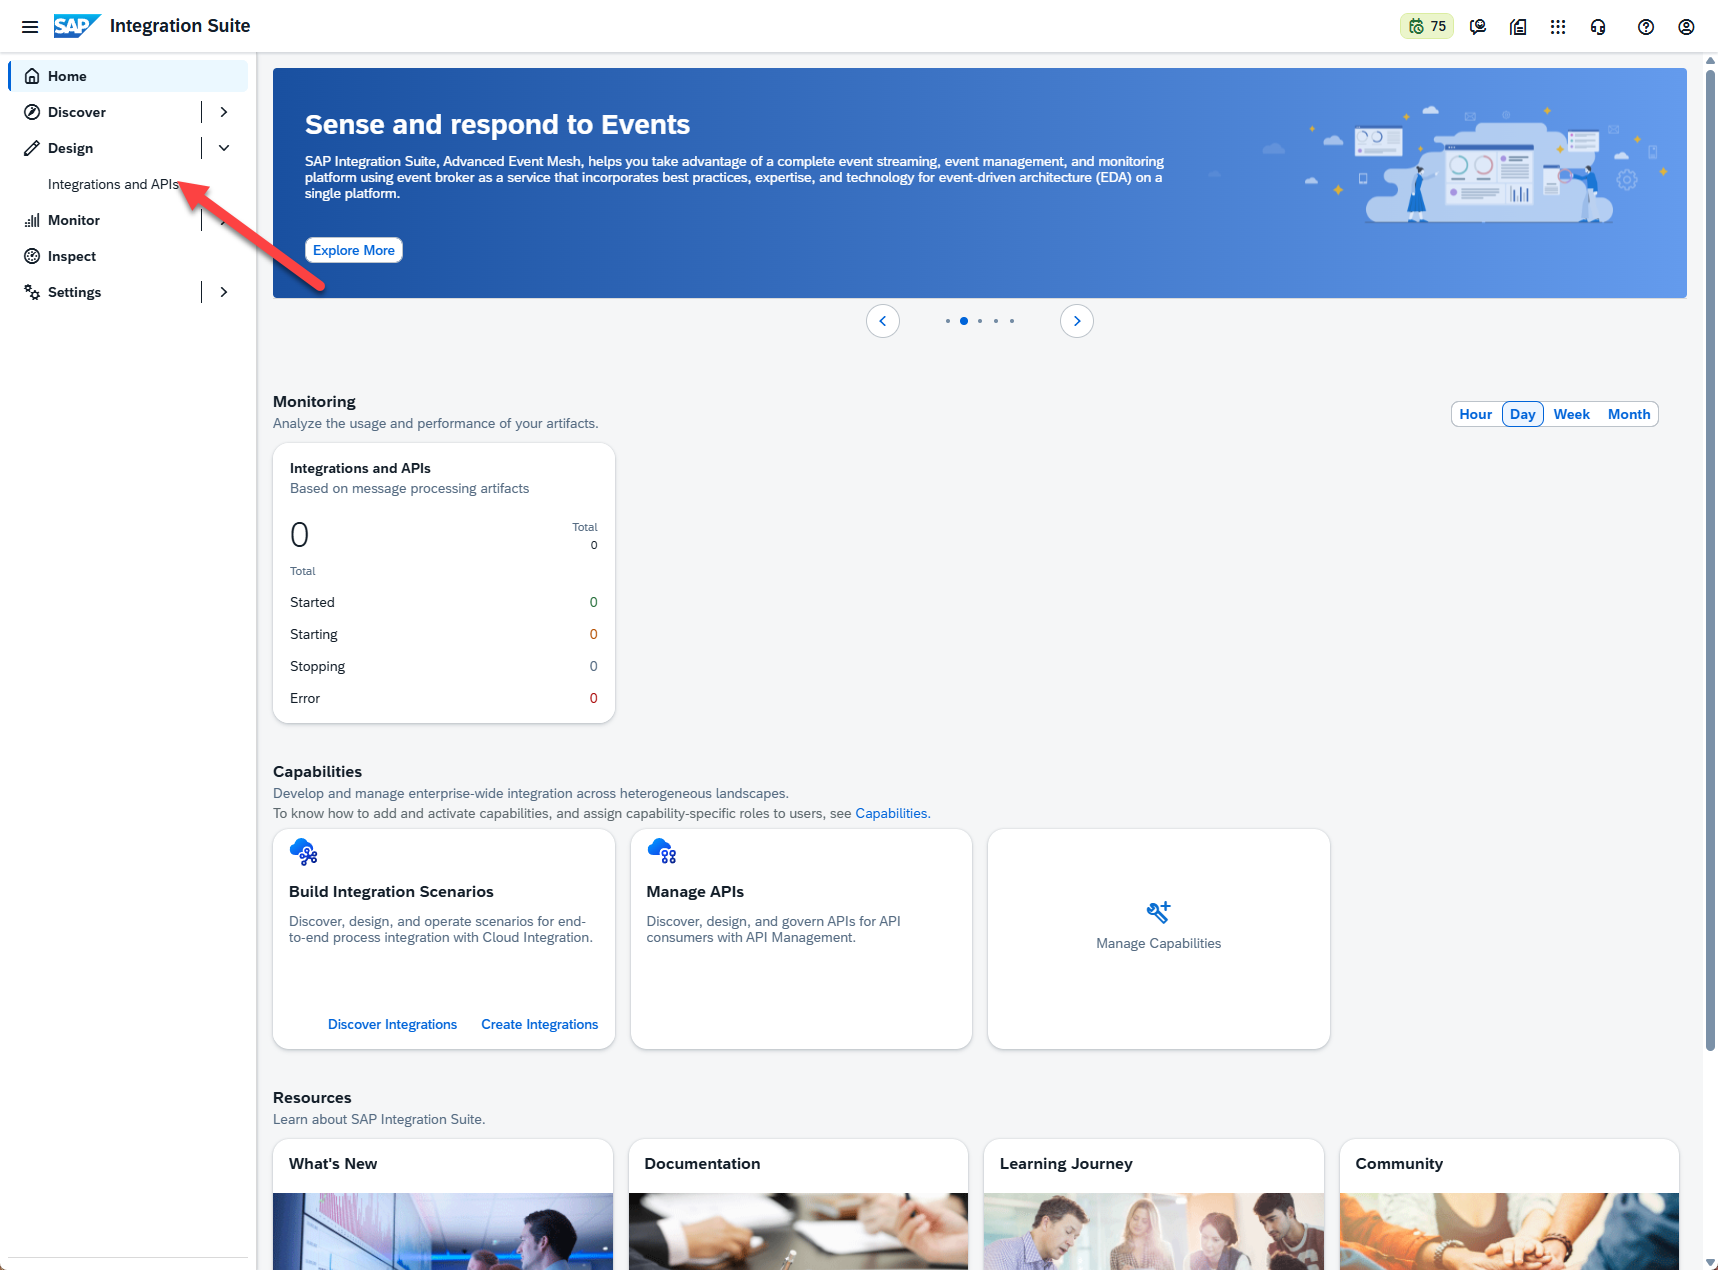
From here we can log out of and then back into the Integration Suite. After doing so, we are presented with a few new options on the dashboard:
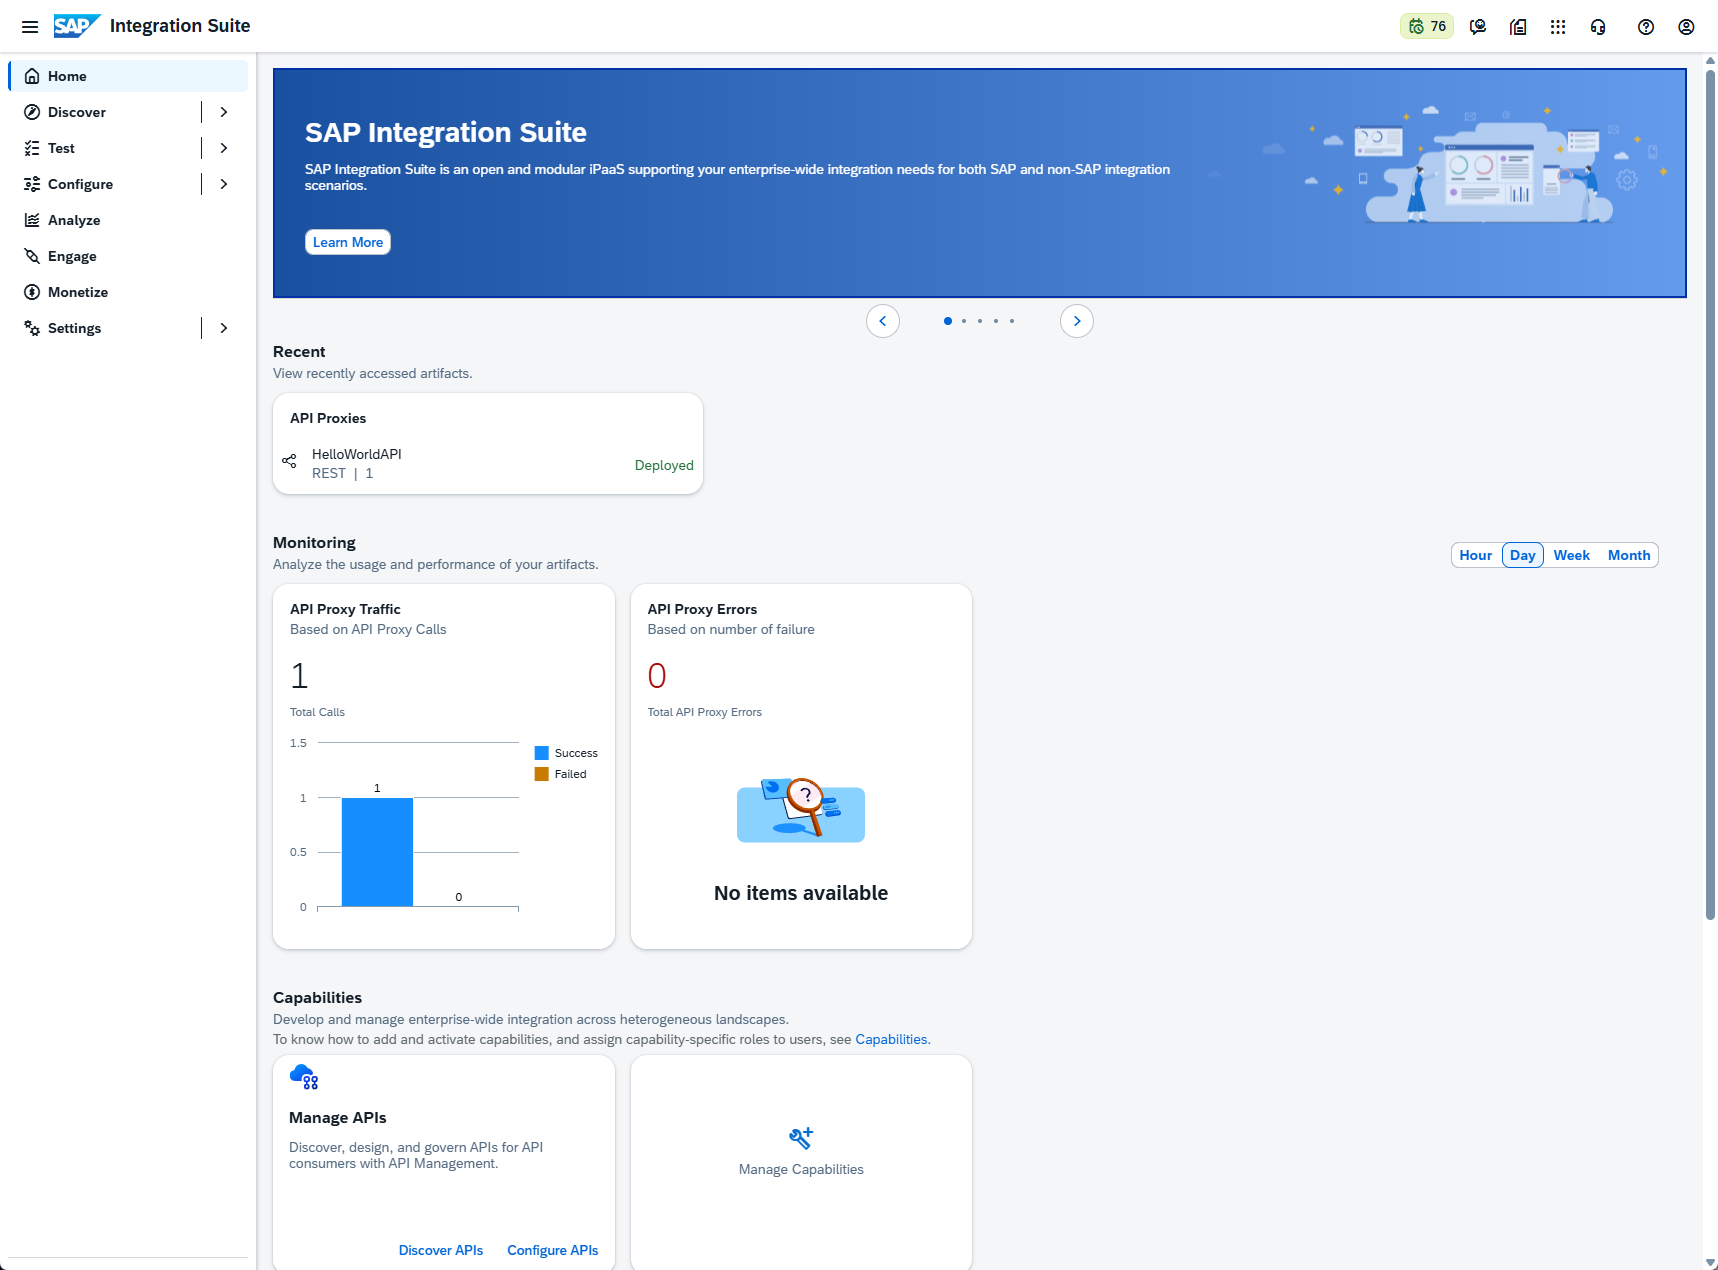
There is a lot to explore here, but it would take multiple dedicated Integration Suite blogs to cover all of the functionality. For now, we will focus on the option that allows us to create the next artifact in our extension, which is the iFlow. To do this, we will select the “Integrations and APIs” option under the “Design” section:
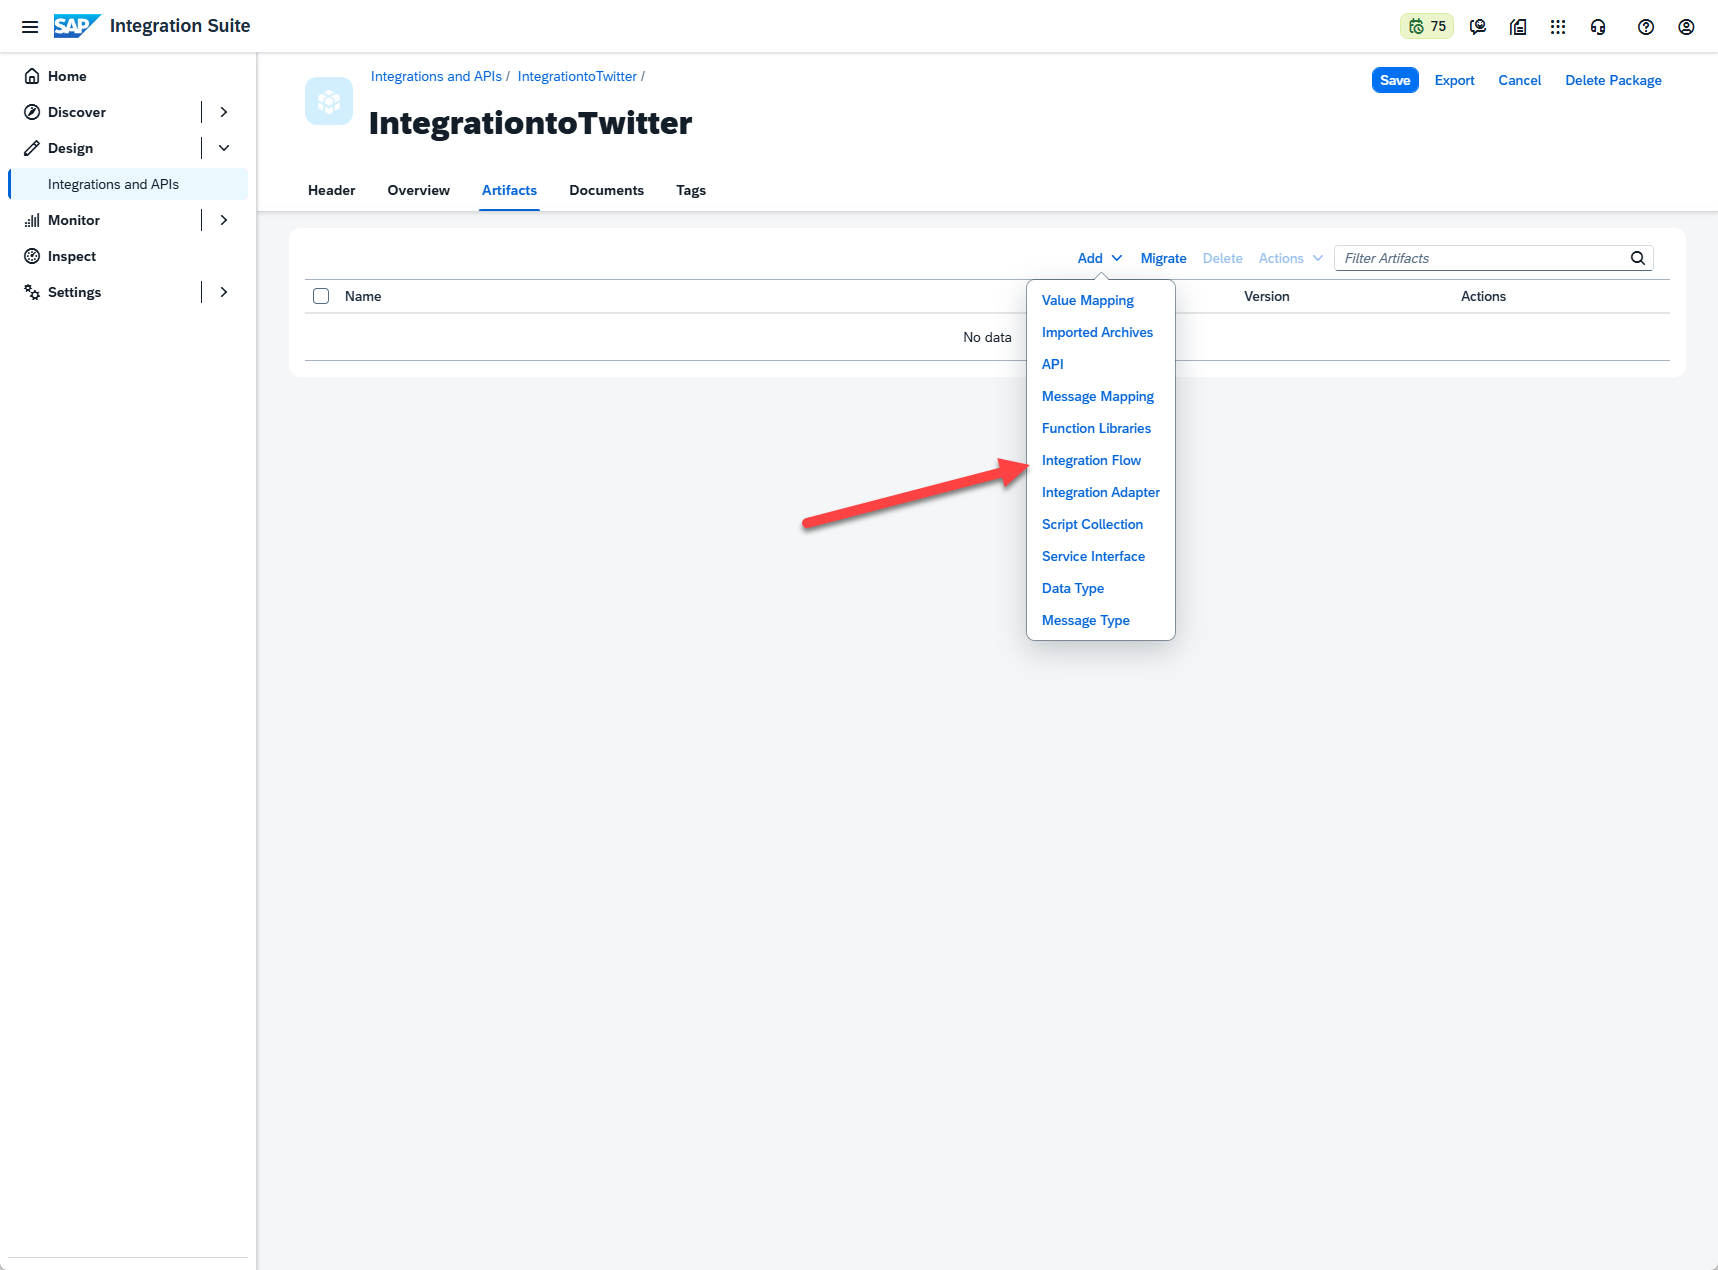
Within the Integrations and APIs, the first task we’ll have is to create a package. Here we can just provide an appropriate name and description, just keeping in mind that the technical name, while free text, cannot have spaces or special characters. After the package is created, we can navigate to the Artifacts tab. In edit mode, we click the button to “Add” a new artifact, and select “Integration Flow”:
Integration Flows are design-time objects that allow integration developers to configure end-to-end message flow processes to exchange information. They come equipped with many pre-built features like conversions, error handling, and even the ability to run custom scripts (as we will do for this project). They can be as smile or complex as required, automatically generate an API endpoint once deployed, and can be monitored directly via Intergation Suite monitoring tools.
To meet the requirement of our extension, we’ll create an Integration Flow that has the following components:
- A “Sender” participant. This is automatically generated before creating an iFlow.
- The link between the “Sender” and the start node. When we drag the arrow from sender to start, we are prompted about what kind of “link” to user (for example: HTTPS, FTP, IDoc, etc.)
- The Groovy script, which can be recreated following steps marked “3” in the screenshot, converts the message coming from our ABAP extensions. The script also modifies the HTML headers to make sure it conforms with what the Twitter API. More on this later.
- The Request reply, which is a “External Call” type process step, creates a node within SAP to handle the HTTP request and subsequent response from an external system (Twitter, in this case). It will then propagate the respond up the call stack and return.
- The link between the Request Response component and the Twitter API, which allows us to send our HTTP request and receive a response.

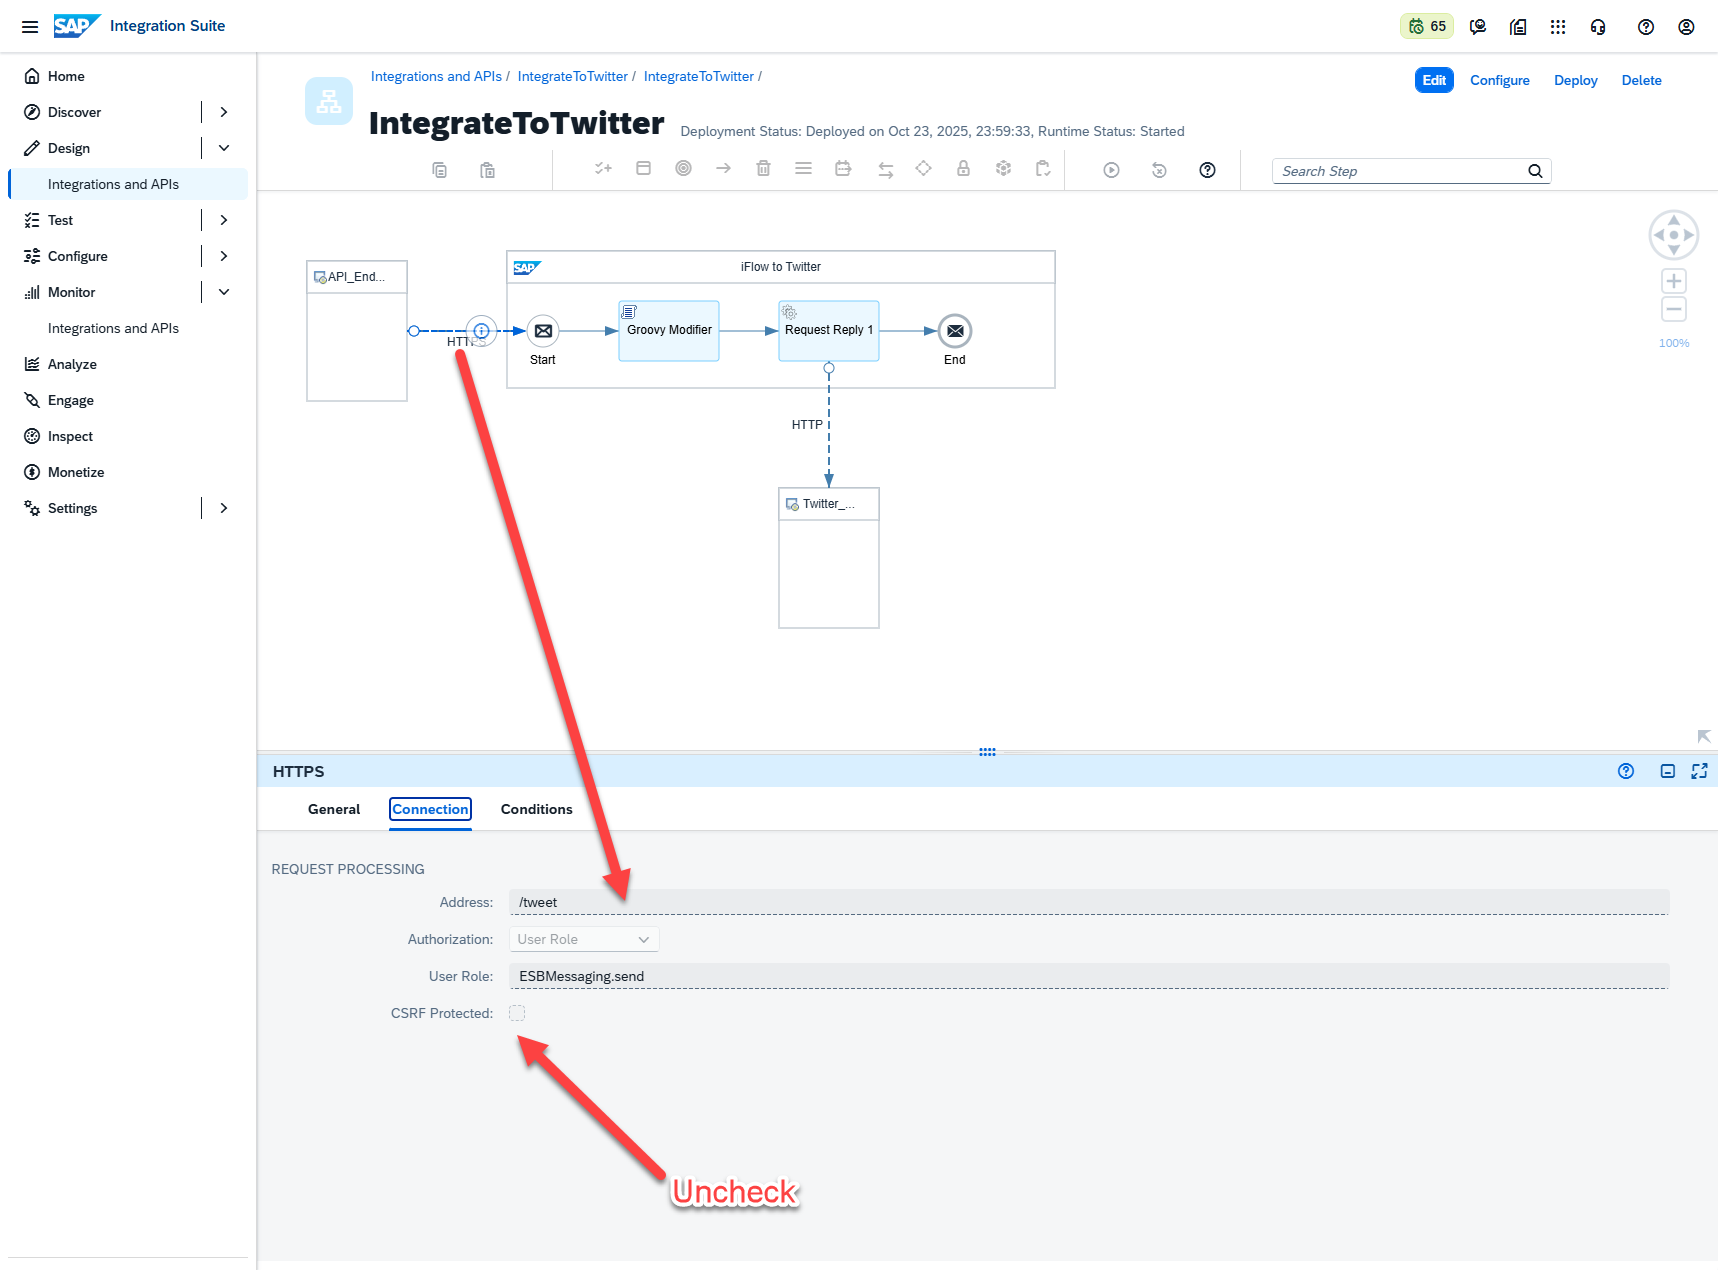
Some additional configuration steps are listed below. These will ensure the flow you create will work with the code examples provided. To summarize, the changes on the three artifacts you want to configure are:
- On HTTPS inbound connection:
- CSRF is unchecked
- Address is “/tweet”
- On the Groovy Modifier:
- You upload the Groovy script provided, making sure to either update your credential name or match the existing strings in your Security Material (more on this later)
- On HTTP outbound after Request Reply
- Enter the address https://api.twitter.com/2/tweets
- Ensure “*” is selected for request and response headers
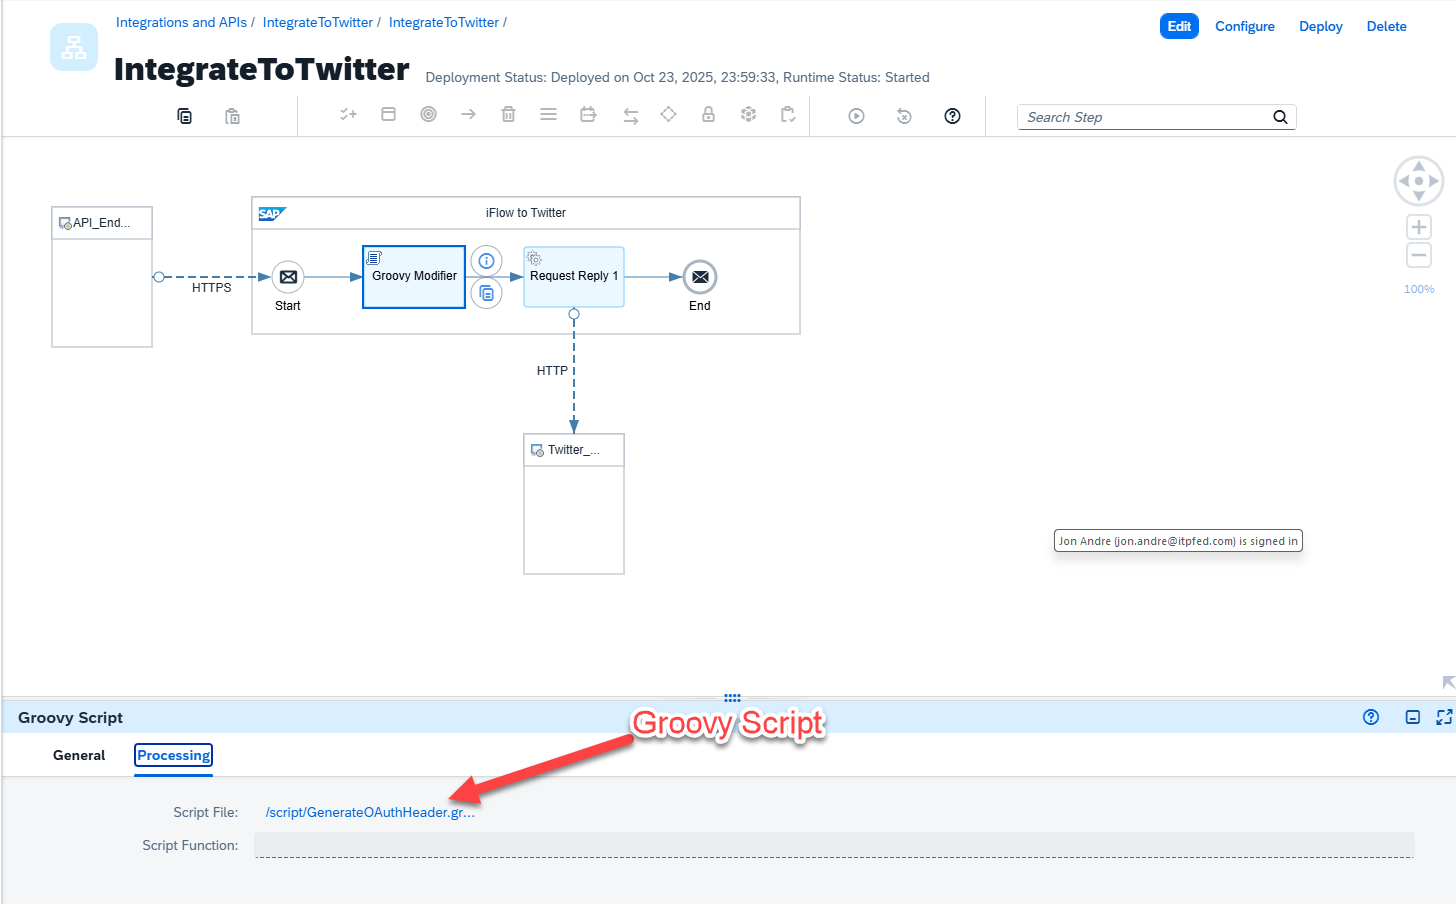

A Zip file including this script is linked. The script can be left mostly as is, with the only update being to change the credential names if you decide to name them something different while creating them within your Security Material.
While on the topic of Security Material, let’s explain what this is and how to use it. Security material allows you to store passwords, certificates, and various other credentials for use in your integrations. These can be used directly within configurable iFlow artifacts, or referenced directly from within scripts. Here we are using these to store our Twitter credentials and retrieving them using a Groovy script. Not much more needs to be known for this blog, other than the credential name in the script and the entry created in the Manage Security Materials app MUST MATCH for this integration to run correctly.
The menu path is Monitor->Integrations and APIs->Manage Security Materials:

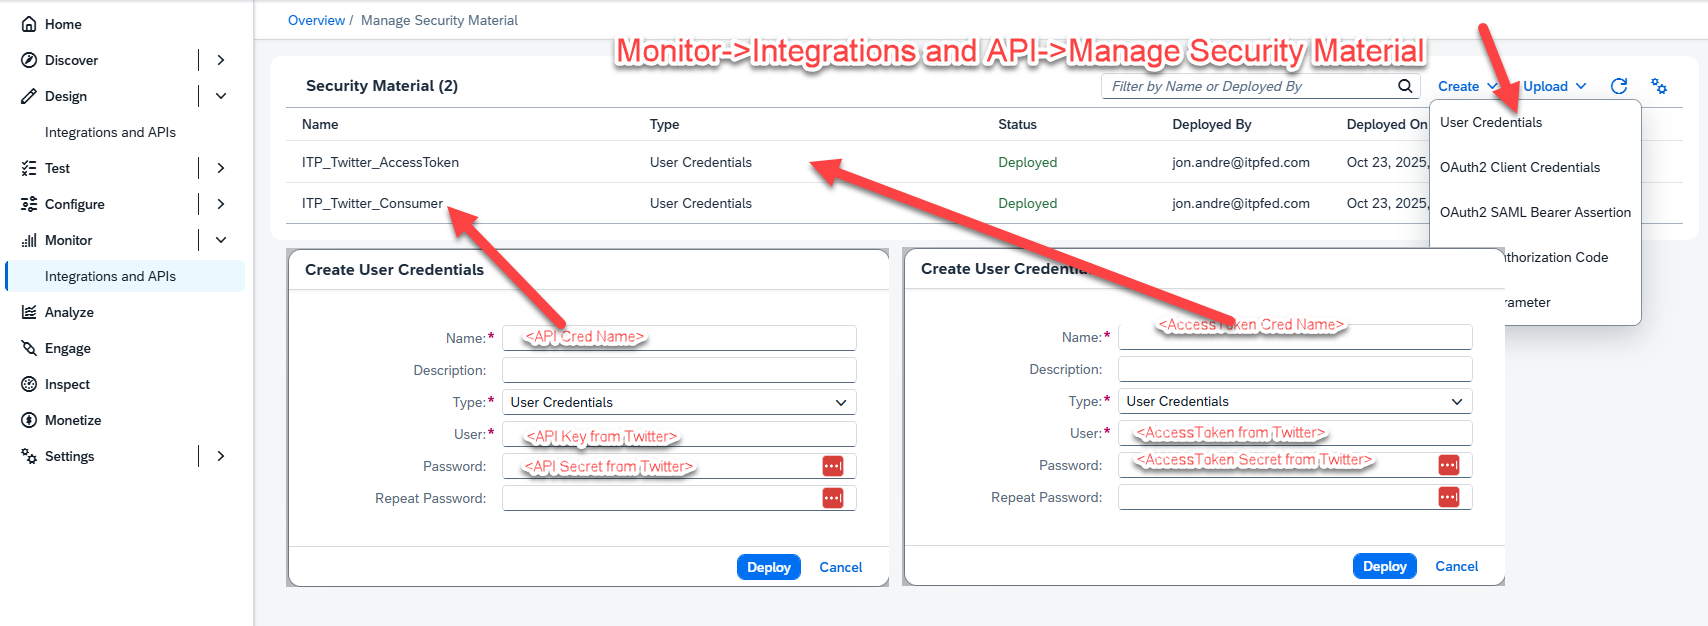
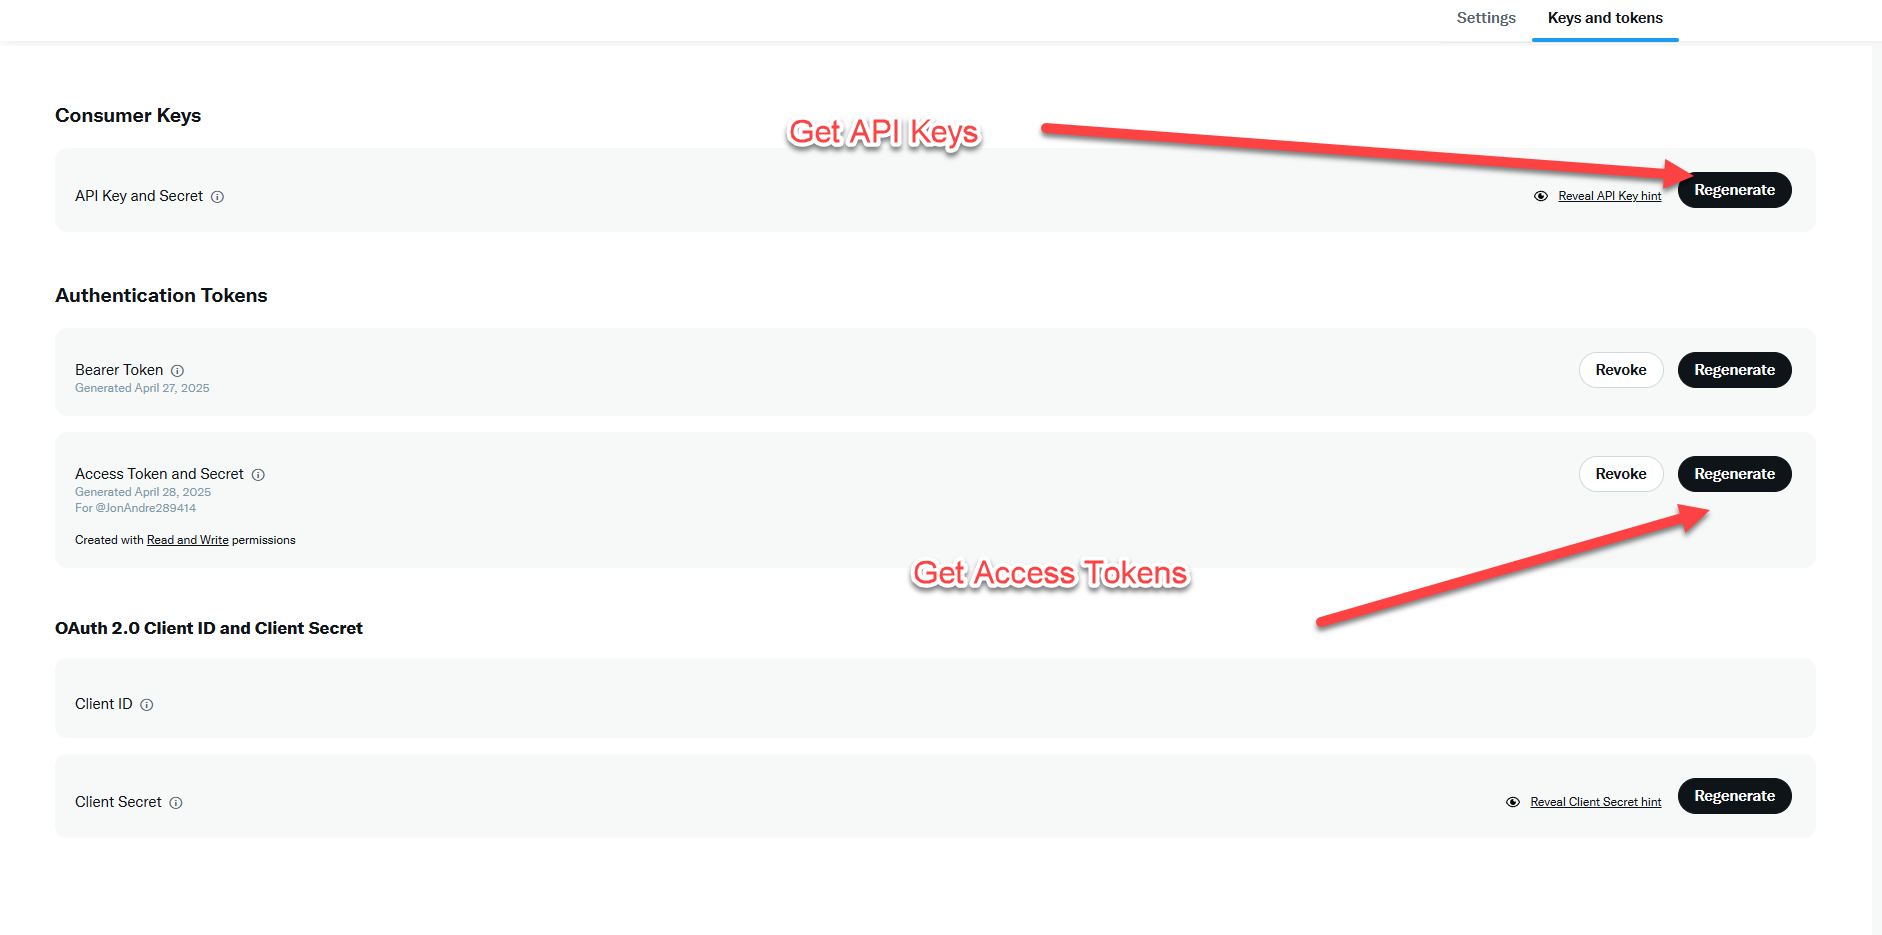
To retrieve your own API and AccessToken information for Twitter, you can follow the guide to creating a developer account here (https://developer.x.com/ )This requires the creation on an Twitter/X developer account, the creation of a project, and accessing this project to retrieve your credentials. More on that process can be found here ( https://docs.x.com/fundamentals/developer-portal ). Just remember to come back to the Manage Security Materials app once these are retrieved and populate them with the appropriate name.
Before we move on, I would like to explain why we need a script for step 2. You may be wondering why there’s a need to include a Groovy script (or any script) in my iFlow. This is here purely to address some technical issues between Integration Suite and Twitter’s API. In particular, Twitter prefers using API v2, and does not allow direct Tweet posting it your own twitter account with OAuth 2.0. SAP, on the other hand, has moved on to mostly using OAuth 2.0, and many of the prebuilt Twitter integration options are still built for Twitter API v1. This is fine for reading Tweets, but not posting Tweets. This mismatch required some custom development, including in dealing with HTTP headers and encryption.
I bring this up to illustrate that creating an iFlow is usually much easier than having to create a script. It is often as easy as connecting two artifacts and suppliying your credentials, since SAP Integration Suite has many prebuilt solutions (Open Connectors, Connections within iFlow itself) for connecting to many well known APIs (Google, Twitter, Office 365, etc). In most simple cases (like posting a Tweet) and entire iFlow can be built and deployed in minutes. So, I wanted to be sure anyone reading this does not come away with any misconceptions.
Lastly, as stated before, this is a simple Integration only meant to illustrate how an iFlow would work, and not necessarily how to build iFlows. This example will get messages to Twitter and post them, but anyone actually attempting to build a production level iFlow should do their full research before attempting, and even consider completing the Integration Suite learning Journey (https://learning.sap.com/learning-journeys/developing-with-sap-integration-suite).
With our iFlow connected and deployed, we want to retrieve our API endpoint. To do this, we can navigate to Monitor-> Integrations and APIs -> Manage Integration Content -> Started. In here, we will find the Integration Content we’ve created. Click on the appropriate content to the Twitter integration and you will find the URL corresponding to your API. If you don’t see this here, double check that you already deployed your project:
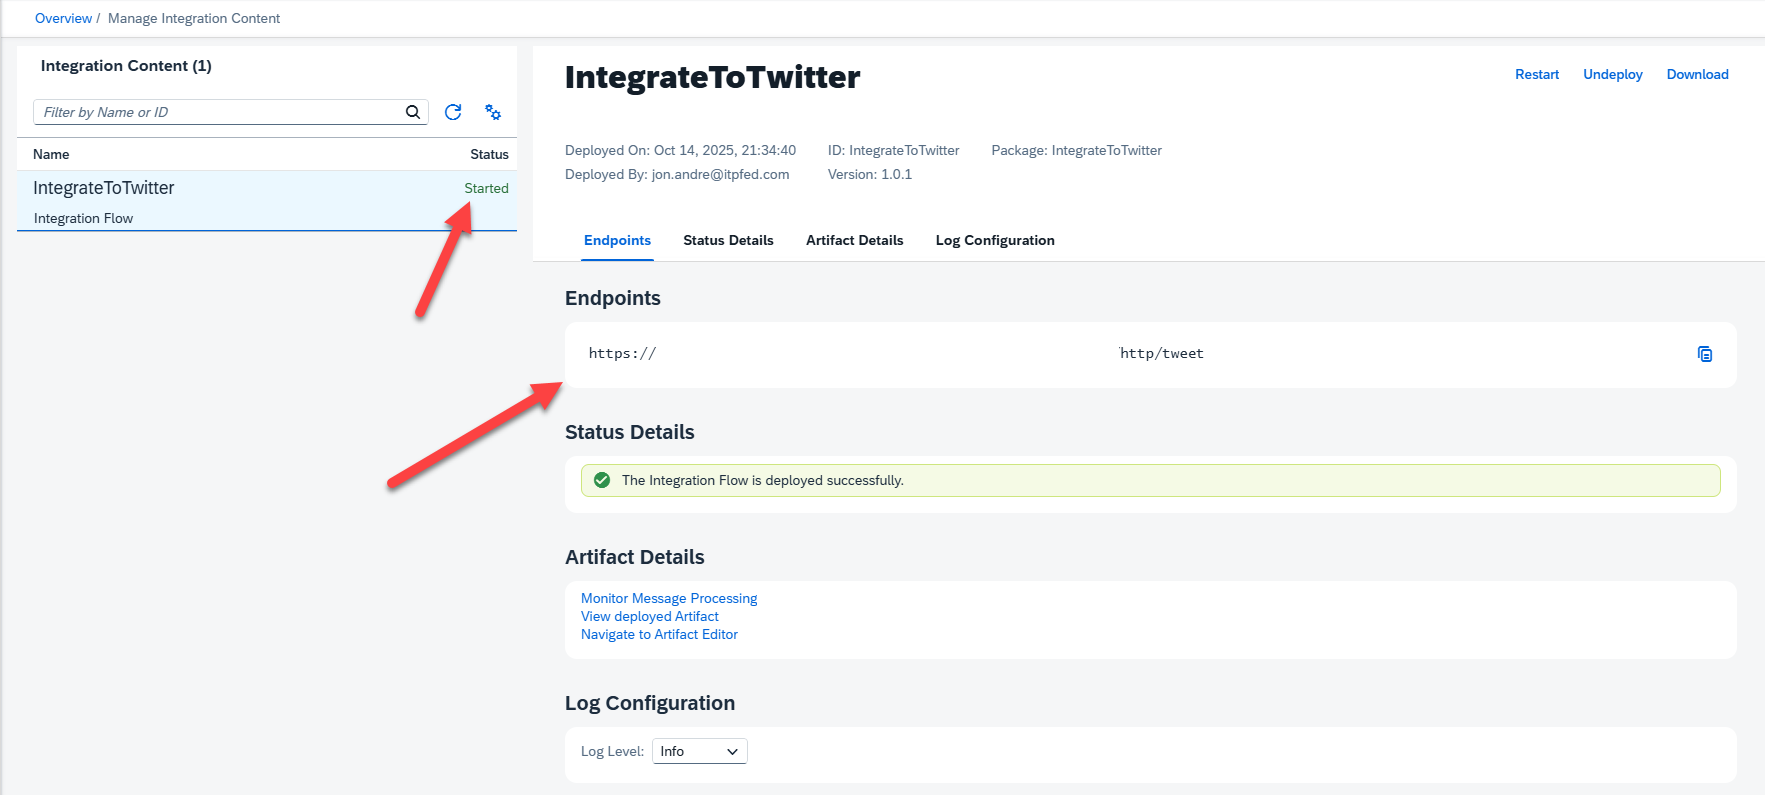
With URL in hand, we are done with the iFlow portion of our blog.
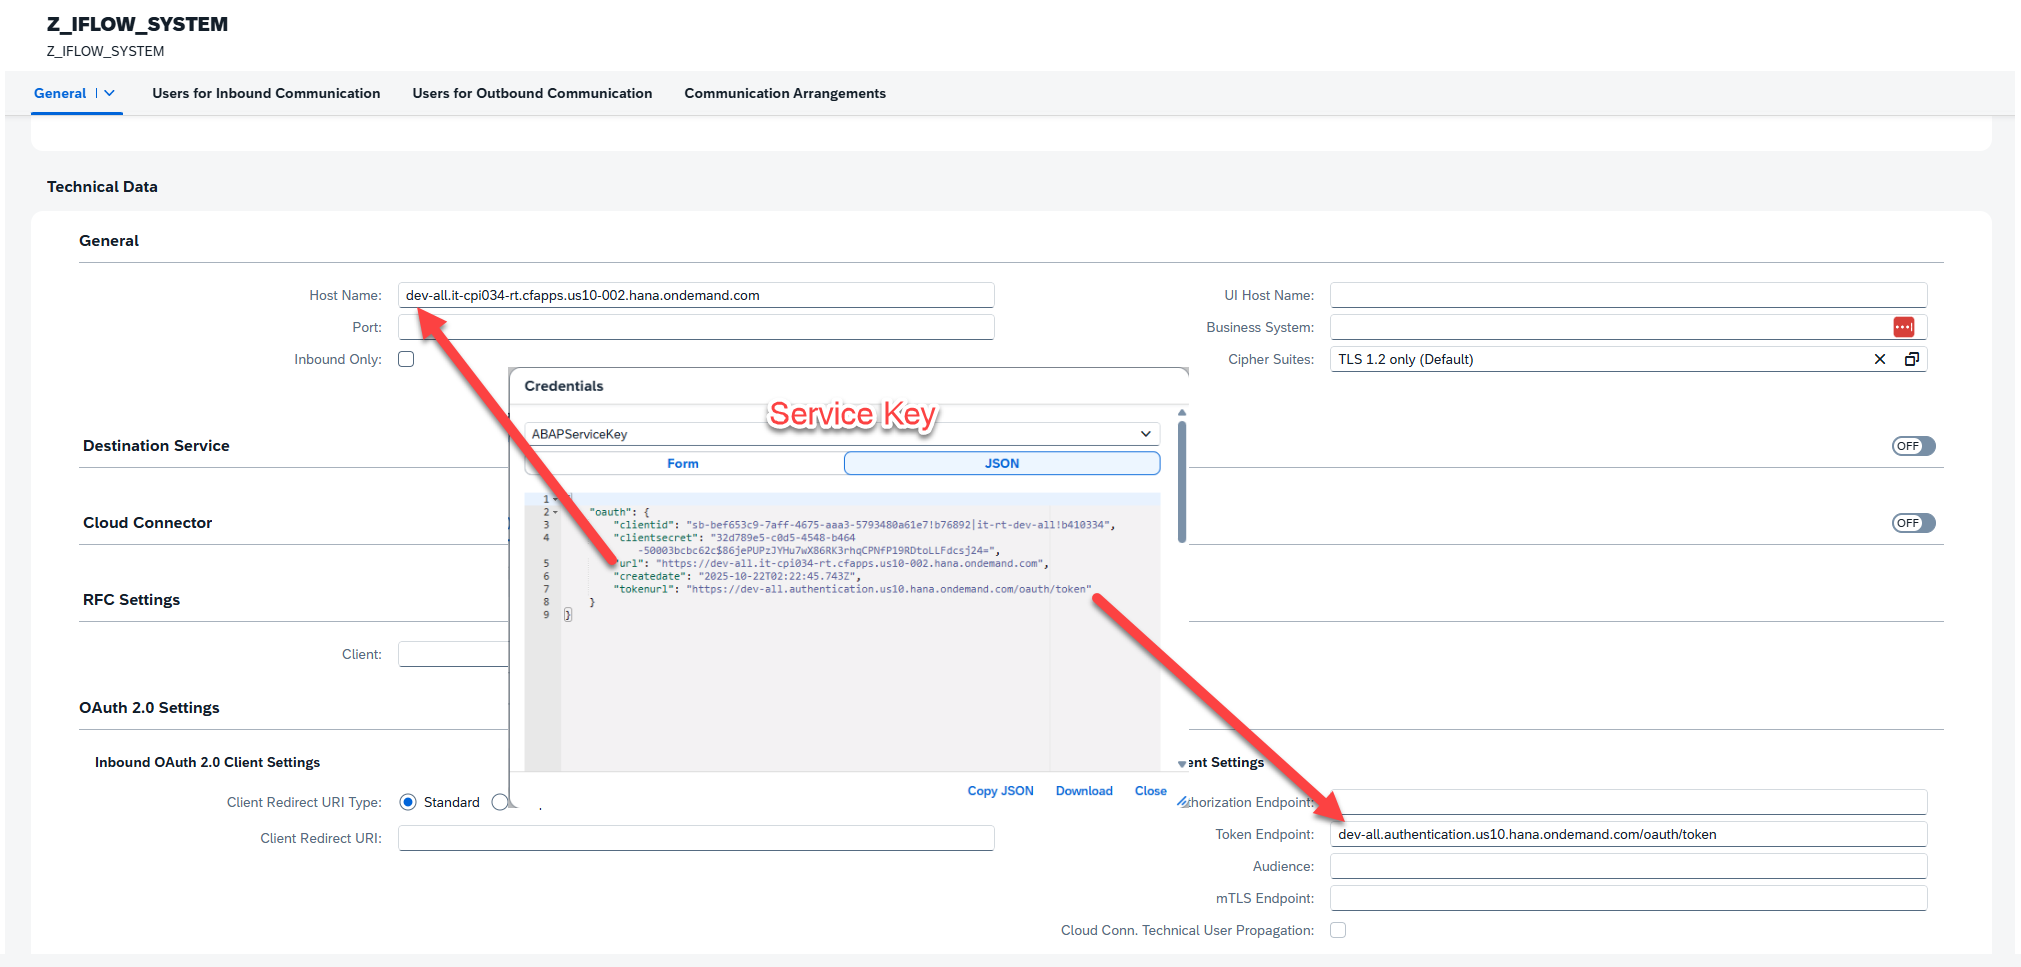
Retrieving Our Service Key
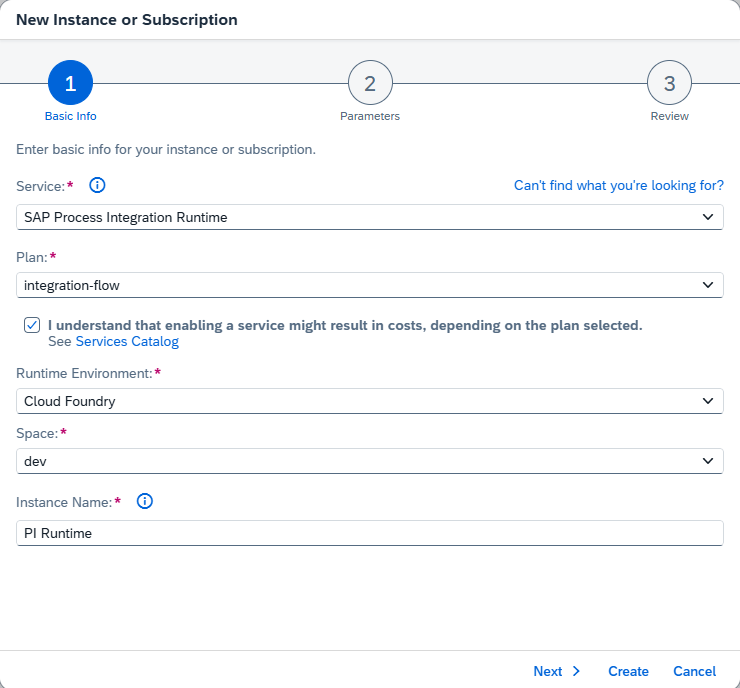
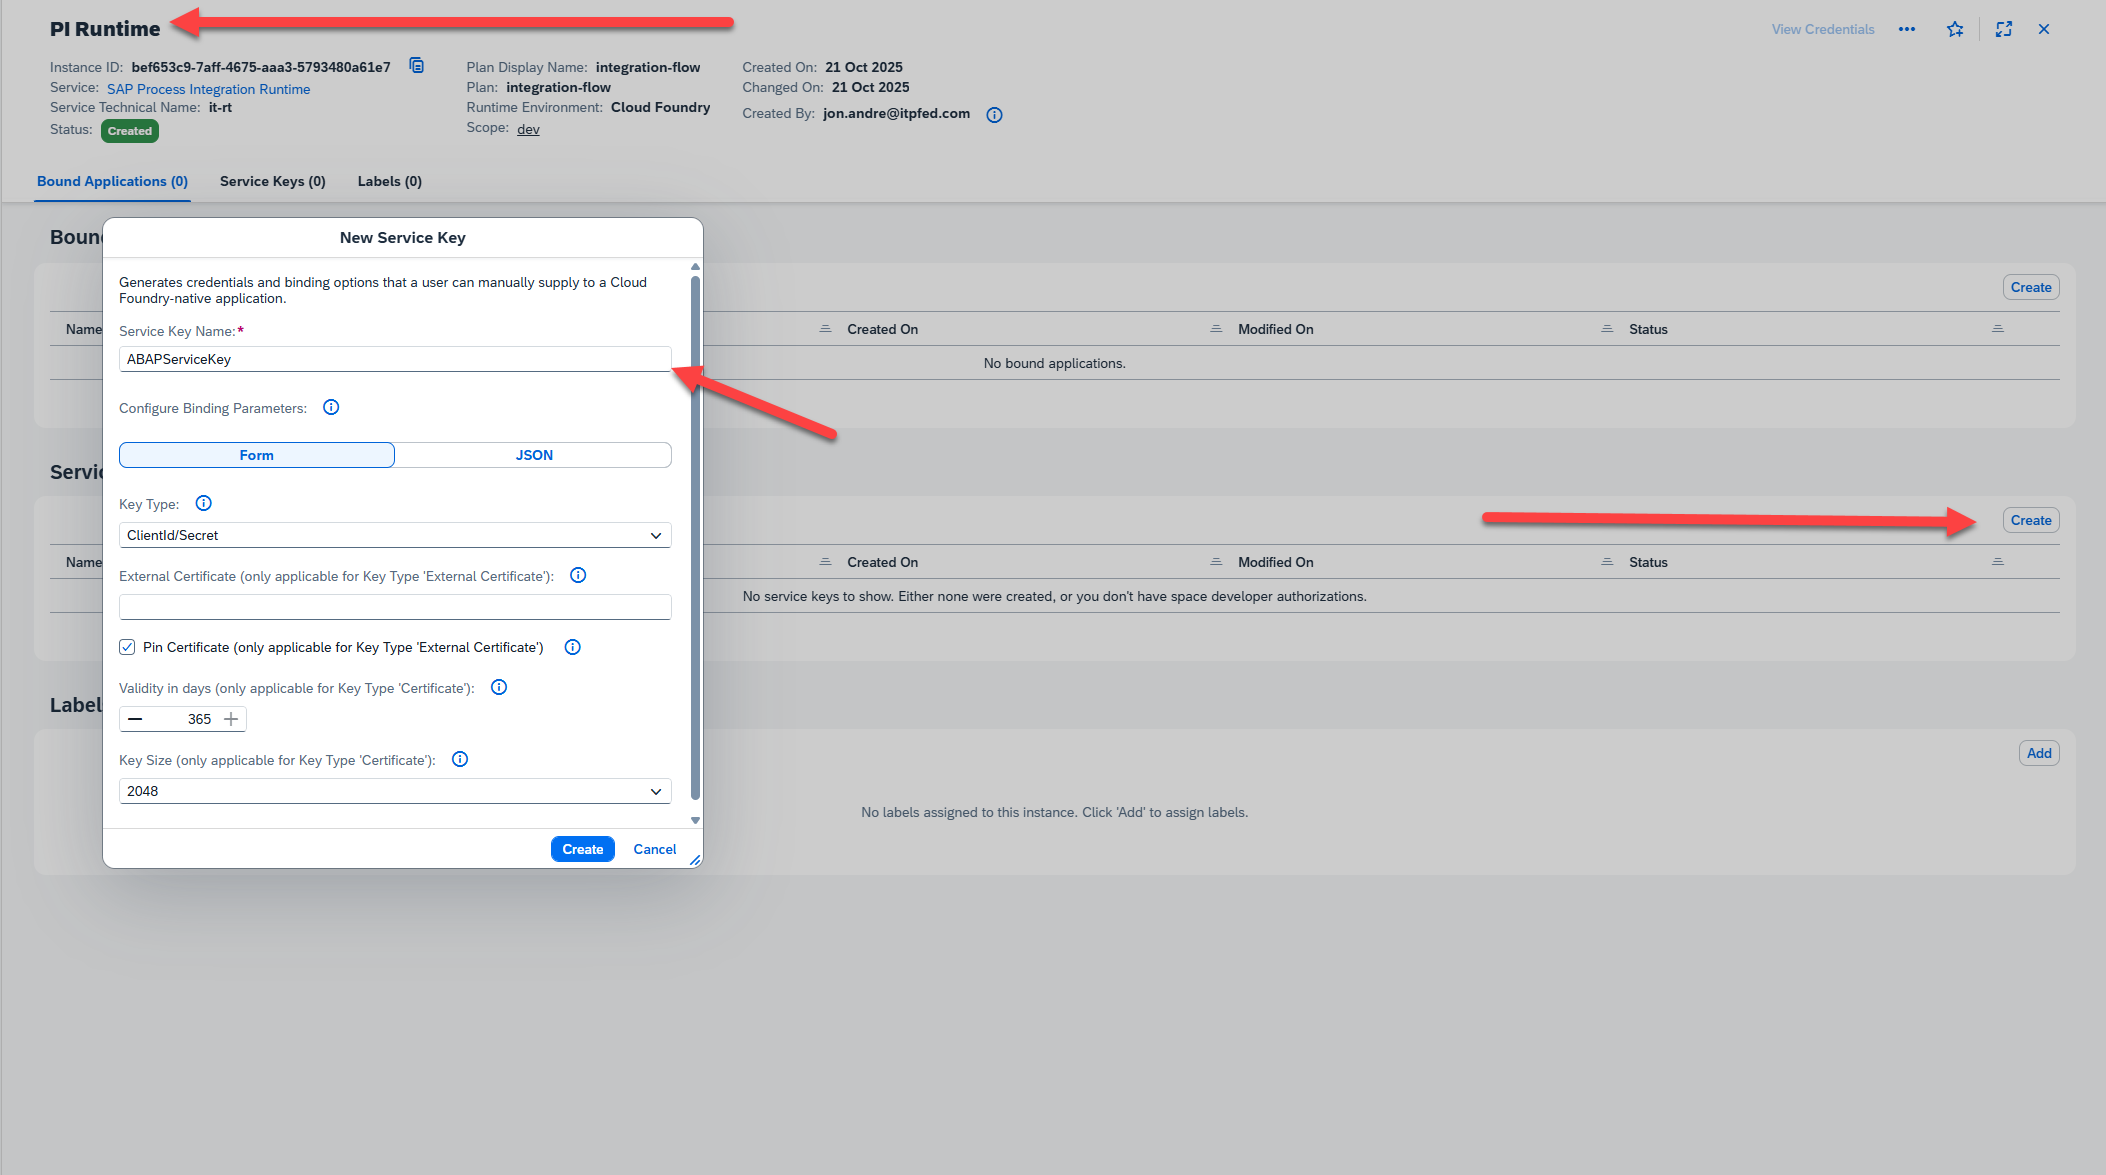
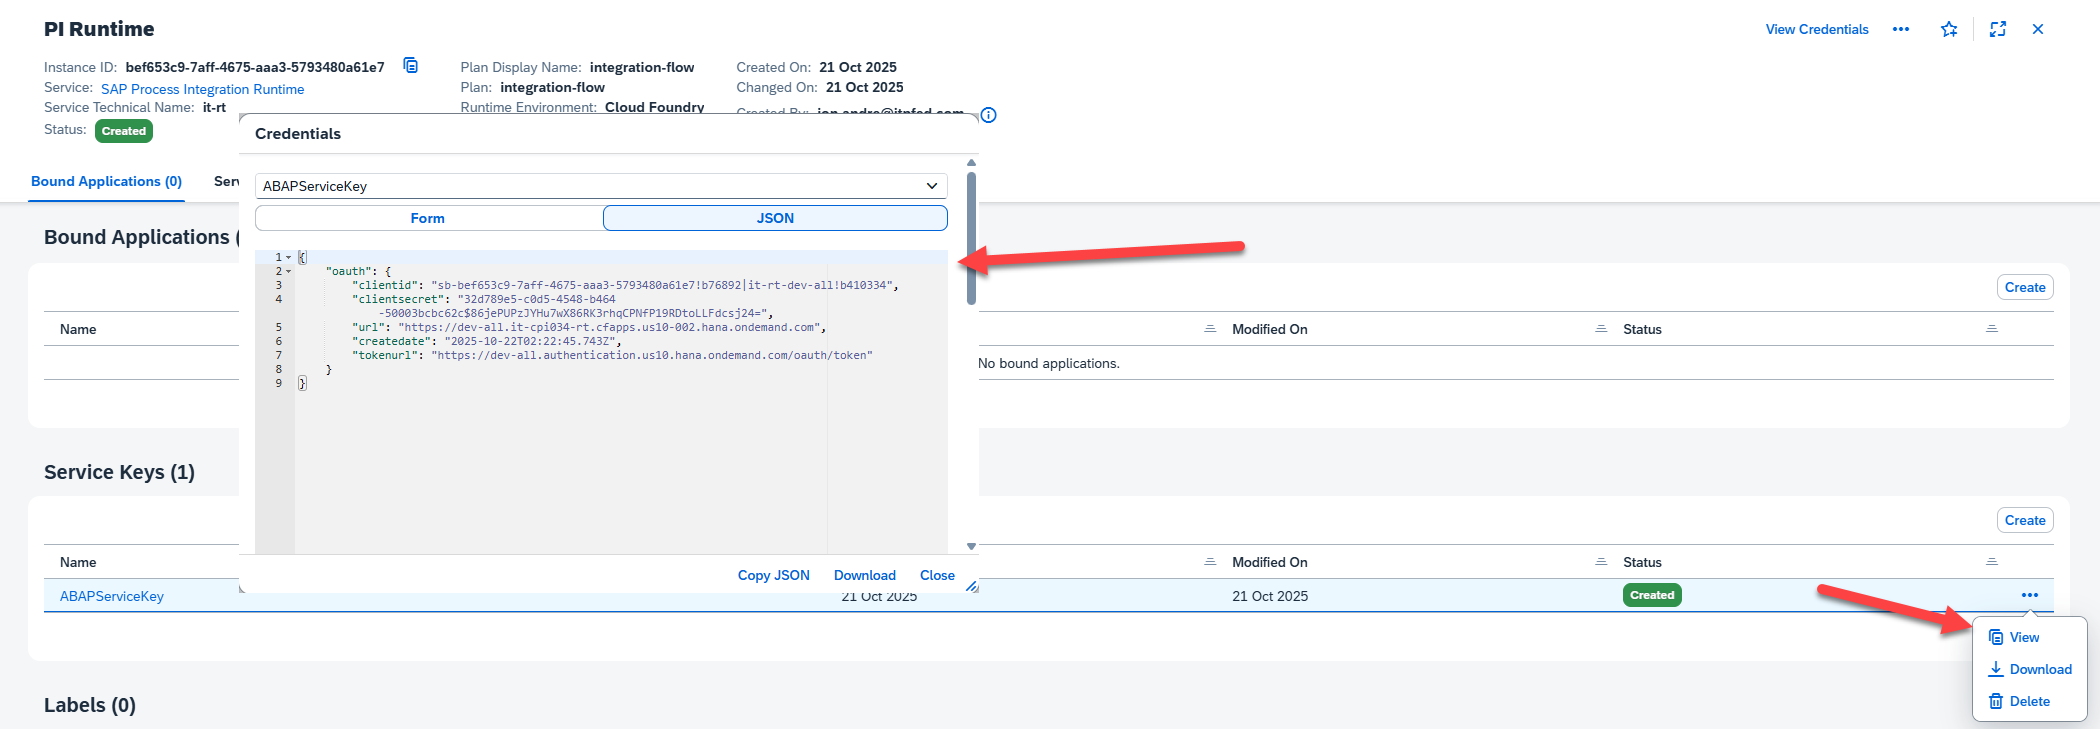
Our next step is to create a service key for our Integration Suite instance. We will need this to connect to our iFlow from the ABAP environment. To do this, we will go back to our BTP dashboard, create an SAP Process Integration Runtime-> integration-flow service instance, then use this service to generate a service key to be used in the ABAP system. By this point in the blog I will assume you are a pro at this. So, instead of explaining step by step, I will include a few screenshots of the steps to follow:
Communication Configuration
Before using the Communication Management app to register our Integration Suite as a Communication system, we’ll first head over to our ABAP instance to create the necessary artifacts to make this process easier.
Within ABAP, we want to create a new Outbound Service and Communication Scenario. We can then use the Communication Management app to create a Communication Arrangement, which will connect our Communication Scenario to a Communication System.

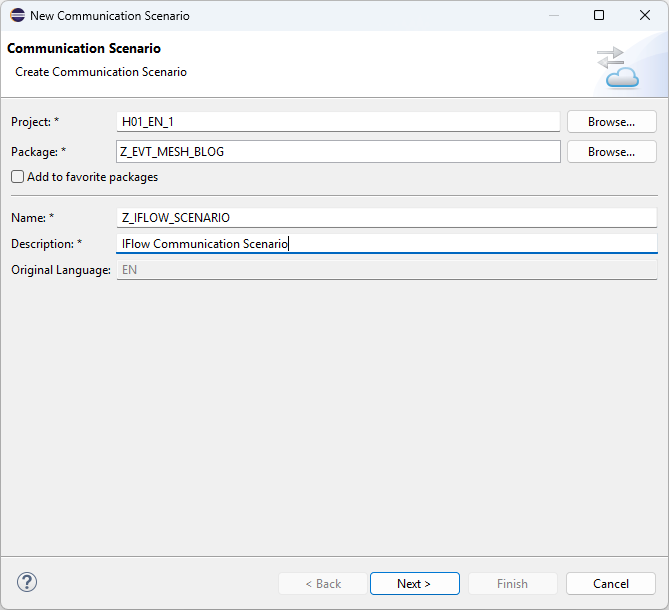
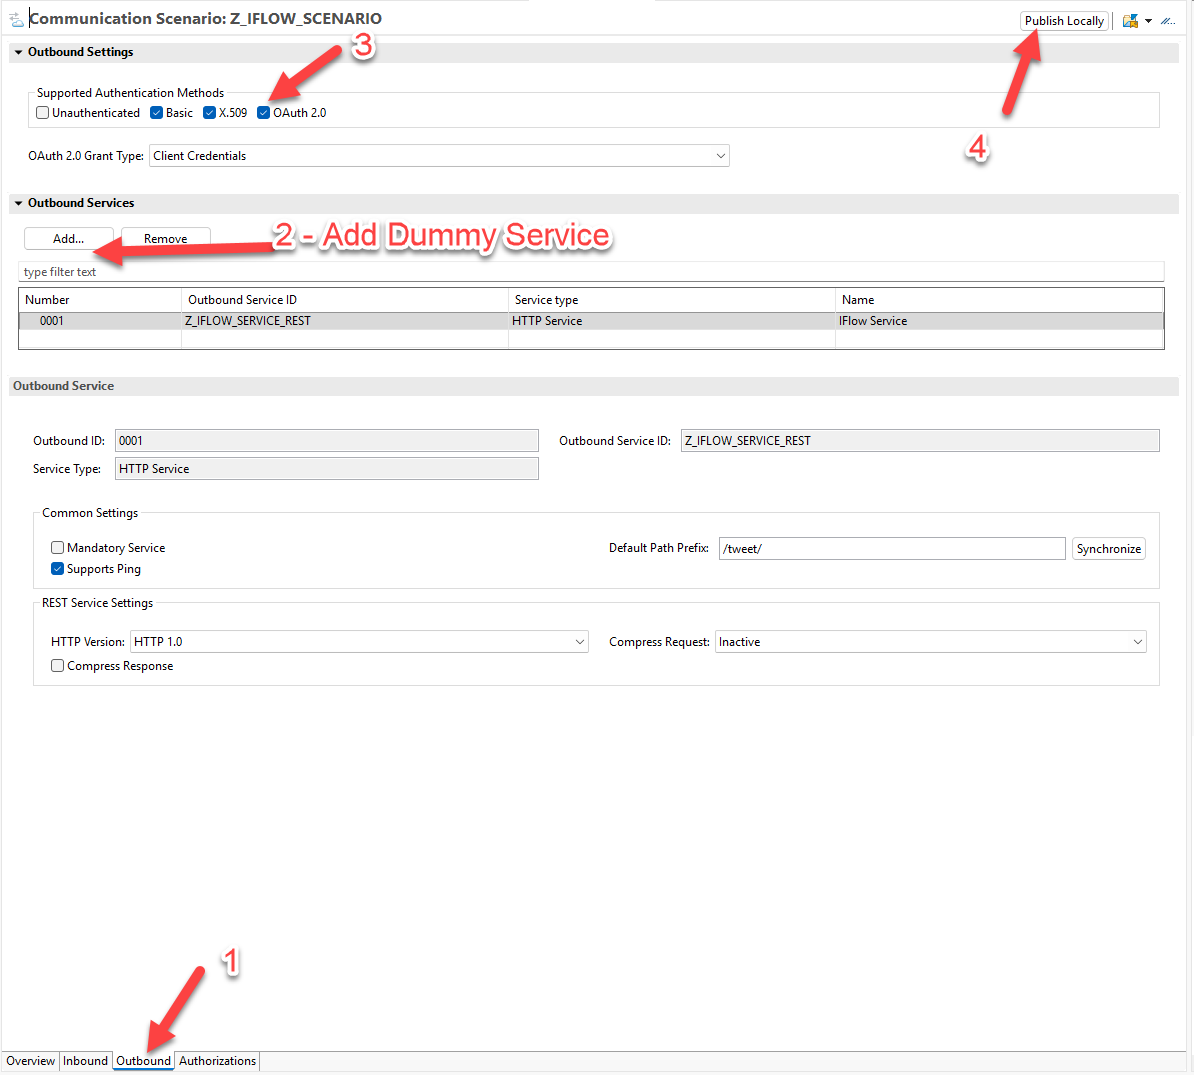
You may notice that, unlike when we created the service to connect to our SAP system, we did not require and metadata for Service Definition. This is because our iFlow is very simple and we have no need for structured OData request. To post our Tweet, as you will see momentarily, we simply just specify the text in the body of the post. So, the creation of our Service is a bit of a “dummy” service. It is required, however, because we cannot have a communication arrangement without an attached service.
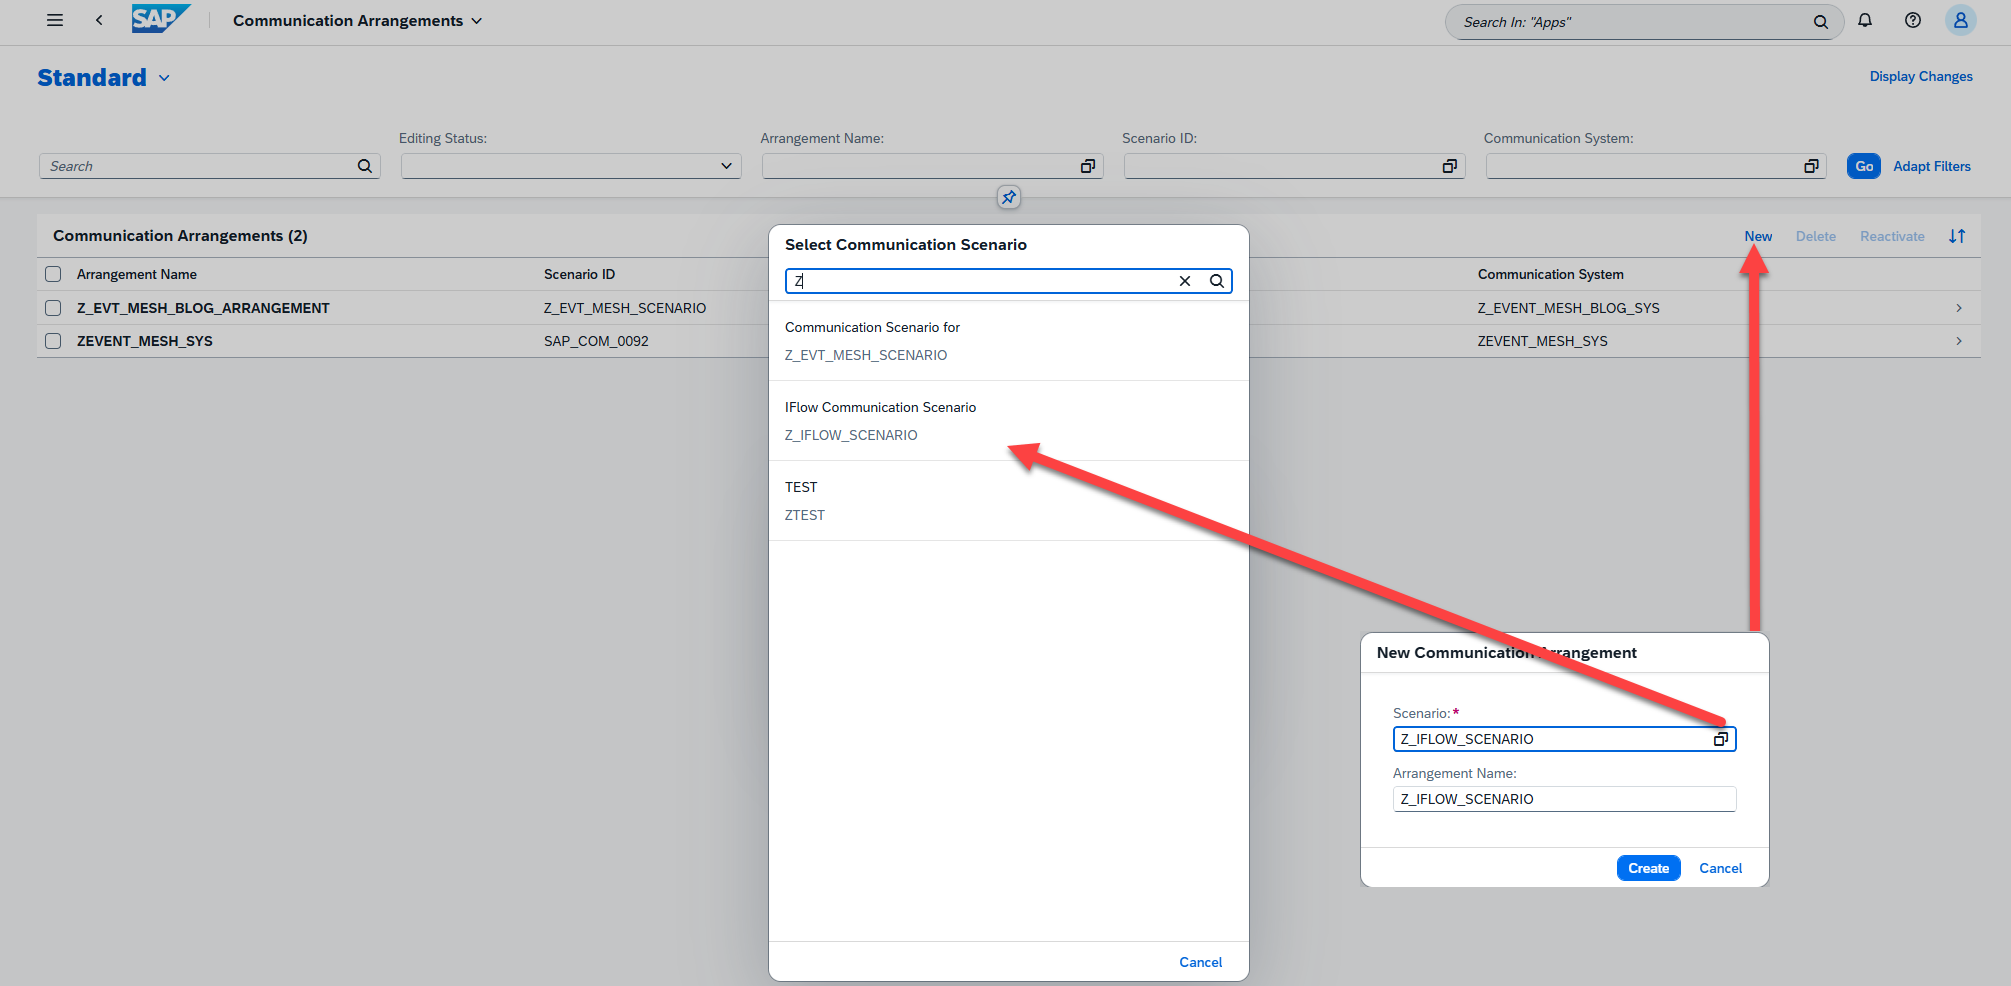
Now that our Communication Scenario is published, we will follow steps to create a Communication Arrangement, which include creating and specifying a Communication System (our Integration Suite system), along with a Communication User (which is an abstract way to store our credentials that we extract from our Service Key. Since we have already covered this process for the most part in the previous blogs, I will explain this portion through a series of screenshots. The process is mostly simple and straightforward, however if you run into trouble feel free to visit the previous blog for more detailed steps:

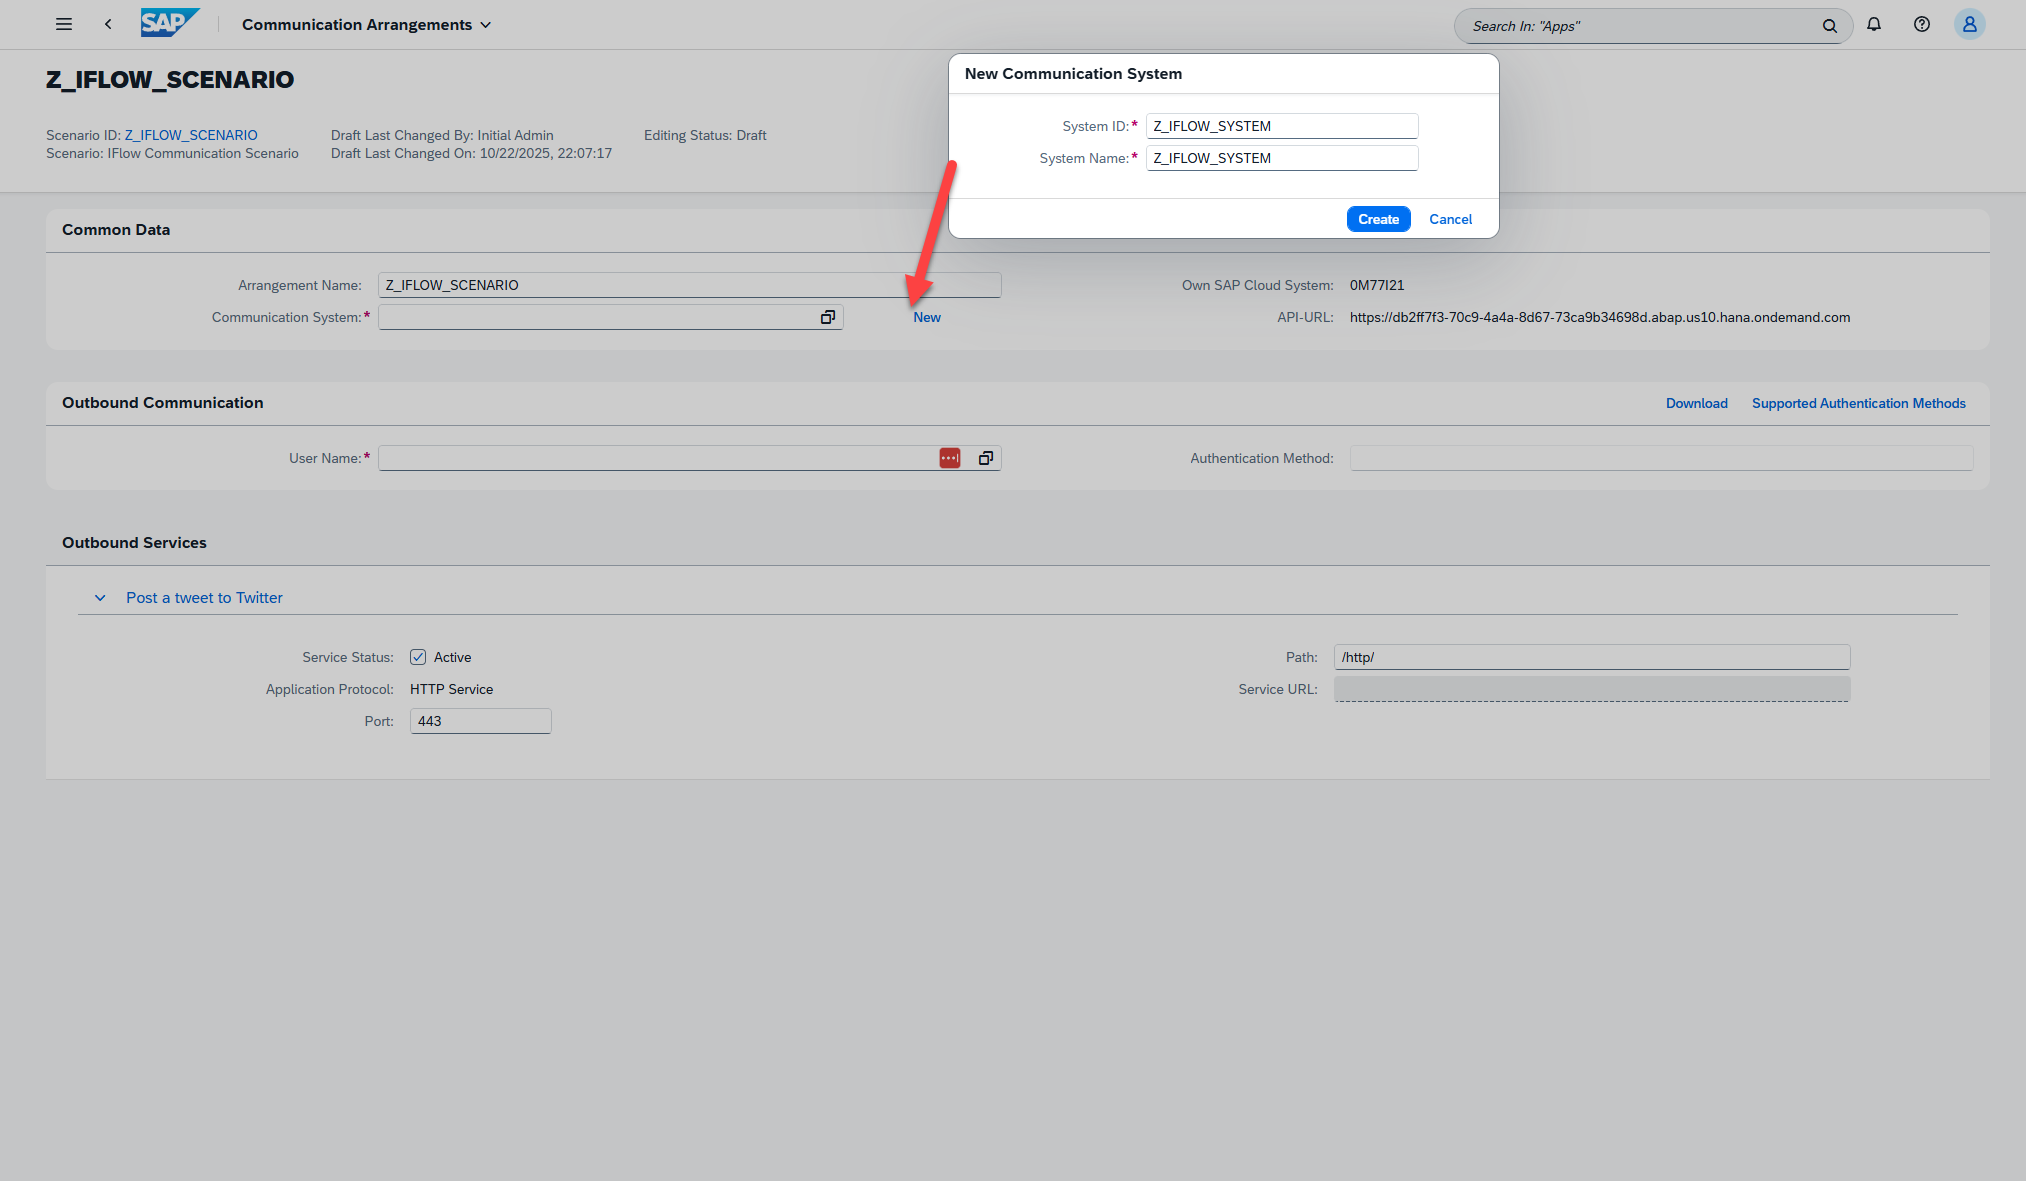

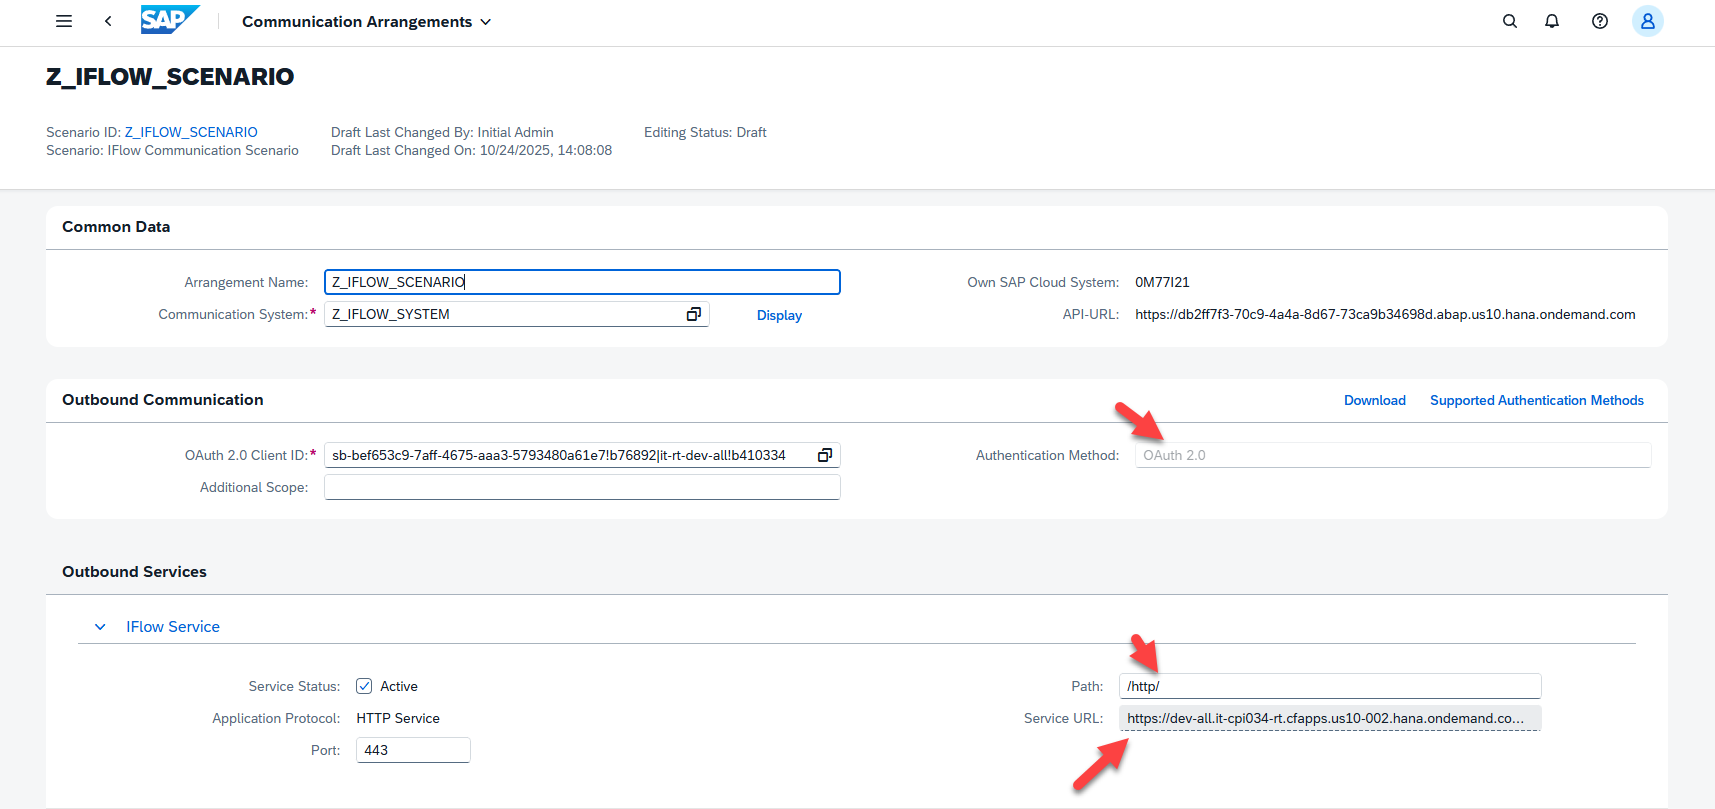
Take note of which artifact is connecting what layer. Our Communication system gets us to Integration Suite instance, and can be reused for any other interfaces we would like to connect to this system. Our Outbound Service adds the URI addition of “/http/”, which allows us to reference a subset of possible Integration Suite endpoints that use HTTP protocol. The last piece of our URI, the “tweet” portion, can then be added directly from our code, as we shall see shortly.
It is worth noting that we could have just done a direct HTTP call to our iFlow service. However, this would require storing credentials within our program, and we would have to store and have knowledge of the URI. By using a Communication Scenario, we can connect to different endpoints and update credentials without ever having to touch our ABAP logic. This means if we change system environments, or even swap in an entirely new system to host our Integration solution, our code itself does not need to change to accommodate this. For this reason, it is always recommended to use some sort of Communication Arrangement/ Destination Service when building ABAP BTP solutions.
Now that our Scenario is fully configured, we can head back over to Eclipse and complete our extension. We have already completed logic to respond to business events and retrieve database data in our previous blog. Now, we will take that data, construct a tweet, and use our iFlow integration to post this Tweet to Twitter.
Tying it Together in ABAP Code
Like we did previously to retrieve our data from the backend, we will create a new method “send_tweet( )” within our generated Event Mesh code to handle creating and sending our tweet. I will show the code below, then break down what each piece is doing:
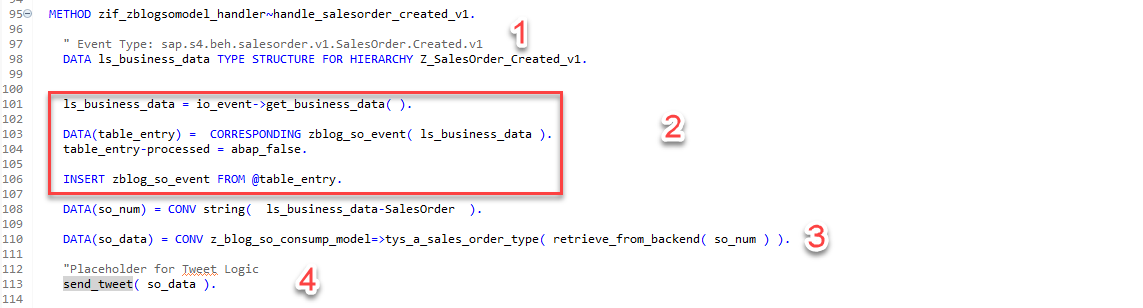
The method pictured here, ZIF_ZBLOGSOMODEL_HANDLER~HANDLE_SALESORDER_CREATED_V1, is triggered any time a sales event is detected from the Event Mesh system. It then does the following:
- Pulls the data from the Event JSON
- Stores the data in our created internal DB, which is good practice since the event cannot be processed from the Event Mesh again
- Uses OData services to connect to the backend SAP system to retrieve more details about the SO
- Sends this data to our newly created send_tweet method.
The send_tweet method, which handles all details of tweeting itself, is constructed as follows:
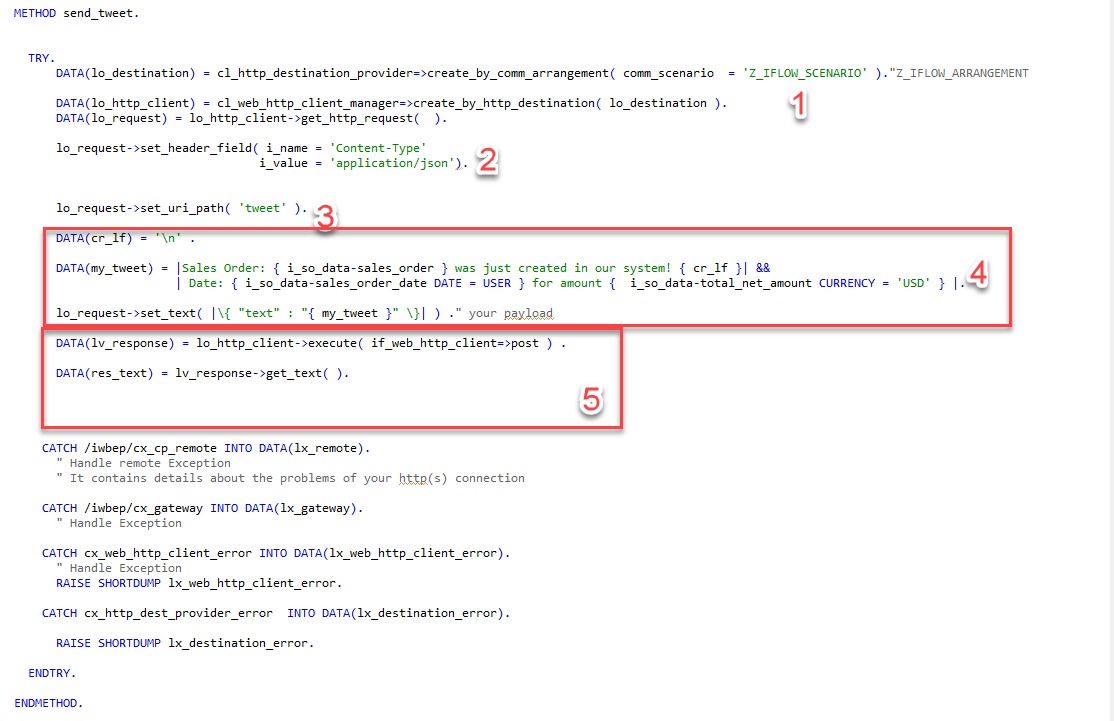
- Uses Communication Arrangement to pull the actual URL and associate any requests being made to the credentials stored.
- Adds the content type of ‘JSON’ to the header.
- Sets our URI path. Prior to this, the URI targeted would be <Integration Suite Location><Additional URI addition from our Outbound Service (“/http/”>. We append “tweet” to specify the full location of our iFlow service.
- Builds the raw text of our Tweet. This used both a text template and the actual date we retrieve in our OData call to the SAP system. It then sets the text of our HTTP Post body/Tweet.
- Performs the HTTP post and retrieves the response.
Testing Our Solution
After completing and activating our code, our BTP Extension is finally complete! Next, we can choose from a variety of ways to test that everything is working.
- Simulate Event Consumption, as we outlined in the previous blog
- We can use the Event Mesh test functionality with a mocked up Event JSON, if we want to ensure all that connection is working correctly.
- We can also head back over to our SAP system and use SWUE, and resend a previously created Sales Order event
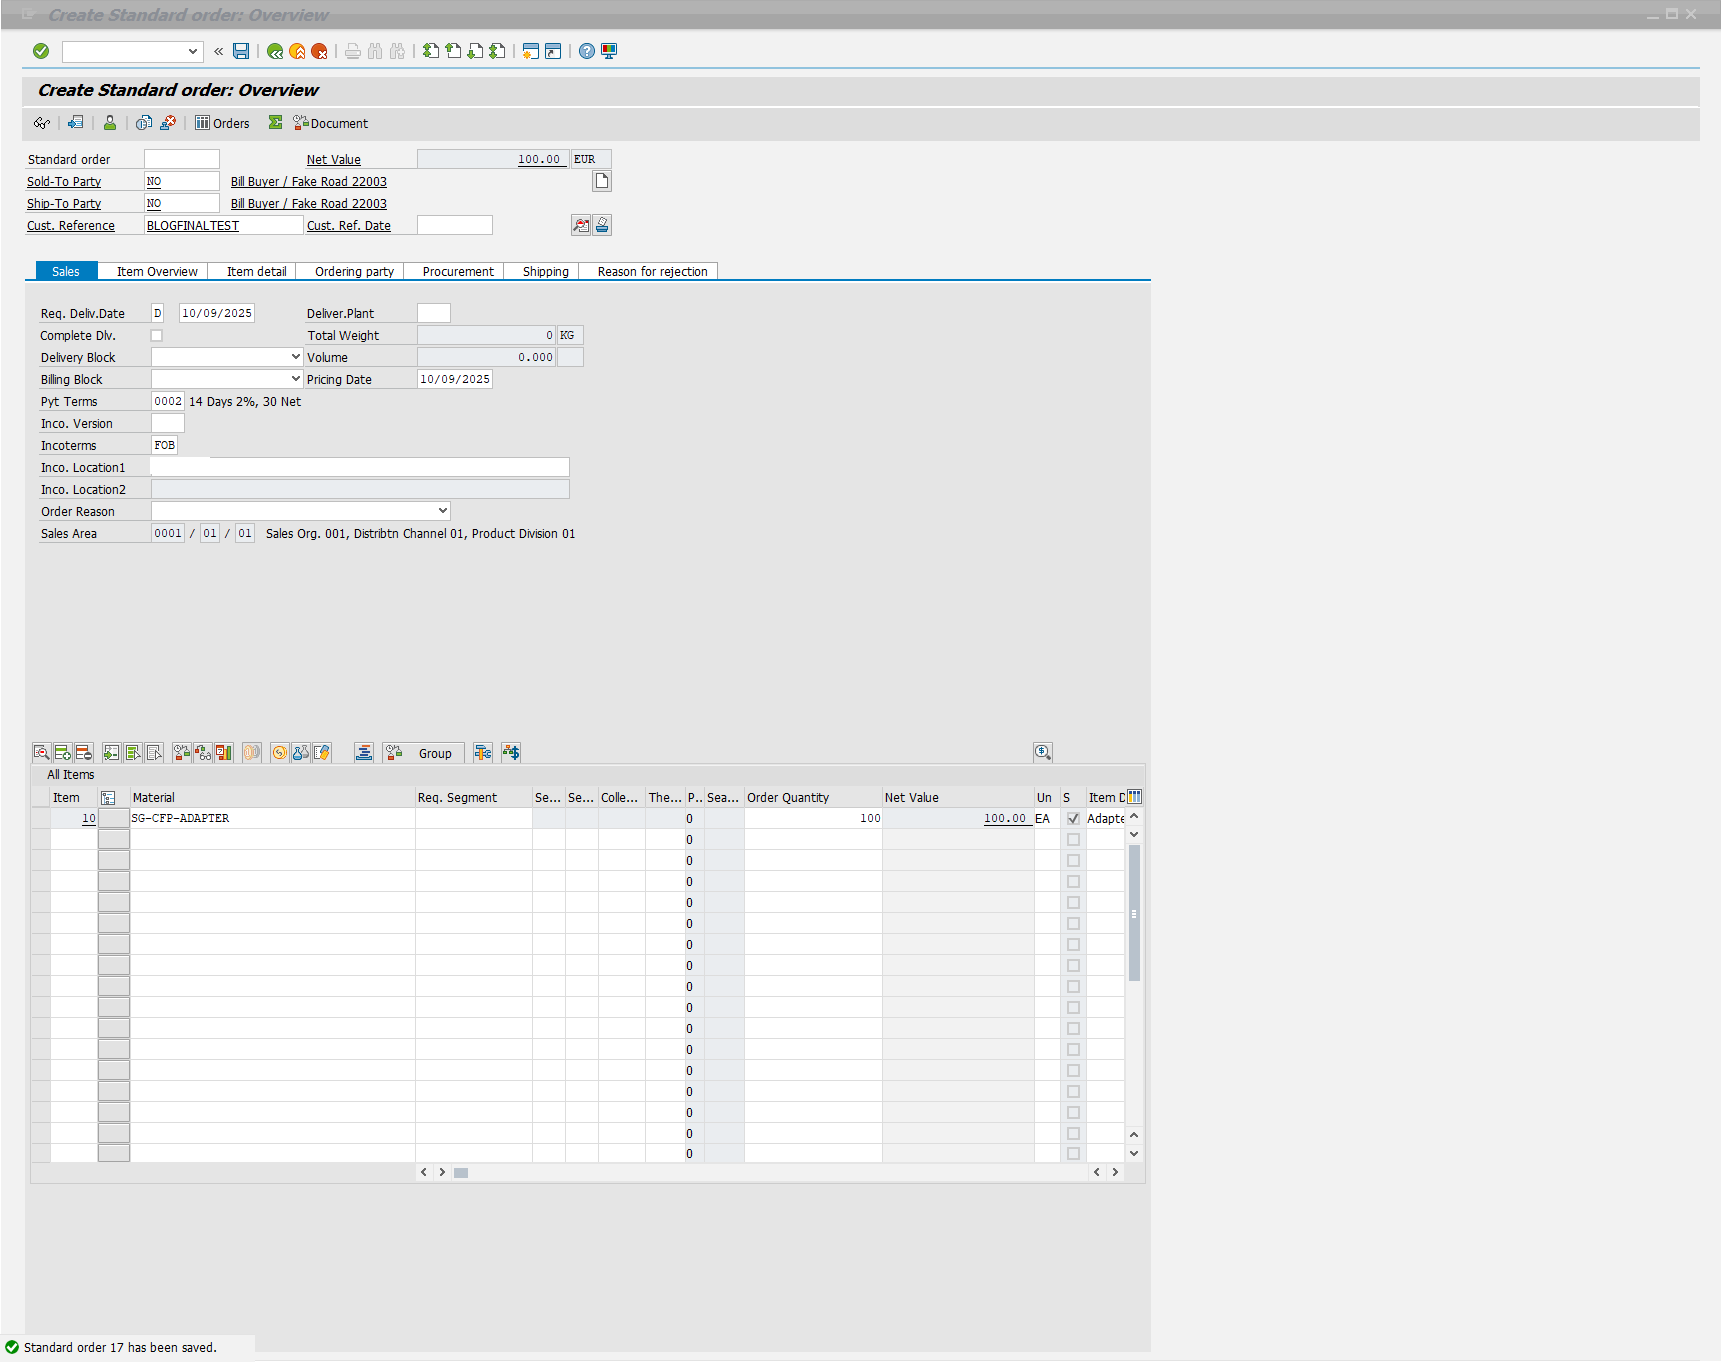
- The final option, which is the most rewarding, is to simply create a new Sales Order in VA01 to ensure everything is working from end-to-end
We will go with option 4 and give that test now:

Summary
Hopefully over the course of this blog series you have gained or reinforced your understanding of what a BTP Extension is, and one potential way we could implement them. As I stated when I started this blog, this is just one of many ways we could have achieved this task. For instance, we could have also full implemented our response within Integration Suite, by tying events to a Groovy Script. Or we could have even implemented the entire solution within the Kyma environment, as the Kyma Environment has its own version of the Event Mesh that could be utilized.
This is why I would like to reiterate that the BTP is the ability to do things, and is not necessarily a rigid framework with a set of sequential steps. No matter the approach you take however, you can achieve a modular, loosely coupled solution that also keeps the core clean of any unnecessary customization.
This completes our blog series. Feel free to reach out to me directly with any questions or issues you run into if attempting to recreate this extension. Thank you for reading!