 Anthony Cecchini is the President of Information Technology Partners (ITP), an SAP consulting company headquartered in Pennsylvania. ITP offers comprehensive planning, resource allocation, implementation, upgrade, and training assistance to companies. Anthony has over 17 years of experience in SAP R/3 business process analysis and SAP systems integration. His areas of expertise include SAP NetWeaver integration; ALE development; RFC, BAPI, IDoc, Dialog, and Web Dynpro development; and customized Workflow development. You can reach him at [email protected].
Integrating Your Own Application-Specific Functions in the ALV Grid Control
When we ended the last blog on the ALV Grid Control I promised that we would cover adding Application Specific functions like push buttons or context menu that provides different functions to the ALV Grid Control. I also said we would learn how we can use Interactive Reporting with the ALV Grid Control. So let’s get started!!
You can add the following GUI elements to an ALV Grid instance of an SAP ALV Class:
– Push buttons and menus in the toolbar
– A context menu that provides different functions, depending on the column and row position.
Adding new GUI elements to an ALV Grid instance is event-controlled and requires experience in ABAP Objects event handling. There is an event for each element type (toolbar push button, toolbar menu, and context menu). In the relevant event handler method, you define the properties of an element (such as its menu options) and assign a function code to each executable function.
Normally, you must register control events both on the application server (for the ABAP Objects run-time system) and on the front-end. Please note Control events that are not registered at the front-end will be blocked by the Controls Technology Framework. This is done to reduce communication overhead between the front-end and back-end. (See my blog on the Control Technology Framework for a better understanding). The ALV Grid Control initially registers most events on the front end in order to simplify event handling.
Lets take a look at a generic template below. You can cut and paste this as a template for your own functions.
TYPE-POOLS: icon, cntb.
class <cl_event_receiver definition.
public section.
class-methods:
handle_toolbar for event toolbar of cl_gui_alv_grid
                   importing sender e_object e_interactive,
handle_menu_button for event menu_button of cl_gui_alv_grid
                   importing sender e_object e_ucomm,
handle_context_menu for event context_menu_request of cl_gui_alv_grid
                   importing sender e_object,
handle_user_command for event user_command of cl_gui_alv_grid
                   importing sender e_ucomm.
endclass.

class lcl_event_receiver implementation.
method handle_toolbar.
<Definition of buttons or menu buttons>
endmethod.
method handle_menu_button.
<Definition of menus for defined menu buttons in 'handle_toolbar'>
endmethod.
method handle_context_menu.
<Definition of context sensitive menu>
endmethod.
method handle_user_command.
<Query application specific function codes>
endmethod.
endclass.
[...]
MODULE PBO OUTPUT.
IF G_CUSTOM_CONTAINER IS INITIAL.
* register events on backend:
    set handler lcl_event_receiver=>handle_toolbar
                lcl_event_receiver=>handle_menu_button
                lcl_event_receiver=>handle_context_menu
                lcl_event_receiver=>handle_user_command
    <call method set_table_for_first_display>
ENDIF.
ENDMODULE.
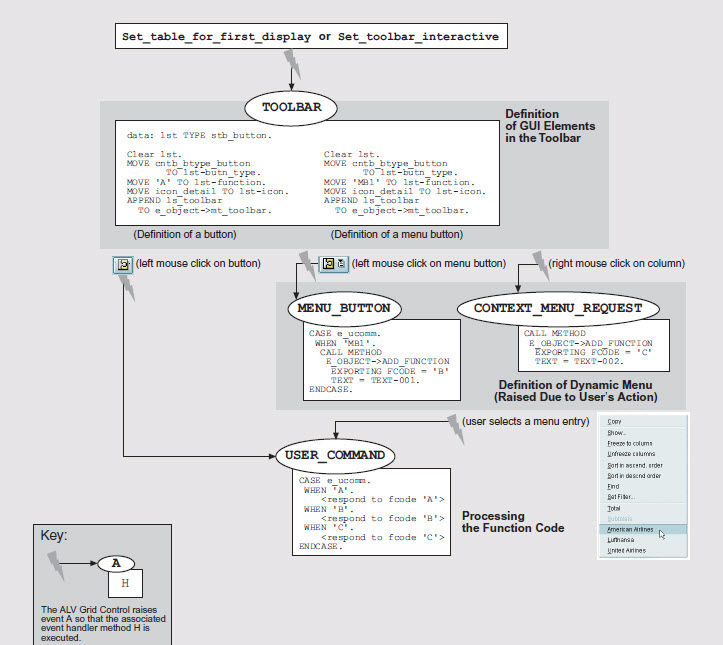
The definable GUI elements are rebuilt each time the corresponding event is triggered. For this purpose, the event has the E_OBJECT parameter that contains a reference to the toolbar, or the context menu, or the toolbar menus. In the event handler method, you can then extend or modify these objects accordingly. All application-specific function codes can then be queried in event USER_COMMAND.
The graphic below illustrates how to define a button and a menu button in the toolbar, and how the standard context menu can be extended for a new option. Please note that menus of the toolbar as well as the context menu are not built until the user invokes them. Whereas elements of the toolbar, on the other hand, are usually defined statically before list display.
Here are some helpful points to remember…
√ When defining elements of the toolbar, the field butn_type determines the type of the GUI element. For possible values, see type pool CNTB.
√ In the template, the event handler methods are declared as static methods, which means that they belong to all instances of the ALV Grid Control in one internal session. When one of these events is raised by one instance, you can identify this instance by using event parameter SENDER, which is passed implicitly with every event.
Now this is great if you need to add your own custom integration. But what if you needed to change the behavior of a standard function delivered? Well I am glad you asked….
Modifying the ALV Grid Control Standard Functions
The standard functions are not designed for specific applications. So there may be times when you want to tailor a generic function — such as sorting by a specific column — for more efficient operation with a specific application. One way to do this is to hide the standard function you want to modify and then add your own implementation. While this approach will certainly work, but there is a more elegant way. Follow these 3 easy steps.
1. Define an event handler method for event BEFORE_USER_COMMAND. This event is triggered after the user has selected a function. This means that the ALV Grid Control passes control to the application before the function is executed. Using event parameter E_UCOMM, you can trap and restrict the function code to just the function you want to modify.
2. Implement your own code for the function within the event handler method. In this context, you can even call methods of the ALV Grid Control if you need too.
3. Reset the function code to ensure that the standard function is no longer executed. You can use code similar to the below:
CALL METHOD <instance of the ALV control>->set_user_command
     exporting I_UCOMM = SPACE.
Let’s end this blog series with a look at how you can incorporate the interactive reporting method we all have fond memories of from our classical reporting days into the ALV grid control.
Interactive Reporting and the ALV Grid Control
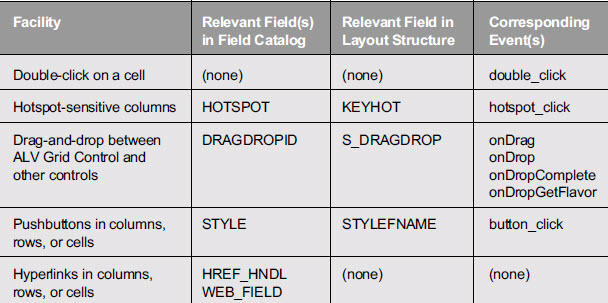
So far our discussions have dealt with functionality provided using classical interface elements, such as push buttons, toolbar menus, and the context menu. There are other interaction facilities can be integrated into an ALV Grid instance. Take a look at the chart below…
As far as the method to integrate these facilities is concerned, the double-click and the hyperlink facility obviously stand out a little bit. To respond to a double-click, you just have to implement an event handler method for event double_click. Hyperlinks do not need any event handling, because the corresponding action is always the same – open a Web browser to show the destination of a link. The links have to be defined in a table of type LVC_T_HYPE, which is passed to the ALV Grid instance using method set_table_for_first_display.
The way to designate a facility to all cells of a single column is controlled by the relevant field in the field catalog. In the case of hotspots and push buttons, you must set this field to “X” or attribute cl_gui_alv_grid=>mc_style_button, respectively. In the case of hyperlinks and drag-and-drop behaviors, a handle must be provided instead. By using this handle, the ALV Grid Control relates the cells of that column to a defined hyperlink or drag-and-drop behavior.
But what if your requirement is for just some cells of a column to be depicted as push buttons — e.g., only those where a condition of the other values of the same row is met? For this purpose, the ALV Grid Control offers a concept that might be complicated at first glance, but as it can be applied for other facilities too, you will surely encounter it more than once when you work frequently with this tool.
The idea is to extend the output table by a field that shall not be visible to the user, but which holds additional information for specific columns of the current row in the table. So lets take a look at the code below…
DATA: BEGIN OF GT_OUTTAB OCCURS 0.
INCLUDE STRUCTURE <Your ABAP Dictionary structure>.
DATA: CT TYPE LVC_T_STYL. "Table to refer to cells of a row
DATA: END OF GT_OUTTAB.
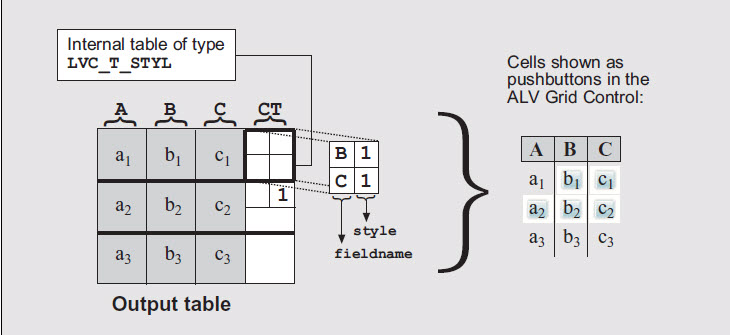
In the specific case of push buttons, the additional field has the type of a table with line type LVC_S_STYL, the so-called cell table. This structure has two fields — style and fieldname — to communicate the row or rows which columns should be displayed as push buttons, follow these steps…
1. To assign this property to all columns, just append one line to the cell table where the field style is set to the button attribute
cl_gui_alv_grid=>mc_style_button.
2. To assign the property to designated columns, append one line in the cell table for each column. Set the field style to the button attribute and determine the column using field fieldname.
Lastly, the ALV Grid Control has to be notified of the meaning of the new field in the output table. The field stylefname of the layout structure is used for this purpose (in our example, you must assign “CT” to this field). As a consequence, the ALV Grid Control marks this field in the field catalog as a technical field that is not displayed.
The diagram below may better explain. It shows an output table where cells b1 and c1 as well as the entire second row are displayed as push buttons through the cell table (to keep the diagram simple, I have assumed that the constant CL_GUI_ALV_GRID=>MC_STYLE_BUTTON has a value “1”).
The ALV Grid Control supplies a large set of generic list functions. These standard baseline functions obviate the need for developers to implement the same code over and over again. As a result, the ALV Grid Control is used throughout the ECC system and list handling is presented in a uniform way to the user. Moreover, the ALV Grid Control offers developers great opportunities to easily adapt this technology to support application-specific requirements.
If you want to read Part 1 of this Blog series on The New ALV Grid Control, click A Guide to the New ALV Grid Control – Part 1
If you want to read Part 2 of this Blog series on The New ALV Grid Control, click A Guide to the New ALV Grid Control – Part 2


