Lets continue our exploration of ABAP OO and using it in SAP workflow. In this post, Bill will show us how to use ABAP Classes to streamline our code for an easier and elegant solution. Here is a little bit about Bill….
 Bill Craig is the president of ASAP Consulting Inc., located in Centennial, Colorado. Bill has over 10 years of experience with SAP ECC systems and integration with SRM. His areas of expertise include SAP Business Workflow and ABAP development. He made his way into programming as a COBOL programmer, switching to SAP when the company he worked for migrated from mainframe programming to SAP. Prior to programming, Bill ran an upholstery shop in Denver, where he managed the workforce, payroll, sales, scheduling and delivery. You can reach him at [email protected]
Using ABAP Object Oriented Coding in your Custom Workflow
In the first part of this blog regarding the use of ABAP OO with SAP Workflow, I explained some of the benefits of using ABAP OO with your custom workflows. In this part I will go into more detail about creating an ABAP OO class and using it within a workflow. This blog does not go into great detail about ABAP OO programming so learning some basics via other blogs or books is helpful.
Creating a class that can be used by workflow is a little more time consuming than creating a copy of a standard SAP Business Object and delegating your new object, but once you have done it a few times, it is rather simple and allows you to utilize ABAP OO.
Using SE24 I created a class ZCLZZ_WF_DEMO_CLASS which I will use in this example to represent a vendor. In order for workflow to be able to use this class you need to add the interface IF_WORKFLOW. The important part of this interface is called the Local Persistent Object Reference, which is used to convert the workflow object reference into the specific instance of the ABAP Class, as well as the reciprocal. This transformation is handled in the two interfaces included with IF_WORKFLOW; BI_PERSISTENT and BI_OBJECT.
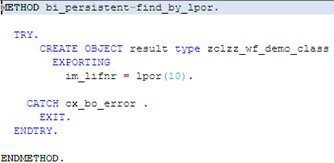
The methods BI_PERSISTENT~FIND_BY_LPOR will convert the current object reference used by workflow into instance of the ABAP Class. The BI_PERSITENT~LPOR method will convert the ABAP instance into the workflow instance. While this communication was handled behind the scenes with BOR objects and workflow, a little bit of coding on your part is now needed.
Once the interface has been added, you need to open each method inherited from IF_WORKFLOW and activate the empty source code. As mentioned previously, the methods FIND_BY_LPOR and LPOR are the ones we need to concentrate on.
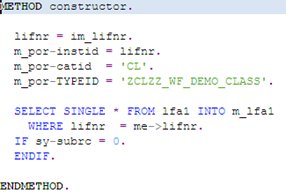
Below is the code that I added to the CONSTRUCTOR, FIND_BY_LPOR and LPOR methods, as well as the Class Attributes required.
Workflow Class Attributes:
Workflow Class Constructor:
Workflow Class – Method FIND_BY_LPOR:
Workflow Class – Method LPOR:
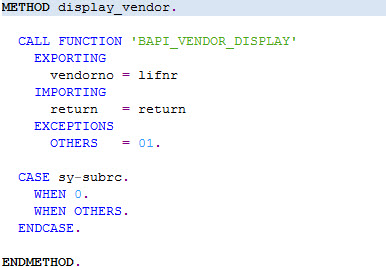
Next, I created a simple method DISPLAY_VENDOR which we can use in a task in our workflow for the user to execute with an exporting parameter of RETURN to match our BAPI call
The next step is to create an event which we will use to start our new workflow, as well as a method to raise the event. On the events tab I created an event START_WF. I did not include any event parameters but it is as simple as clicking on the PARAMETERS button and adding them if you need too.
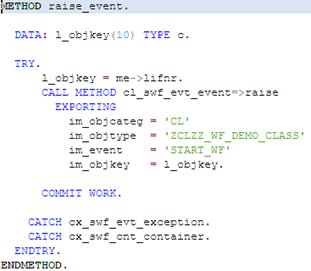
Next I created a method that would raise our new event. The code for this is a little different than the function module calls we are used to using like SWE_EVENT_CREATE or SAP_WAPI_CREATE_EVENT. Instead you use a call to class CL_SWF_EVT_EVENT method RAISE or RAISE_IN_UPDATE_TASK.
If your event has parameters in an event container, call the method GET_EVENT_CONTAINER to return the definition from the event, and/or SET_EVENT_CONTAINER to populate the event container parameters.
OK – We are ready to use our new class in a Workflow!!
I have built a simple workflow that will start from our event defined in our ABAP OO class, as well as call a task using our DISPLAY_VENDOR method.
From the workflow builder screen (Part of Workflow Development Tools) click on the define workflow Triggering Events tab, and rather than selecting BOR Object Type, instead select ABAP Class as the object category. Enter the class and the event, and bindings, binding the event object to a workflow container defined as your class, and finally activate the event.

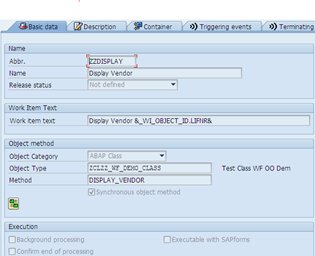
Next, create a task that calls the method within the class. A trick you need to know, is that after you save the task, you need to check the Synchronous object method box
Once you have inserted the task into your workflow and activated it you can test the process from SE24 and executing the method START_WF. If everything was done correctly you will see your workflow was started and by executing the work item in the Workflow INBOX, the vendor is displayed.
This is just a very simple example, but as you can see using ABAP OO opens up a whole new dimension to workflow processes. As I stated in the first part of this blog, most of the workflows that I have done in recent years aren’t designed to deliver the work to the right people at the right time, but rather to automate as many processes as possible in an effort to minimize segregation of duty issues. With ABAP OO it is much easier to incorporate complex code and access standard SAP logic.
In the next part of this blog I will go into more details about work items using ABAP OO, how to create the equivalent of BOR attributes within the class, as well as some tips and tricks that I have learned and continue to learn as I expand my use and knowledge of SAP Workflow using ABAP OO.
If you want to read Part 1 of this blog click ABAP OO in your Custom Workflow – Part 1


