
Jonathan Andre is a lead ABAP developer at IT Partners. Jon is also the President of Andre Technical Consulting LLC located out of Centreville, Virginia. Jon has over 6 years experience with SAP, with a concentration on ECC SD, MM, and IS-OIL modules. Jon’s focus has been in the areas of ABAP OOP and ABAP Web Dynpro. He can be reached at [email protected]
During our previous Slipstream Engine blog, we took a look at Viewports and how in conjunction with Adaptive Flavors, allow a phone users to access SAP table-views
(Such as an Item Overview for a Sales Order) easily on their devices.
Portrait mode phone users who wish to see the table-views simply flip their devices sideways, and the option automatically becomes available. These adaptations, along with out Sales Order Specialist dashboard created in a prior blog in this series, provide a much more mobile friendly experience for our user base, while not requiring as much as a single line of ABAP coding.
In this, the final blog of this series, we will discuss how to integrate our SAP Screen Personas dashboard and VA01 Flavor directly into the Fiori Launchpad.
SAP Screen Personas Fiori Launchpad Integration 
How can we integrate SAP Personas and Fiori? We will use Fiori tiles to integrate our SAP Screen Personas and Flavors directly into the Fiori launchpad. This allows our users to access both new applications (i.e. SAP Fiori Apps) as well as the modernized classic transactions (Screen Personas Flavors) all from one unified entry point, the Fiori Launchpad.
To begin, we navigate to the Fiori Designer web address. The Designer is part of the SAP Fiori architecture and allows us to create Catalogs, Groups, and new tiles for the content we would like to appear on the Fiori Launchpad. The Fiori Designer can be found at the following web address (replacing the host and port with the appropriate values for your server)
http://<host>:<port>/sap/bc/ui5_ui5/sap/arsrvc_upb_admn/main.html
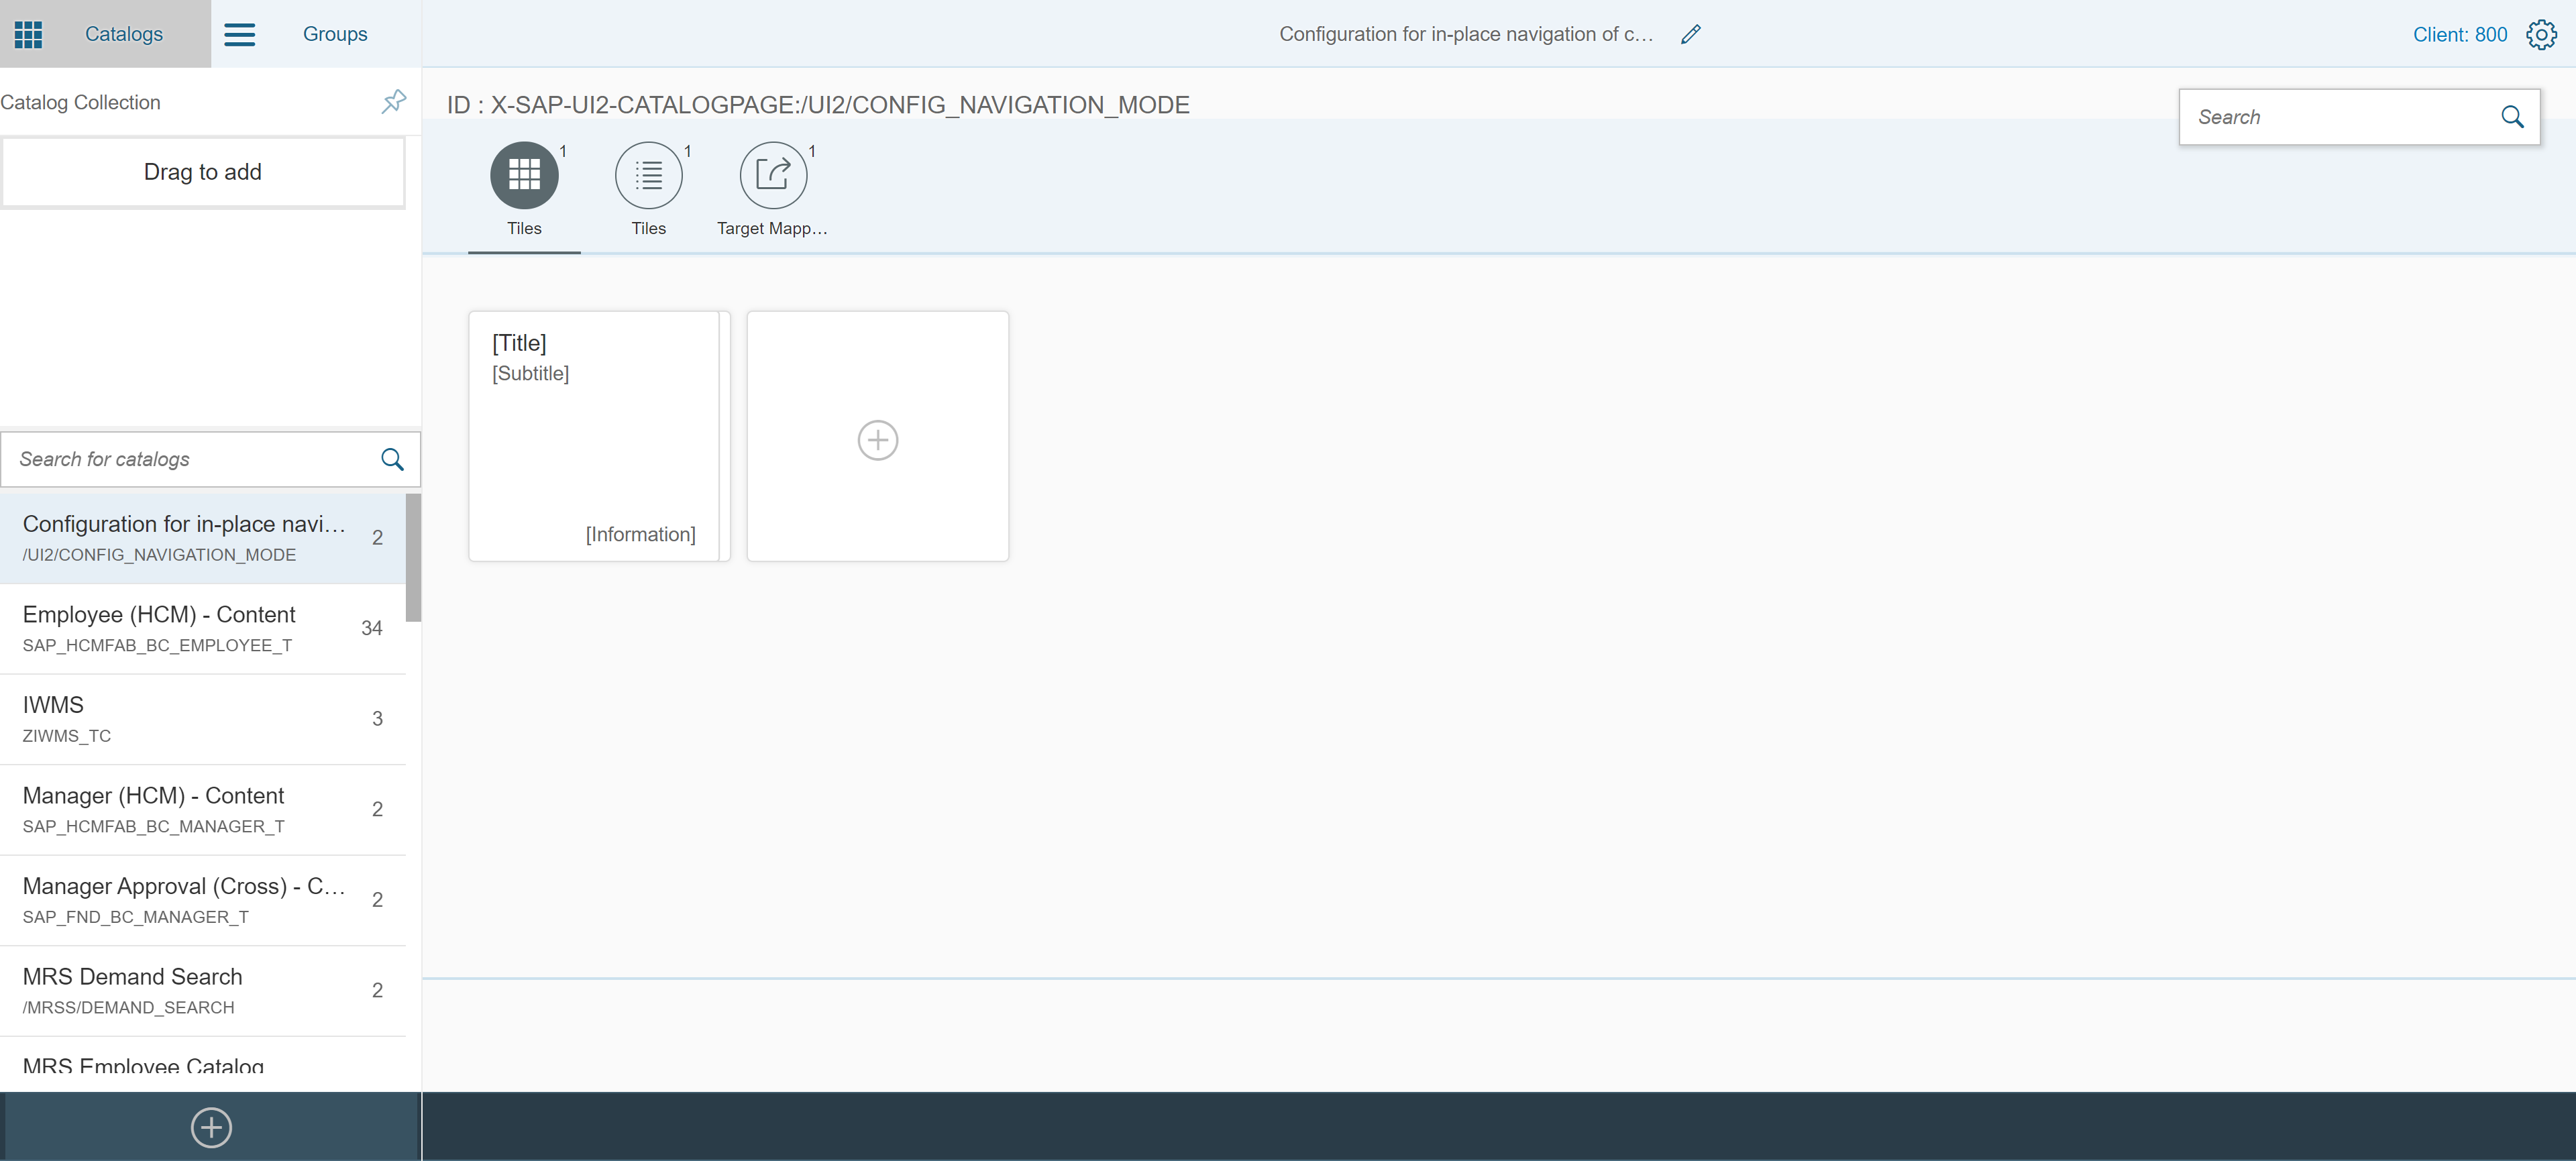
Creating a Fiori Catalog
Once on this screen, our first step will be to create a new Catalog that will house our SAP Screen Personas tiles. We can do this by making sure we are on the “Catalog” tab, clicking the “+” button in the bottom left corner, and entering a name and ID for our new catalog (see below)

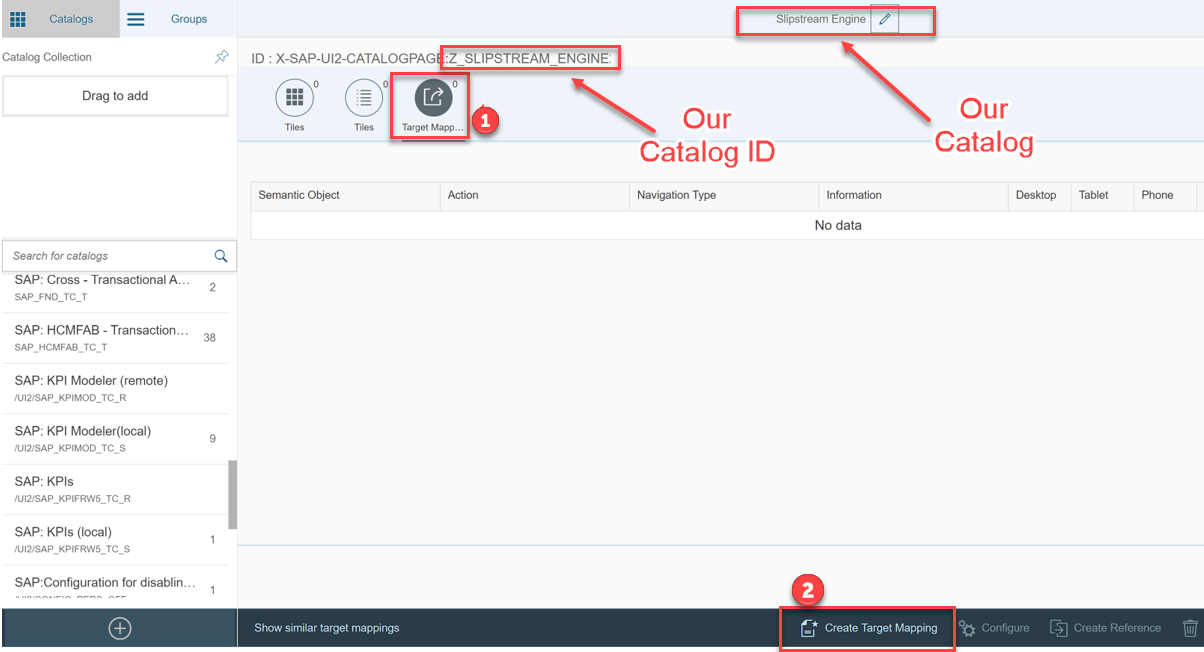
OK, we have created our catalog. The next step is to create a target mapping. A target mapping serves as template of sorts that can reused to create our SAP Screen Personas tiles. To do this, we click the “Target Mapping” icon, then select “Create Target Mapping at the bottom of the screen. (see below)
The next screen presented will be the target mapping screen and should be populated as shown…
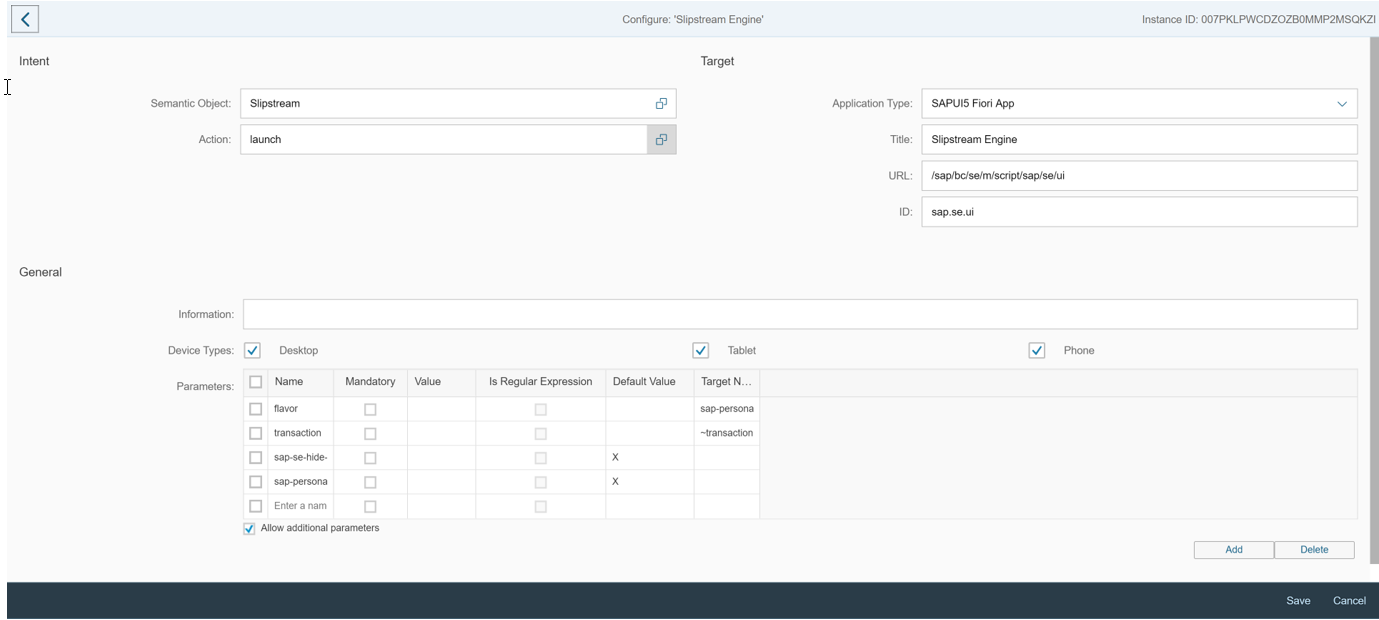
Some notes on some of the values and parameters chosen:
- Semantic Object does not necessarily have to be “Slipstream”, but it is good practice to have it be descriptive of the mappings purpose
- The action selected here is freeform text, but it should be noted that it is case sensitive when creating the tile in the next step
- Within the “Target” section, only the Title is free form. All over fields should be entered as displayed
- Of the parameters listed, only the “flavor” and the “transaction” parameters are truly mandatory. These specify the transaction the flavor enhances, along with the flavor ID to be called
- sap-se-hide is used to hide some Slipstream Engine features too better integrate the flavor with the Fiori UI. This is optional
- The sap-persona parameter is used to hide the “P” on the status bar, also to better integrate with Fiori. This is also optional
Creating a Fiori Tile
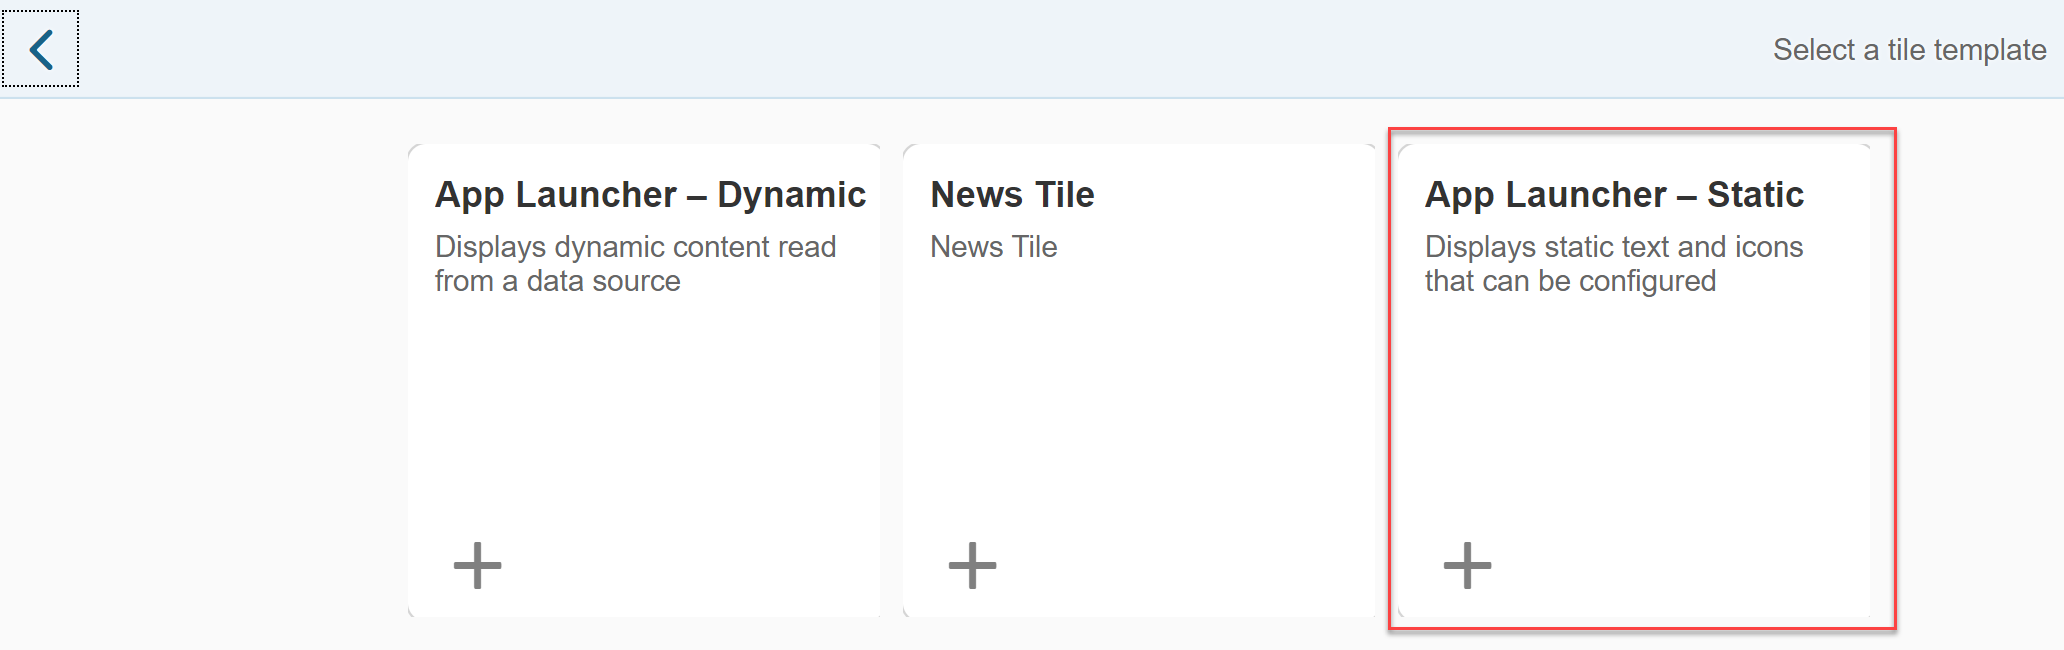
Once the values have been entered, we can hit save and return to the previous screen of our catalog manager. Next, we will create that actual tile that users will see within their Fiori Launchpad. To do this, we click the “Tiles” icon and then click “Create Tile” (see below)
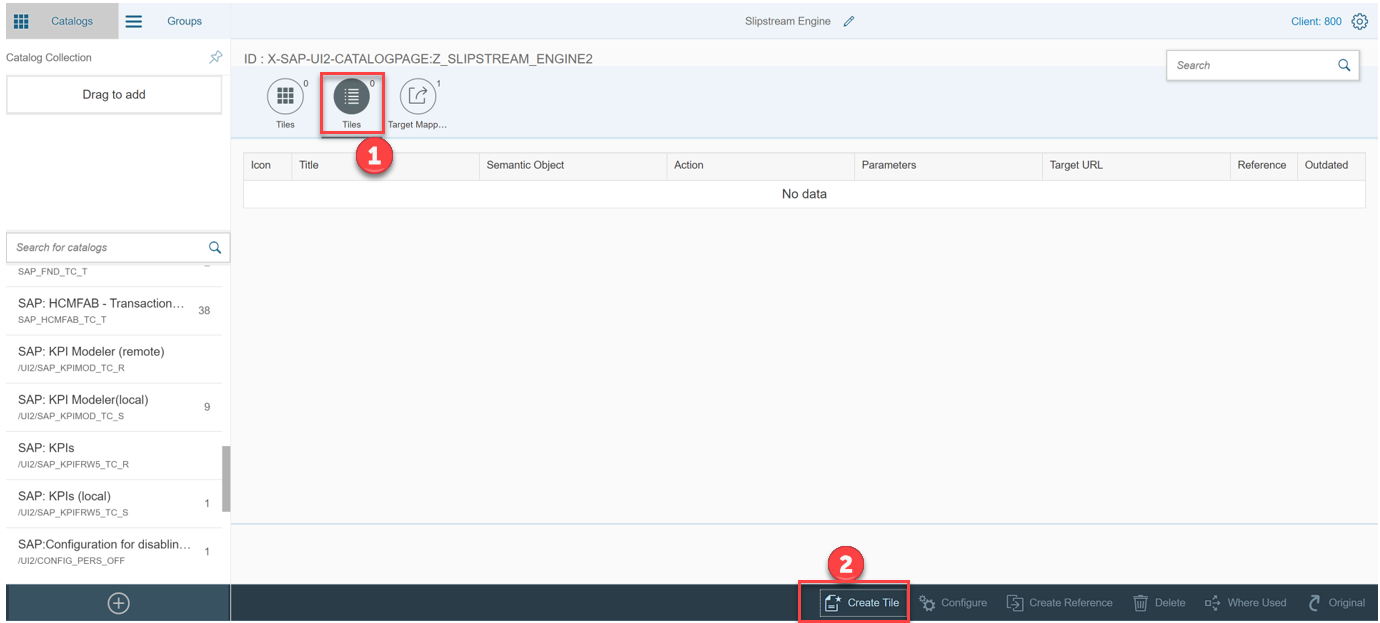
Then, we select the “App Launcher – Static” option…
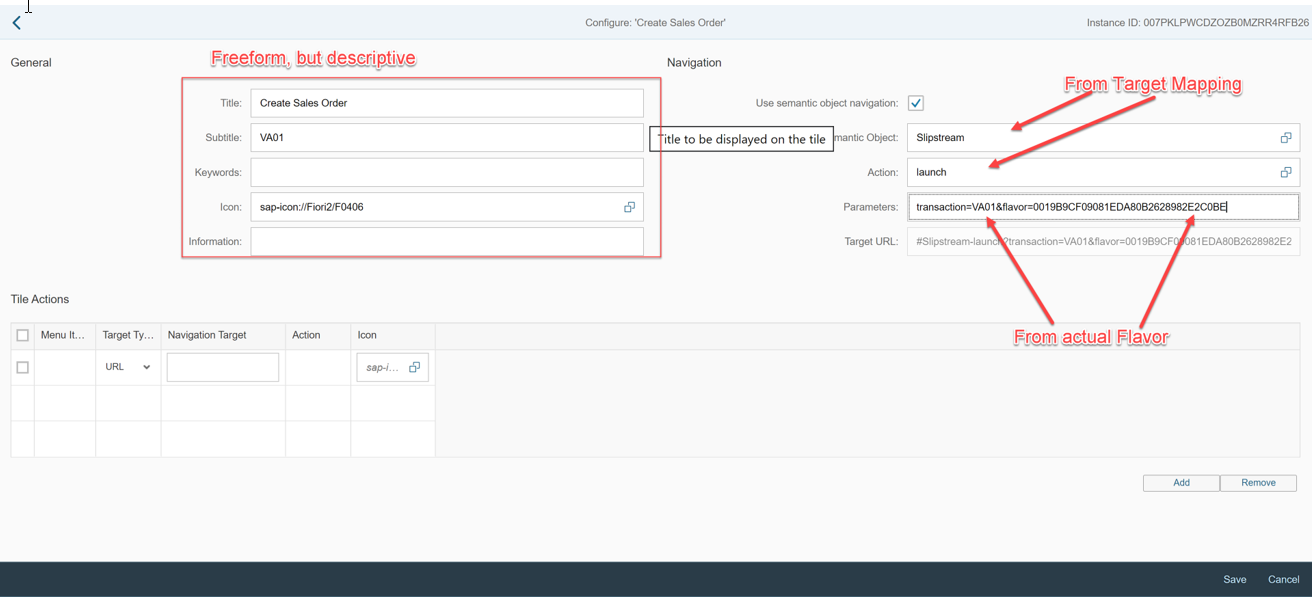
Clicking this option takes us to the tile configuration page. The “General” section of the configuration screen is free text. Here we can just choose something descriptive, so users know the purpose of the tile they are clicking. We can choose a title, subtitle, and an icon from the set of icons SAP provides.
The Navigation section is the true driver of the tile functionality and requires more care when entering the values. Before populating this section, we will need to navigate to our created Flavor and record the “Flavor ID”. The “Flavor ID” can be found by opening the Flavor, opening the Personas drop-down and clicking the “Information” button on the particular flavor. To allow the most flexibility, its best to use the Flavor ID of the parent Flavor (see below)

With our Flavor ID recorded, we can now very carefully populate the fields required to make our tile operational. The Semantic Object and Action fields should match the values we entered in the Target Mapping step. Keep in mind that these are case sensitive!
The parameters need to specify both the transaction code and the flavor ID we wish to access. This should be entered one after the other with no spaces as shown in the screenshot. Obviously, the values entered will vary based on the actual transaction your flavor was created for and the flavor ID generated for your own flavor…
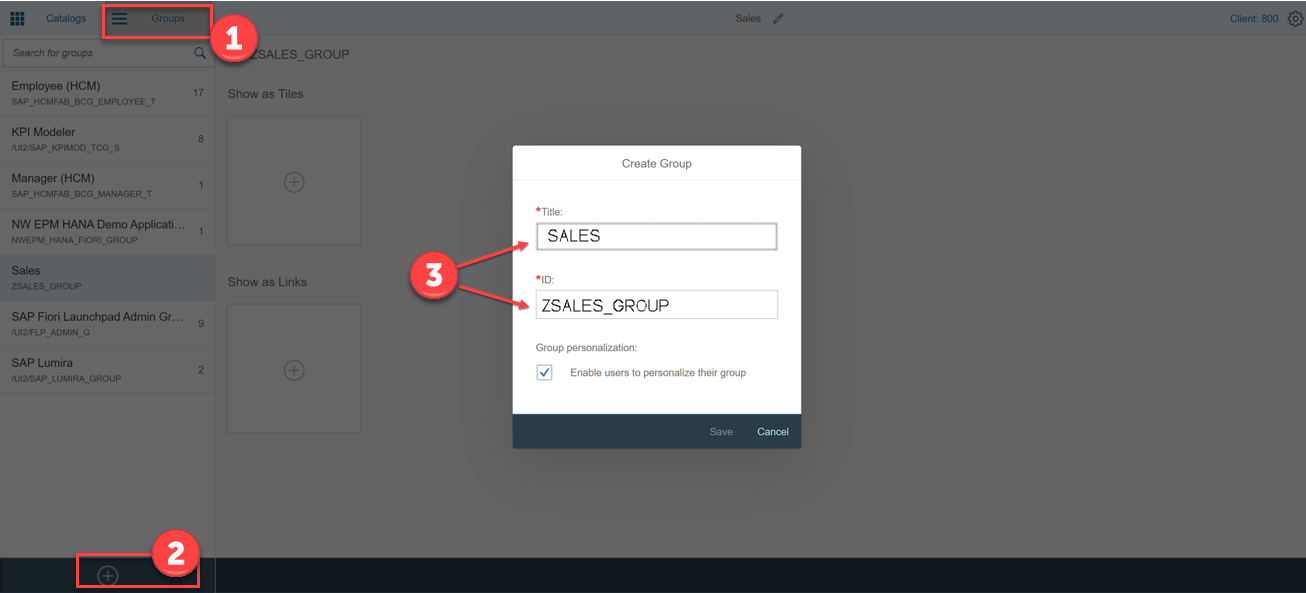
Once this step is completed, we can hit save and proceed to the next step, assigning the tile to a group. To create a group, we click the “Group” tab up top and then click the “+” icon in the bottom left of the screen. If you or your target user is already assigned an existing group, you can skip this step and go straight to the tile assignment
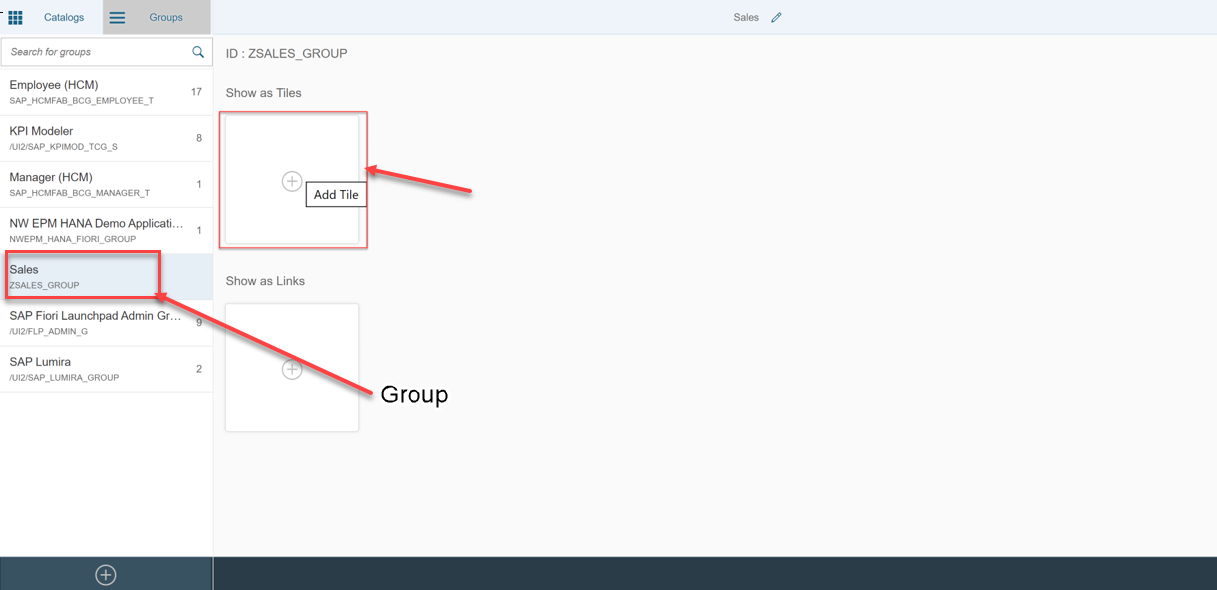
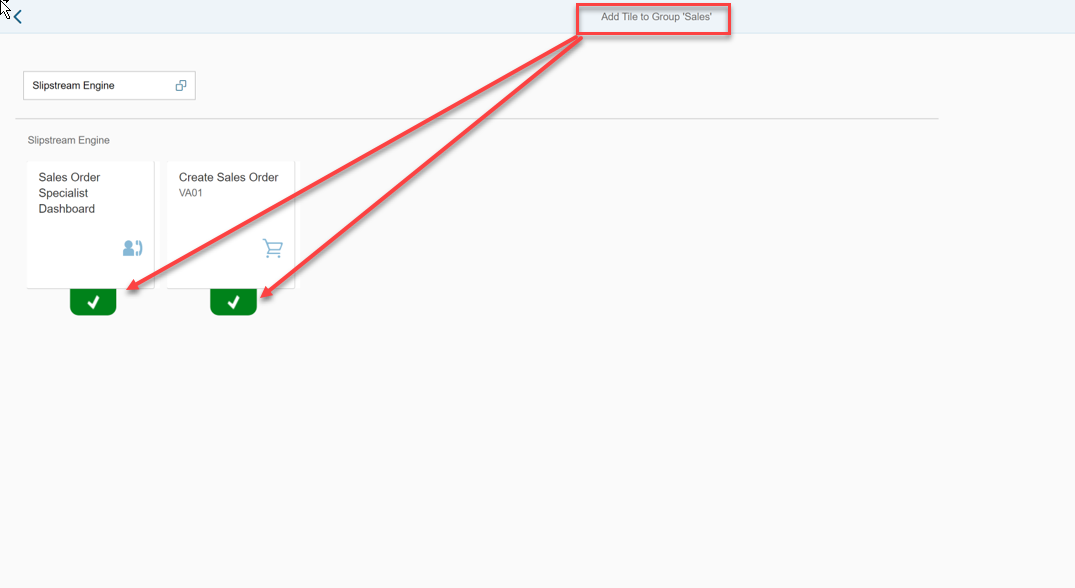
With the group created, the only remaining step is to assign our newly created tile to the group. To do that, we select our group in the left menu pane and click the blank “+” tile…
On the next screen, we can hit the search box to select a catalog from which we can select an existing tile. Scrolling through this list of catalogs, we should see the catalog we created in the very first step of this Blog…

After selecting the catalog, all available tiles for this catalog will be displayed. To add a particular tile, we click the “+” icon below the tile. This will turn the icon to a green check, confirming it has been added:
Once the tiles have been added to the group, the next step would be to add authorizations for the catalog/group in transaction PFCG. This is beyond the scope of this blog, but click here for a 10 minute video introducing the transaction.
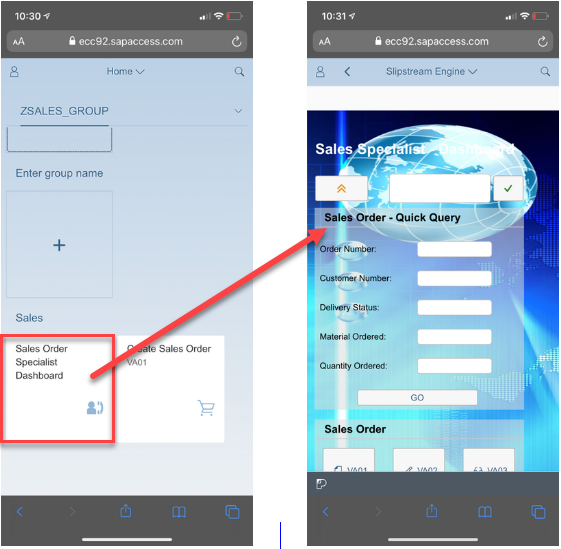
With all the required steps completed, we can navigate to our Fiori Launchpad and check that it is operating as desired.
The Fiori Launchpad, if configured correctly, is accessible through the following URL:
http://<host>:<port>/sap/bc/ui5_ui5/ui2/ushell/shells/abap/FioriLaunchpad.html
The resulting Fiori launchpad is now fully functional and allows us to access our Personas flavors through mobile or desktop device…
Summary
In this 4 part study on Mobilizing the SAP UX we discovered …. The Slipstream Engine by itself offers a multitude of improvements when rendering for mobile devices straight out of the box and is without question better than the alternative of using WebGUI alone. However, even with these improvements, there are some shortcomings that simply cannot be improved without some level of screen alterations.
As we saw with the mobile version of VA02, there is simply too much information to display on a single screen, even after hiding many of the menu options. Input fields, tabs, and especially tables are simply too large to display without either providing a “windowed” view of only part of the screen, or introducing “pinch-and-zoom”, which we discussed the shortcomings of. This is, of course, where Screen Personas Adaptive Flavors come into play and thru the use of the Flavor designer customize fields based on the device, user role, or user preferences. Adaptive Flavors implemented in conjunction with the use of the Slipstream engine provide users a modernized UI while requiring a minimal level of effort. Adaptive Flavors allow one initial Flavor to be reused to customize different classes of mobile devices, providing a user a UI experience that seems personalized and efficient for their needs. Even rotation from portrait and landscape modes are made easy using the Flavor designer and editor, as long as you have prior knowledge about screen dimensions. SAP, foreseeing the importance of knowing this information, has done well to make this information accessible for Flavor designers in the Device Preview as well.
Next, we have learned that a Viewport in SAP Screen Personas is a view on part of your Adaptive Flavor. You can use Viewports to break complex screens into multiple parts, which improves the performance and loading time of the flavor, and gives the end user a modernized UX while requiring a minimal level of effort.
Finally in this last post, we walked through the steps required to integrate our newly created Personas Flavors directly into the Fiori Launchpad