
Jonathan Andre is a lead ABAP developer at IT Partners. Jon is also the President of Andre Technical Consulting LLC located out of Centreville, Virginia. Jon has over 6 years experience with SAP, with a concentration on ECC SD, MM, and IS-OIL modules. Jon’s focus has been in the areas of ABAP OOP and ABAP Web Dynpro. He can be reached at [email protected]
During our previous Slipstream Engine blog, we began looking at how we might adjust an existing flavor to better suite a mobile device using Adaptive Flavors. This allowed us to create a child version of our existing flavor that felt as if they were built specifically designed for our devices, while keeping the parent flavor’s functionality.
What our last blog did not cover, however, is what to do in situations where the existing screen is even more complicated than our parent Sales Order Specialist flavor. In particular, it didn’t address how to adjust more complicated screens like Sales Order create or a Purchase Order create screen to a point where a mobile user does not feel overwhelmed.
This blog will discuss how to we can achieve further simplification of screens with a divide and conquer approach using SAP Screen Personas Viewports.
An Introduction to SAP Screen Personas ViewPorts 
In our first Personas blog SAP Screen Personas : Get Up and Running Quickly Using These Steps, we used SAP Screen Personas to simplify the VA01 transaction to the simplest possible form in order to complete a Sales Order. We did this by hiding input fields, merging tabs, and we were left with a final screen that looked like this…
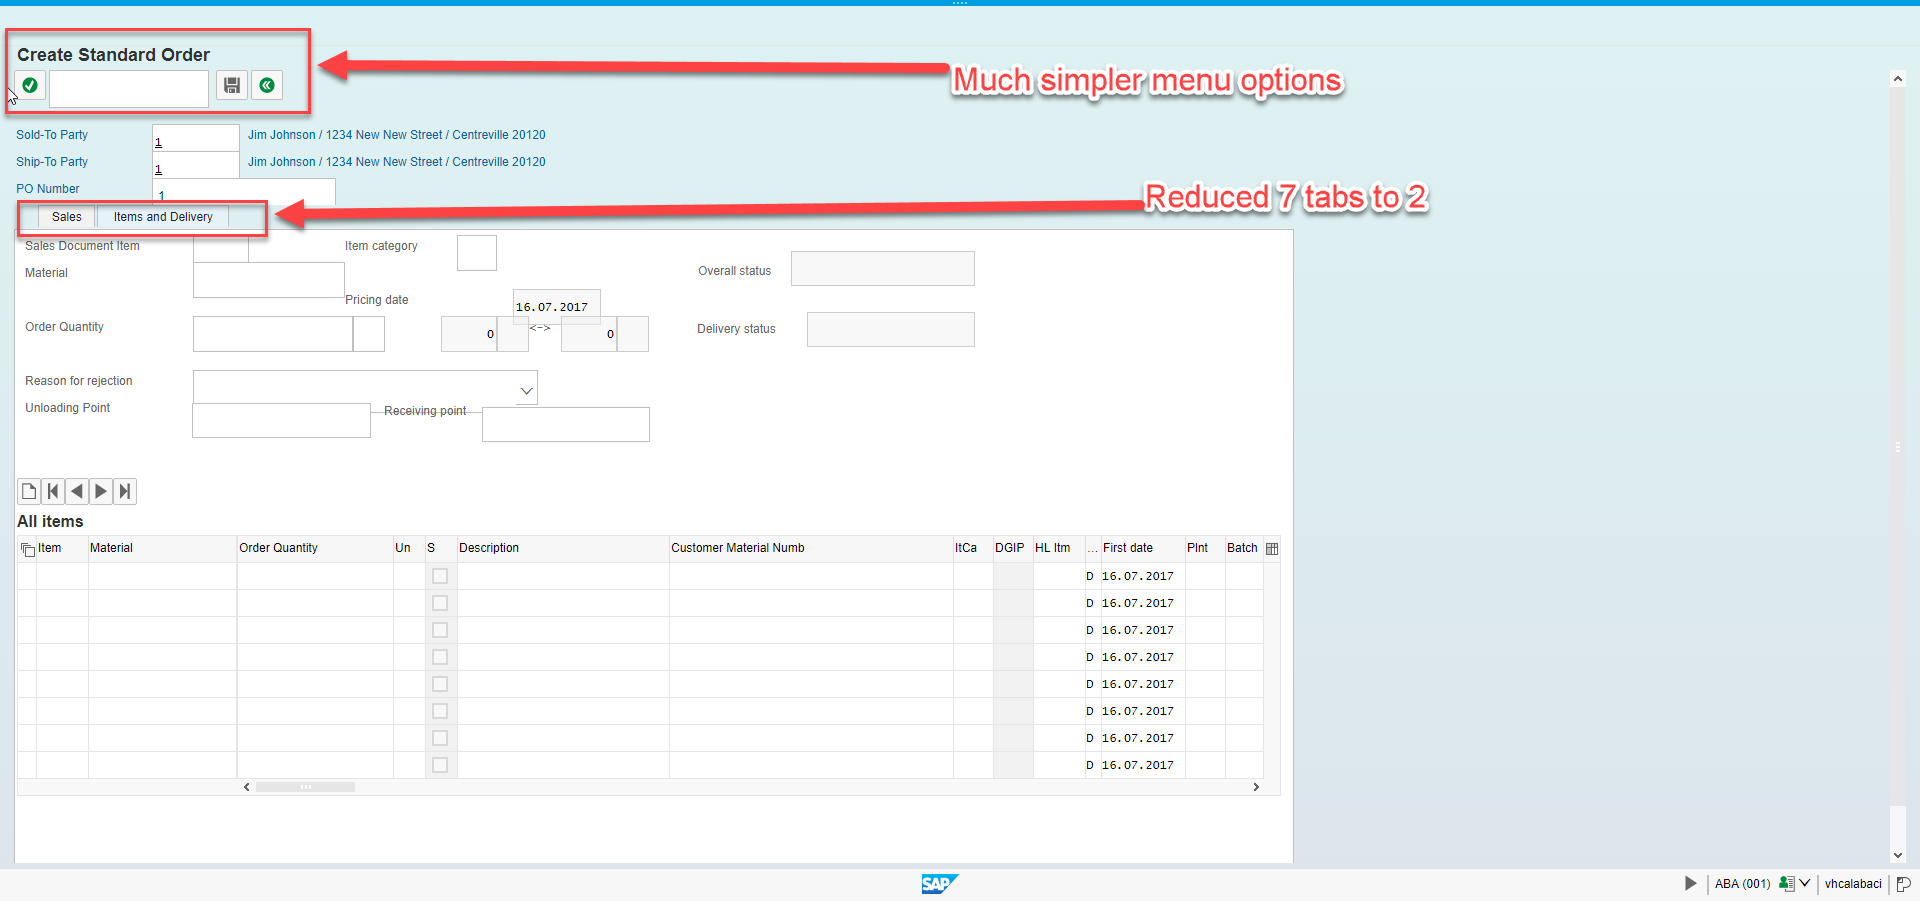
While this arrangement of fields and tabs works fine for a desktop application, its is clearly too large and cluttered to be used effectively on a phone. But, as we’ve stated before, we have already reduced this field to its simplest form possible to allow us to successfully create a sales order. How can we further simplify this field when every field and table column is required?
The answer to that is Viewports.
Creating SAP Screen Persona Viewports
To illustrate how a Viewport would be created, lets start off by recreating our VA01 Flavor we created in the original Screen Personas blog series (with a few minor tweaks), this time created for the Slipstream engine:
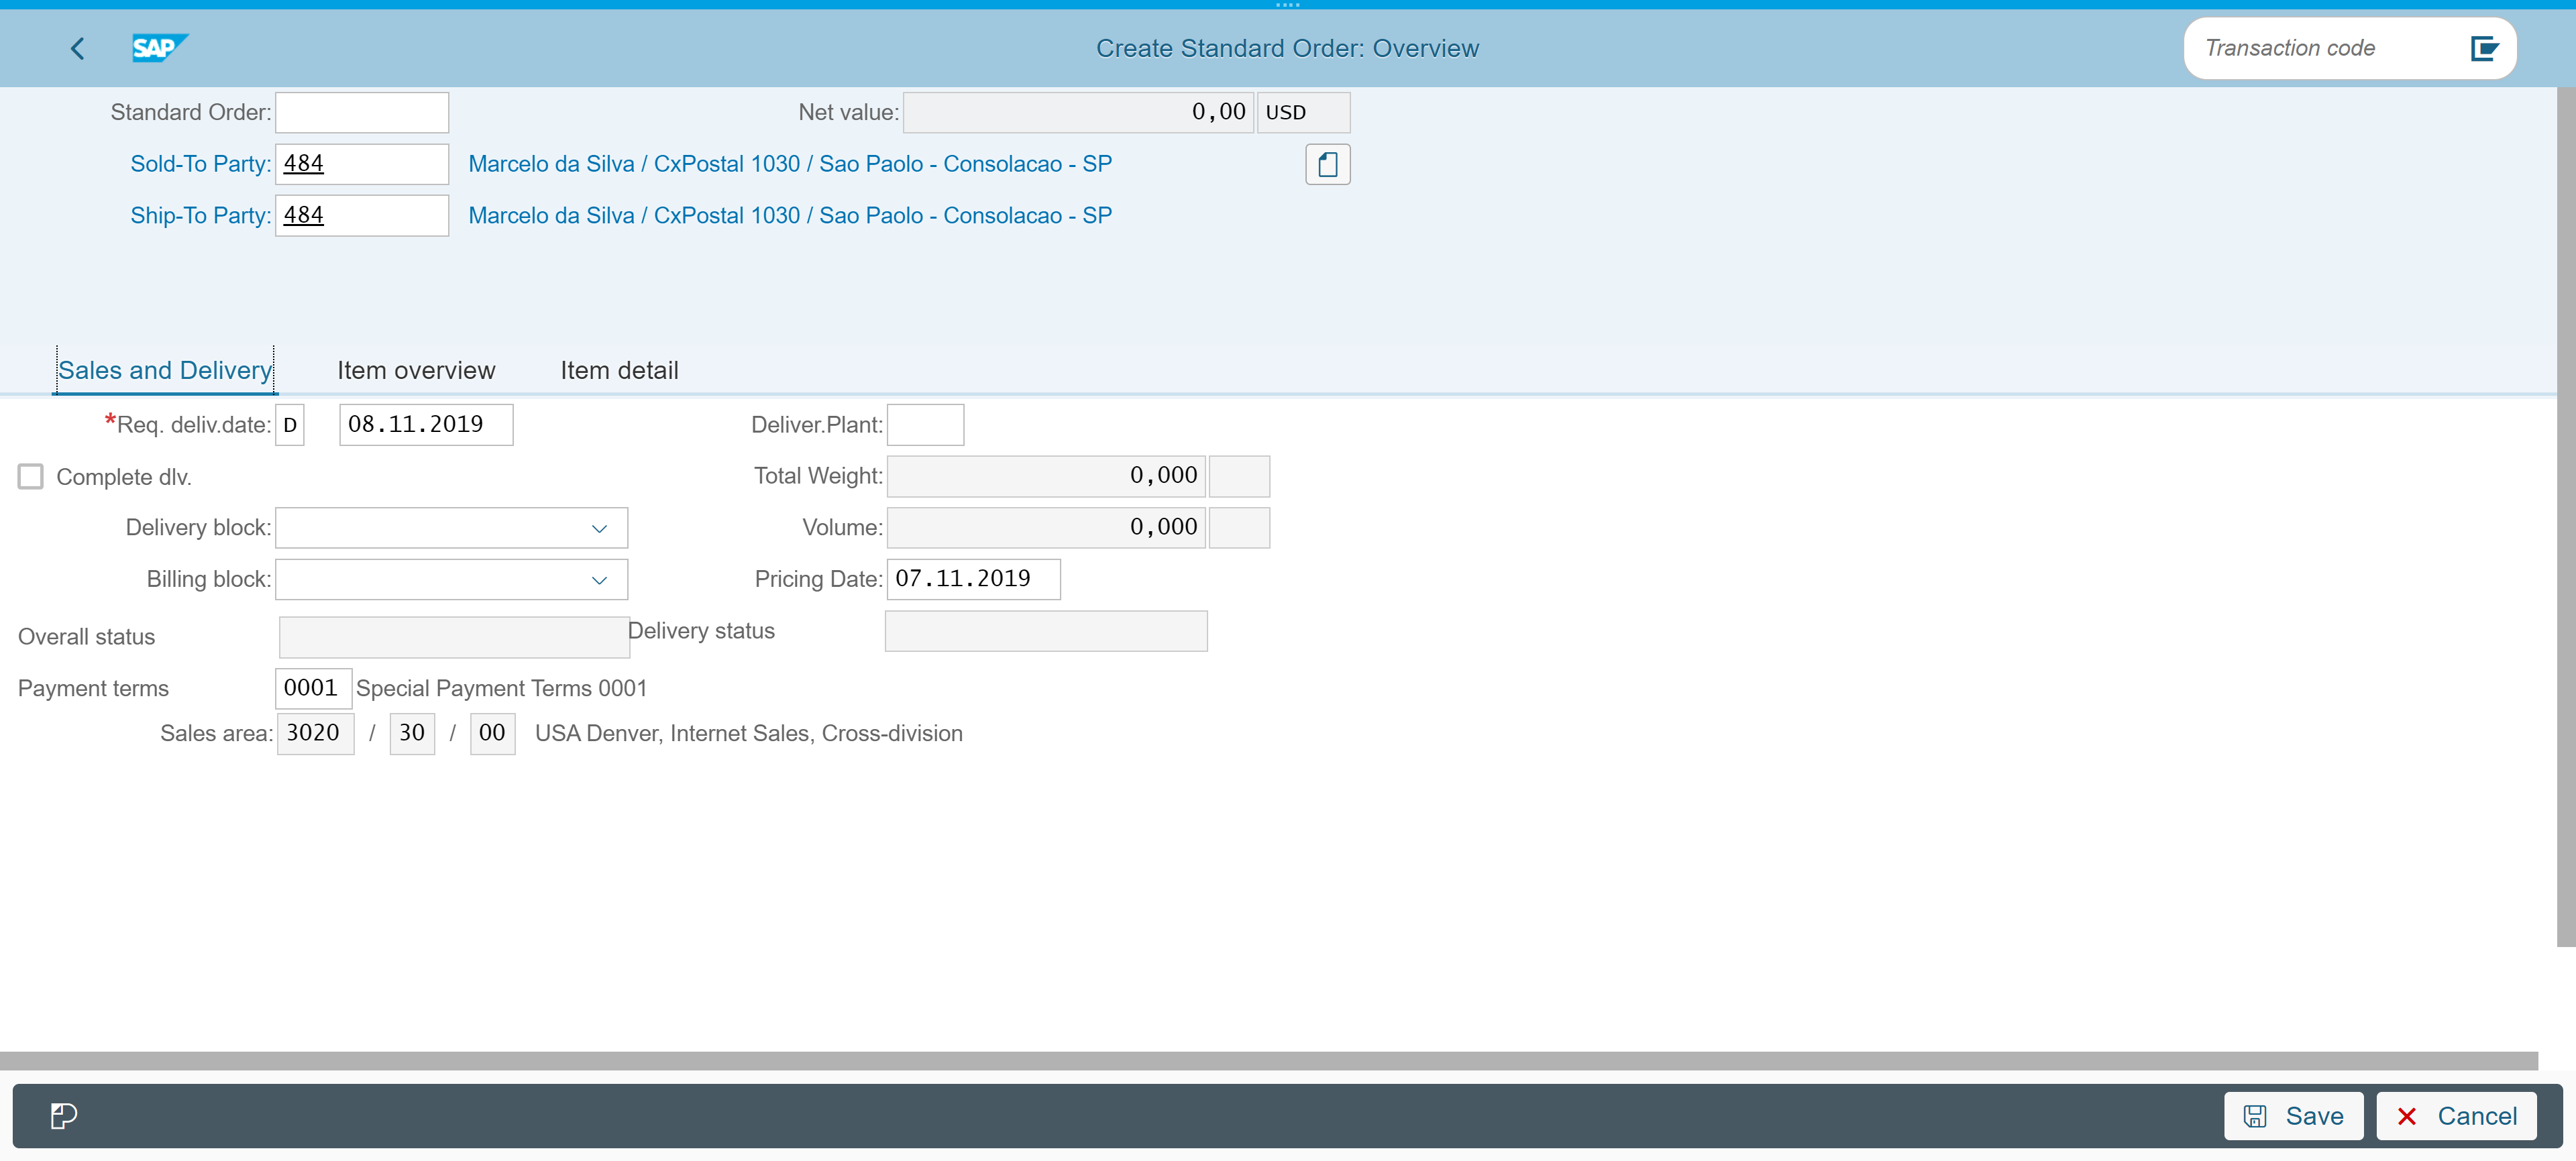
Just like in the first SAP Screen Personas blog, we have taken original screen and reduced it to only the fields that our hypothetical user base requires to use the transaction.
This is looks great for desktop, but we run into some issues when we display this for mobile. The screen is too wide to display without horizontal scrolling…
As has been done last month’s blog, Going Mobile with SAP Screen Personas – Part 2, we could potentially address this just by creating an Adaptive Flavor for mobile devices. However, this does not address the issue of the screen being too crowded for a mobile device. Instead of just creating an Adaptive Flavor, we will create a Viewport. To do this, we open our Parent Flavor, navigate to the “Design” tab, and click the “Viewports” option (note that Viewports can only be created for the Parent Flavor. These can later be edited for separately for each Adaptive Flavor).

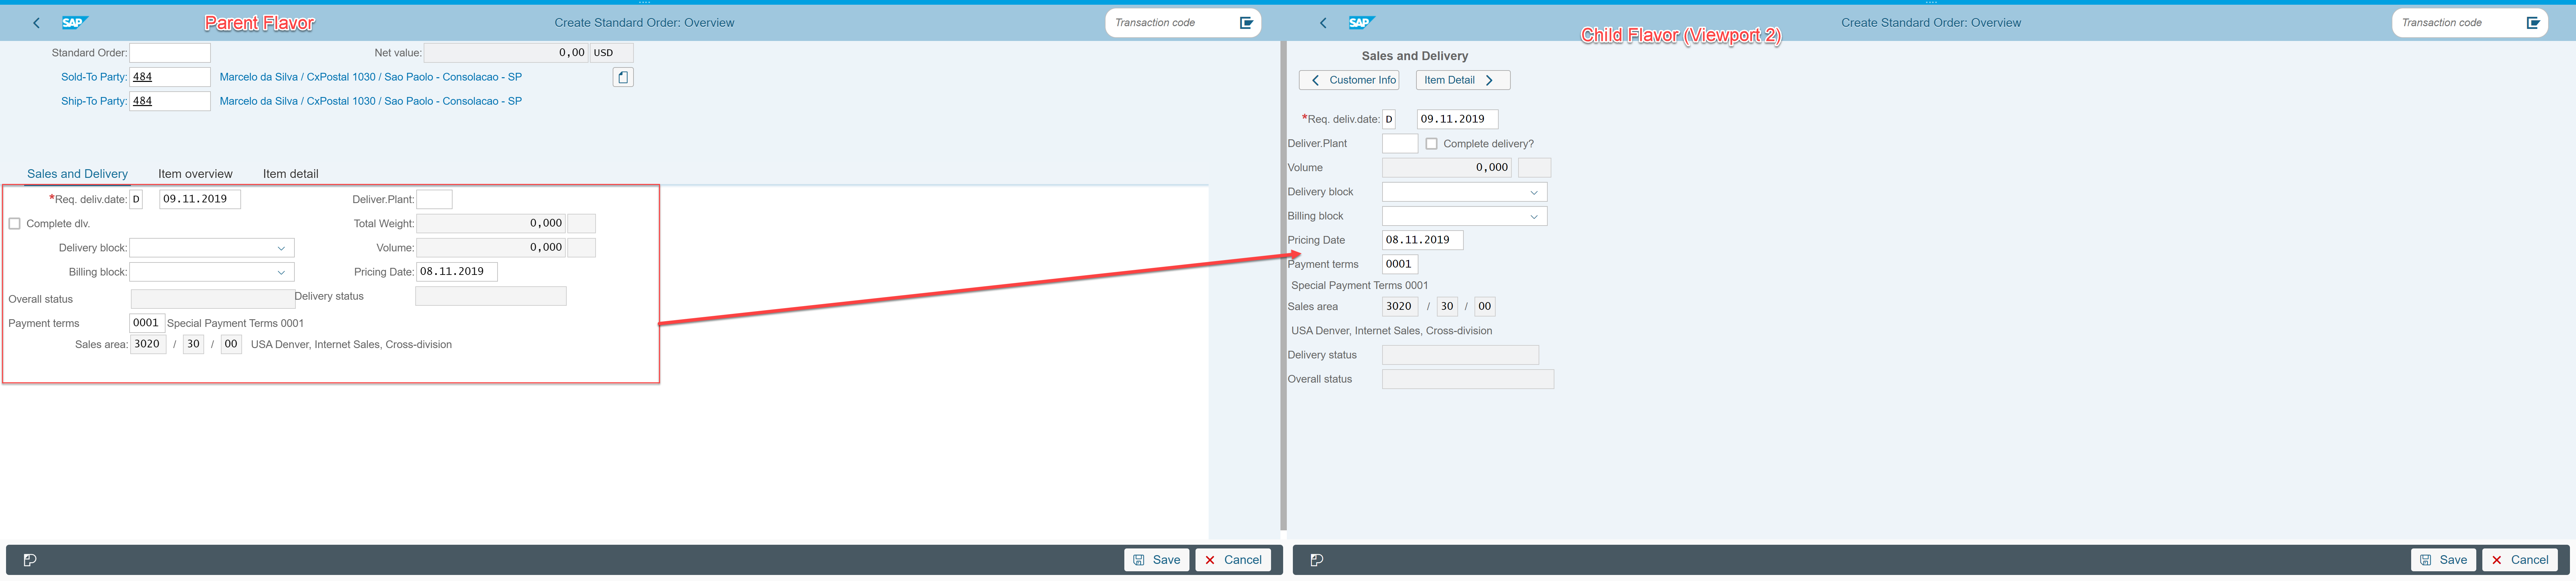
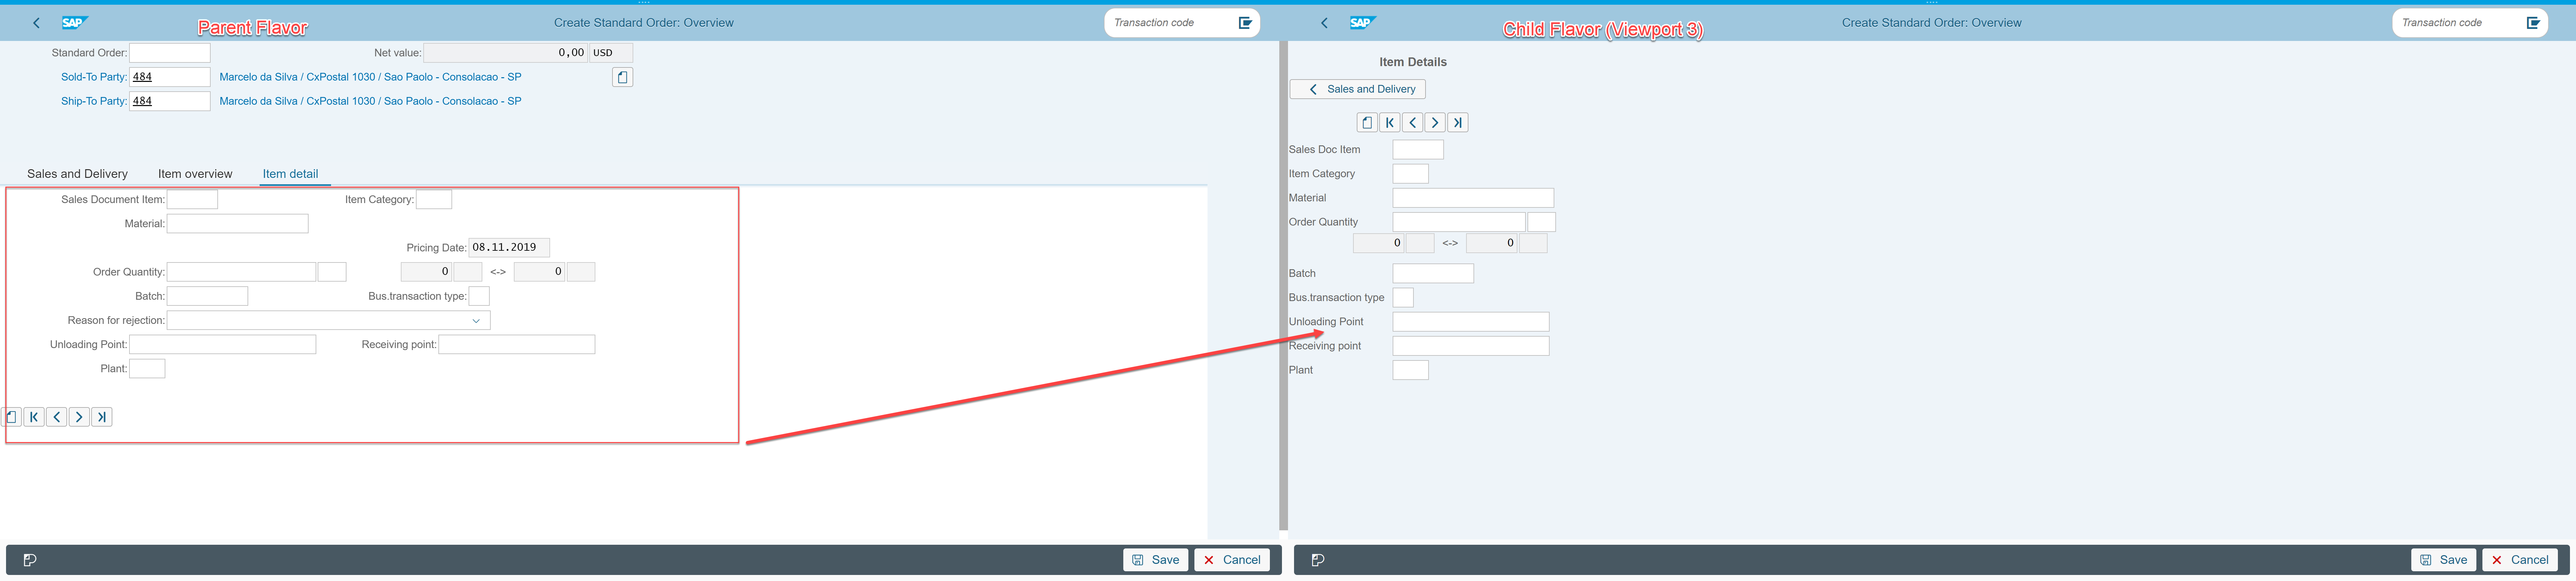
This opens up a pop-up window which allows us to create and specify the names of our Viewports. Note the order in which the viewpors are created. This is important because, in the simplest of applications, we will be navigating sequentially through the screens. We will create a Viewport for the customer header data and each individual tab present in out Parent Flavor (Sales and Delivery, Item Detail, and Item Overview)

Note that, even though we would like to create four different screens for mobile, we only create three additional Viewports. That is because we will be using the Default screen as the first screen the four screen sequence. Users will always be presented with the default screen when navigating to the transaction, and we will need to use scripting buttons to navigate to subsequent Viewports (more on this later).
Using Viewports and Adaptive Flavors Together
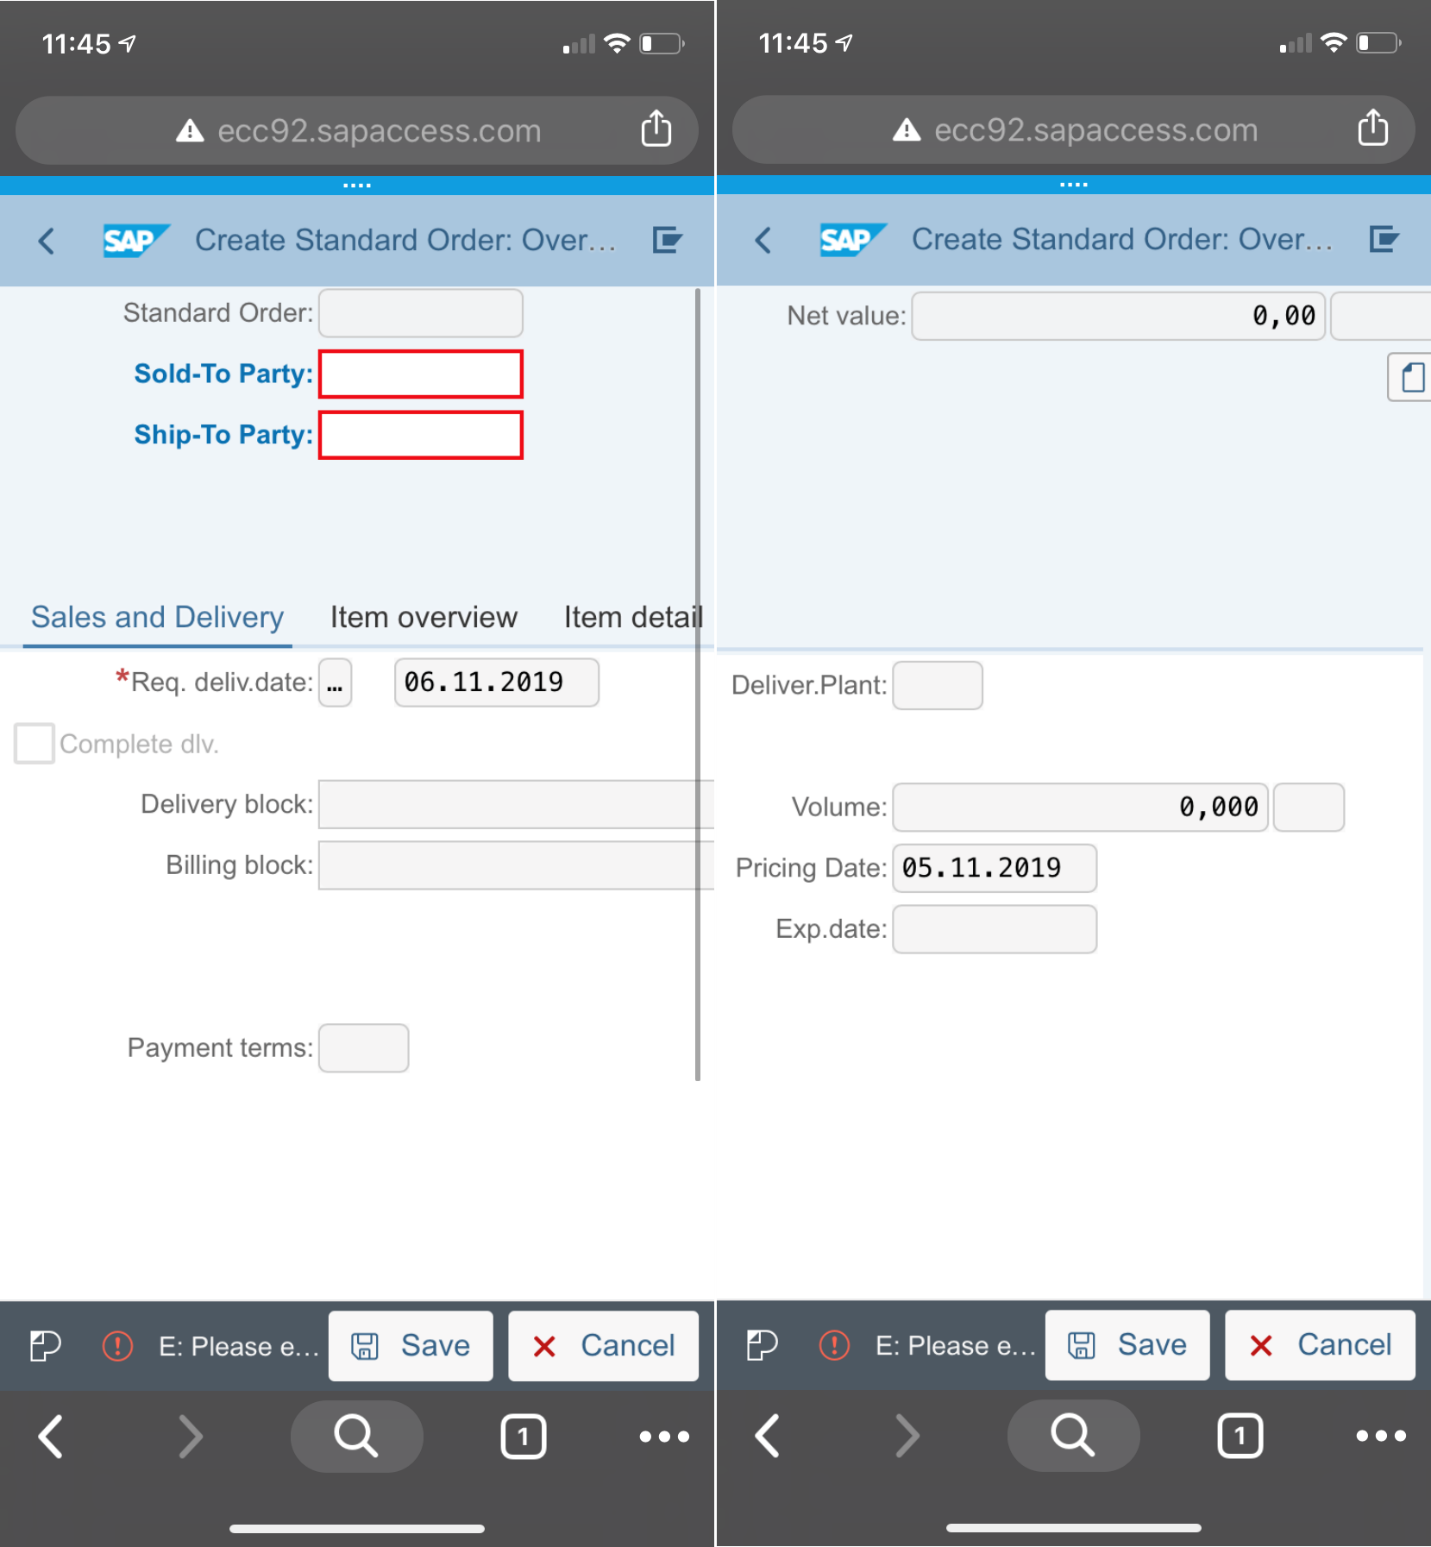
After creating the Viewports in the Parent Flavor, we can create and open our Adaptive Flavor in edit mode. For this first Adaptive Flavor, we will be creating a display area with portrait mode smart phones in mind. So we will set the minimum display width of the flavor to 360, as we did in our last blog.
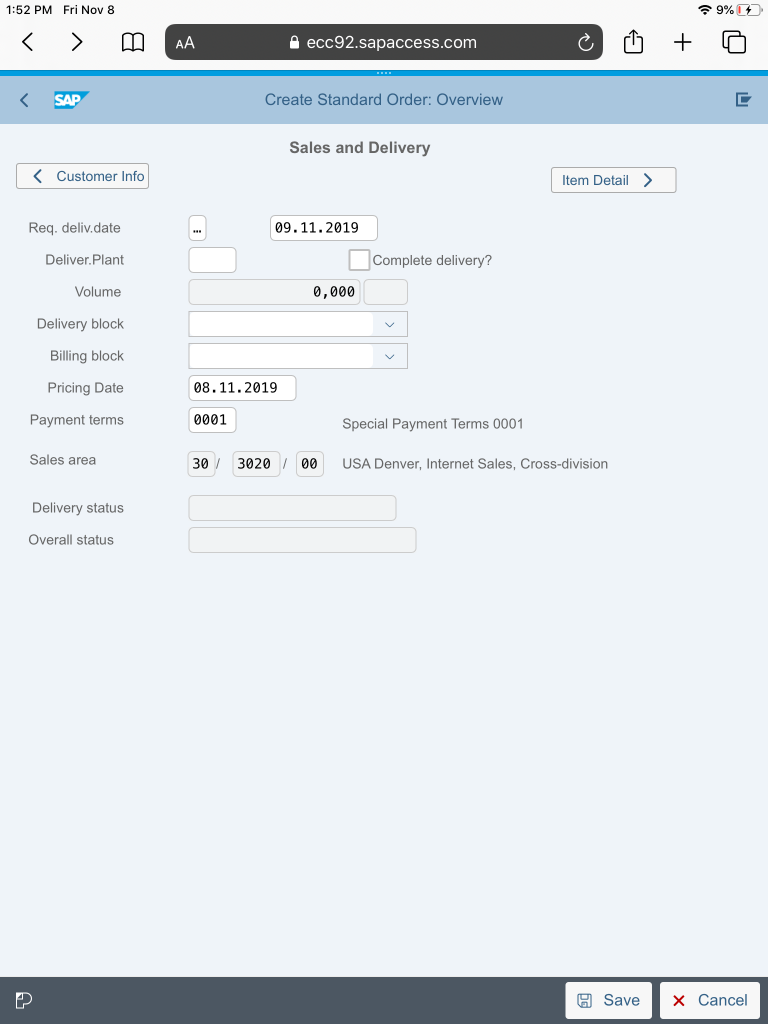
For this first default screen, our goal is to remove all fields until we are only left with the input fields required to populate the Customer Information. Population of these fields is required to select other tabs, so we need to ensure users perform this step first before proceeding with inputting other fields.
After moving fields we require, and hiding other field as we would when creating any Flavor, we end up with the layout below…
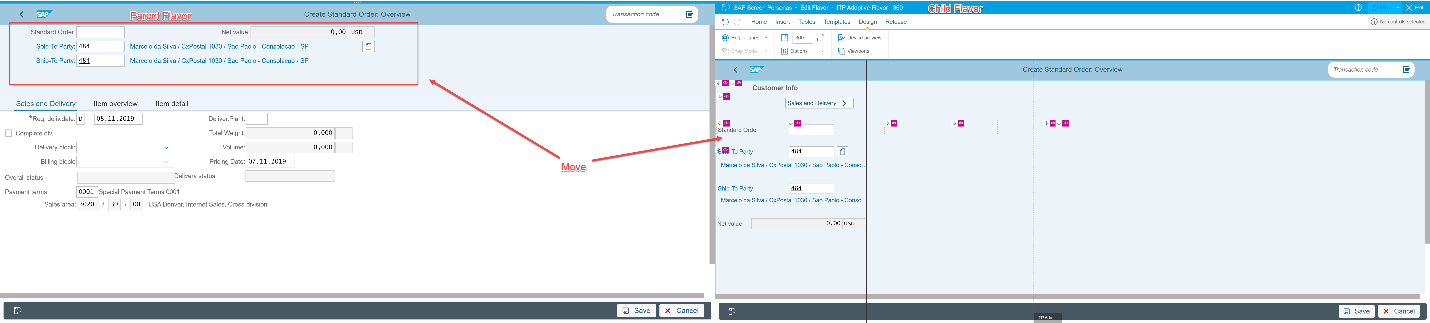
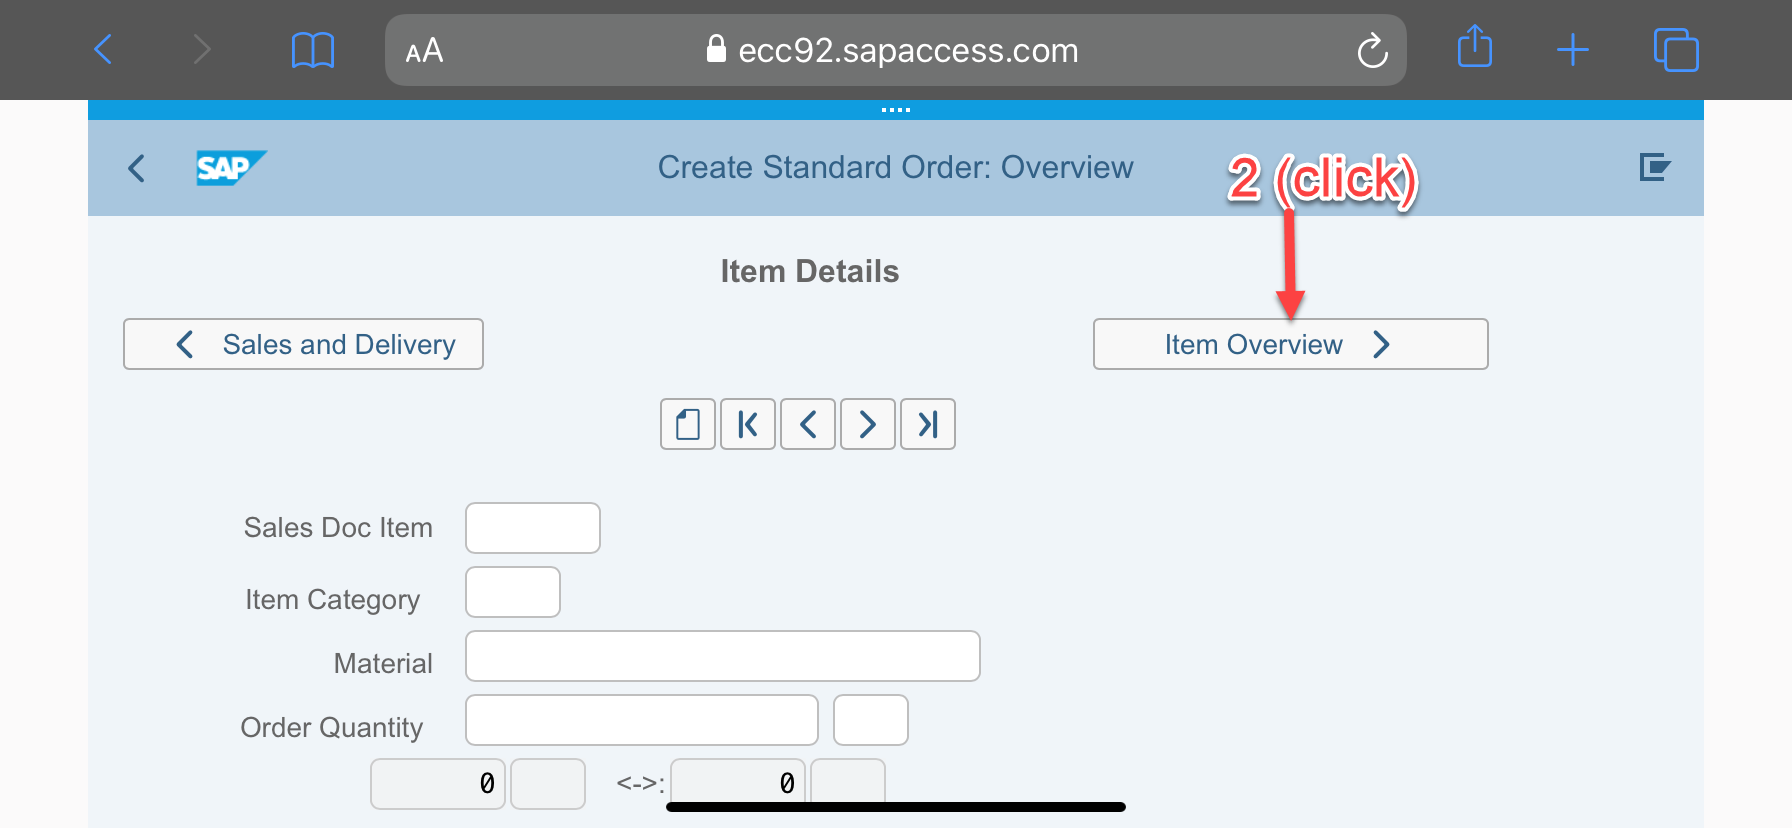
In addition to moving the fields, we also need to create a way for users to navigate to the next Viewport. To do this, we create a new scripting button. This button will be displayed on the Child Flavor, but is not necessary or displayed on the parent flavor. For our button label, we pick the name “Sales and Delivery” to indicate the target Viewport clicking this button will take us to. Then, we need to assign the appropriate script to the button that will execute the Viewport navigation.

Fortunately, SAP automatically generates these scripts when the Viewports are created. As a result, assigning the correct script is as easy as clicking script button, navigating to the “Insert” menu option, and assigning the “onViewPortNext” script to the “onClick” event for the button
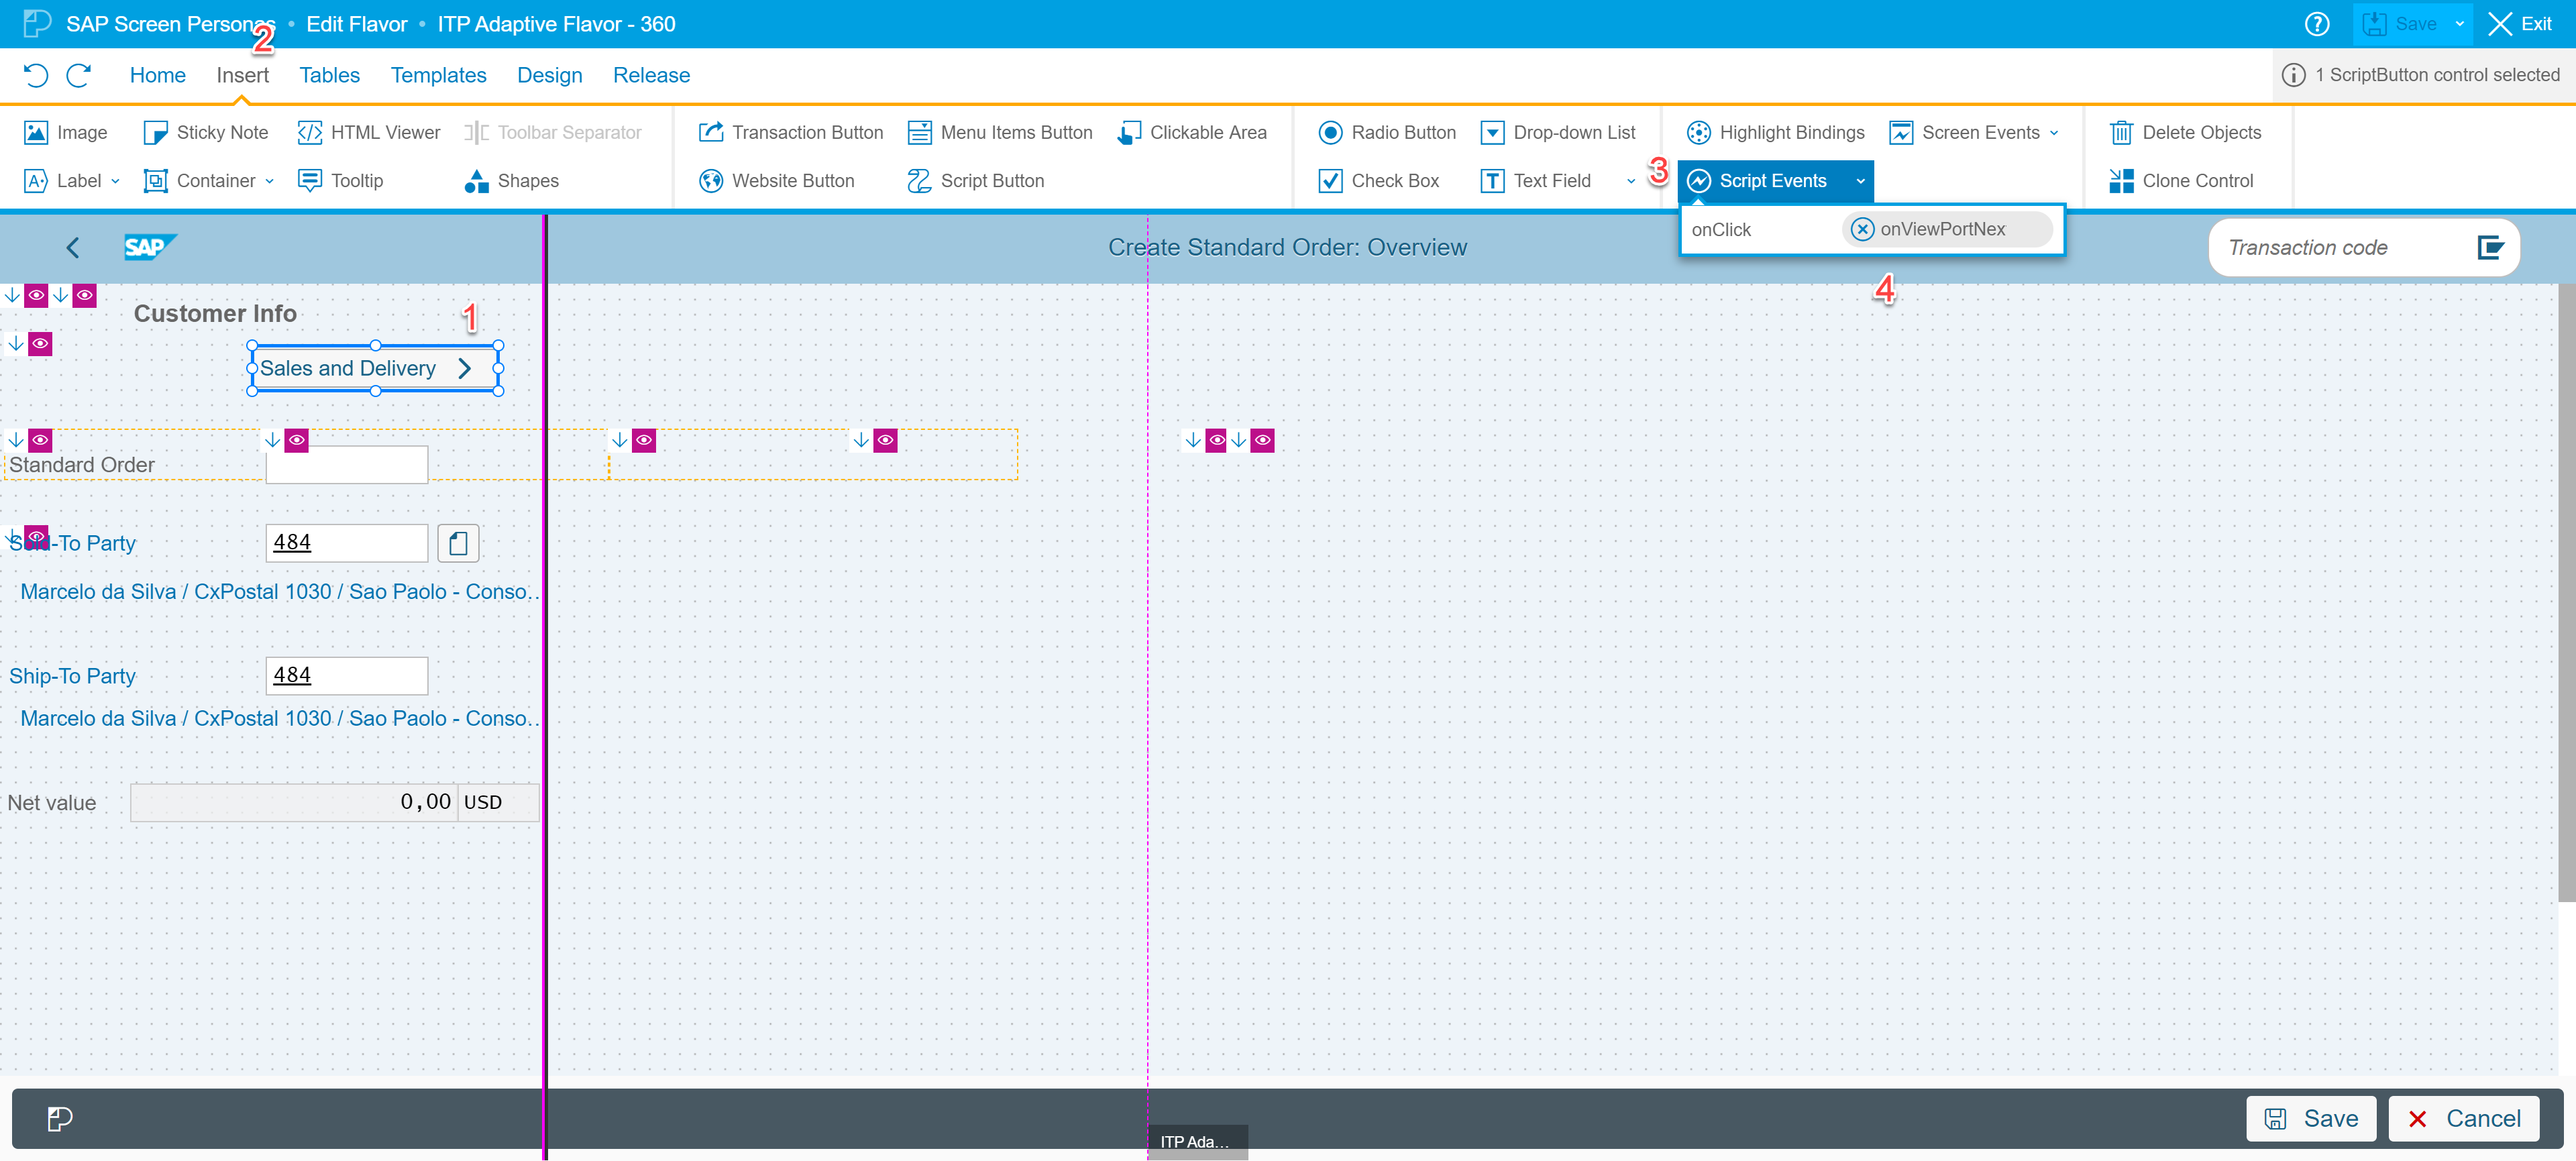
Now, when a user clicks the “Sales and Delivery” button, the next sequential screen will be displayed. Generally, the “next” Viewport screen is determined in the order they were created in the Parent Flavor. Beyond navigating to the next Viewport, SAP also provides the following automatically created scripts:
onViewPortPrevious – Will navigate to the previous Viewport
onViewPortReset – Will return to the original (Default) screen.
More complicated navigation scripts can be created (for instance, if you would like direct navigation to a viewport and not sequential navigation). However, that is beyond the scope of this blog.
Following the same process as above, we create the remaining tabs, Sales & Delivery and Item Detail viewport, but not the Item Overview tab. We will cover that in the following section…
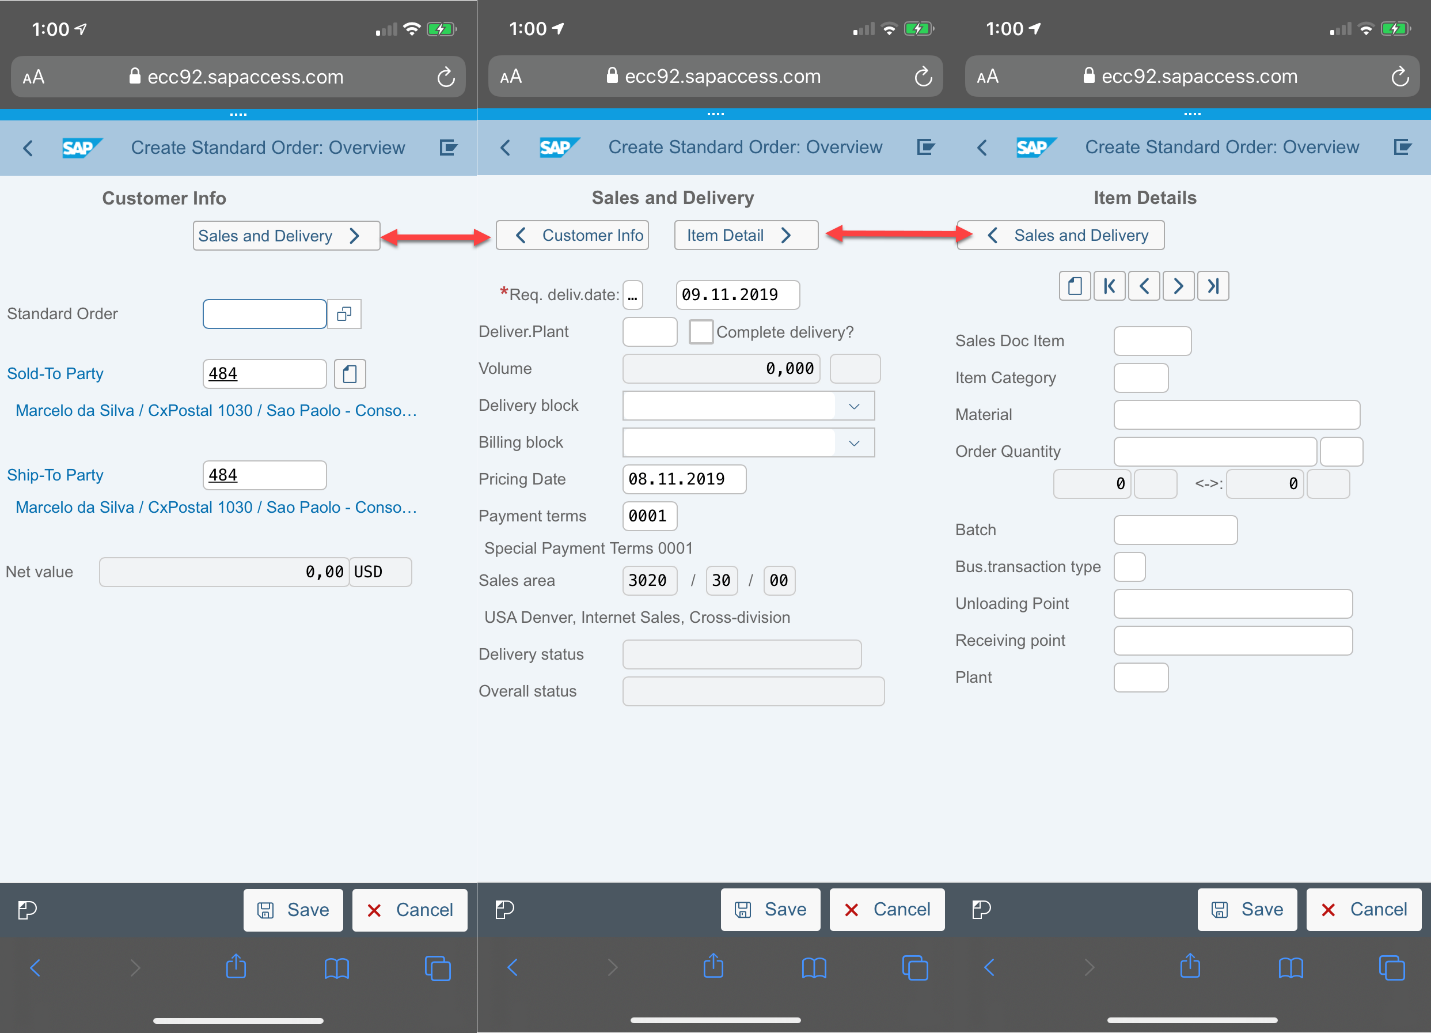
Once completed, we can finally see how our created Adaptive Flavor looks on out mobile device. Our new Adaptive Flavor is much more user friendly and less cluttered on such a small screen. However, thanks to Viewports, we are still able to keep all of the original functionality of the Parent Flavor (save for the Item Overview, which will be covered here in a minute)
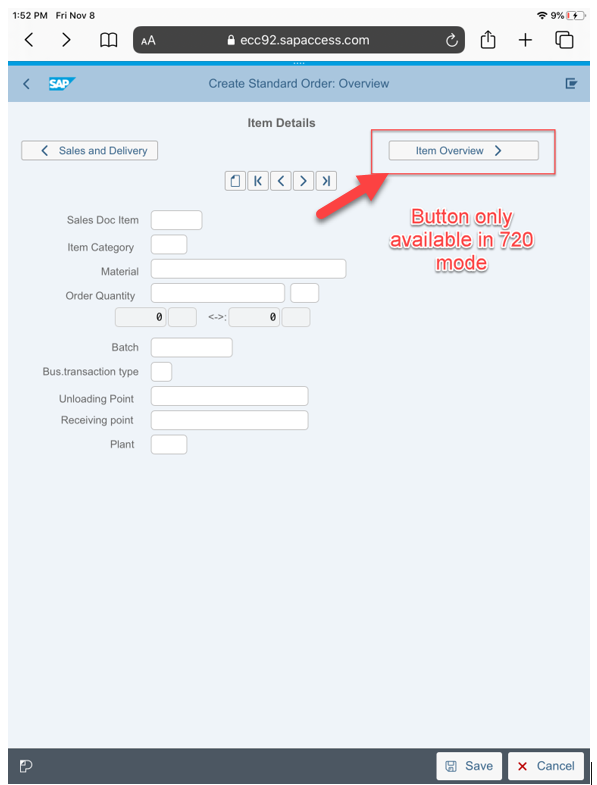
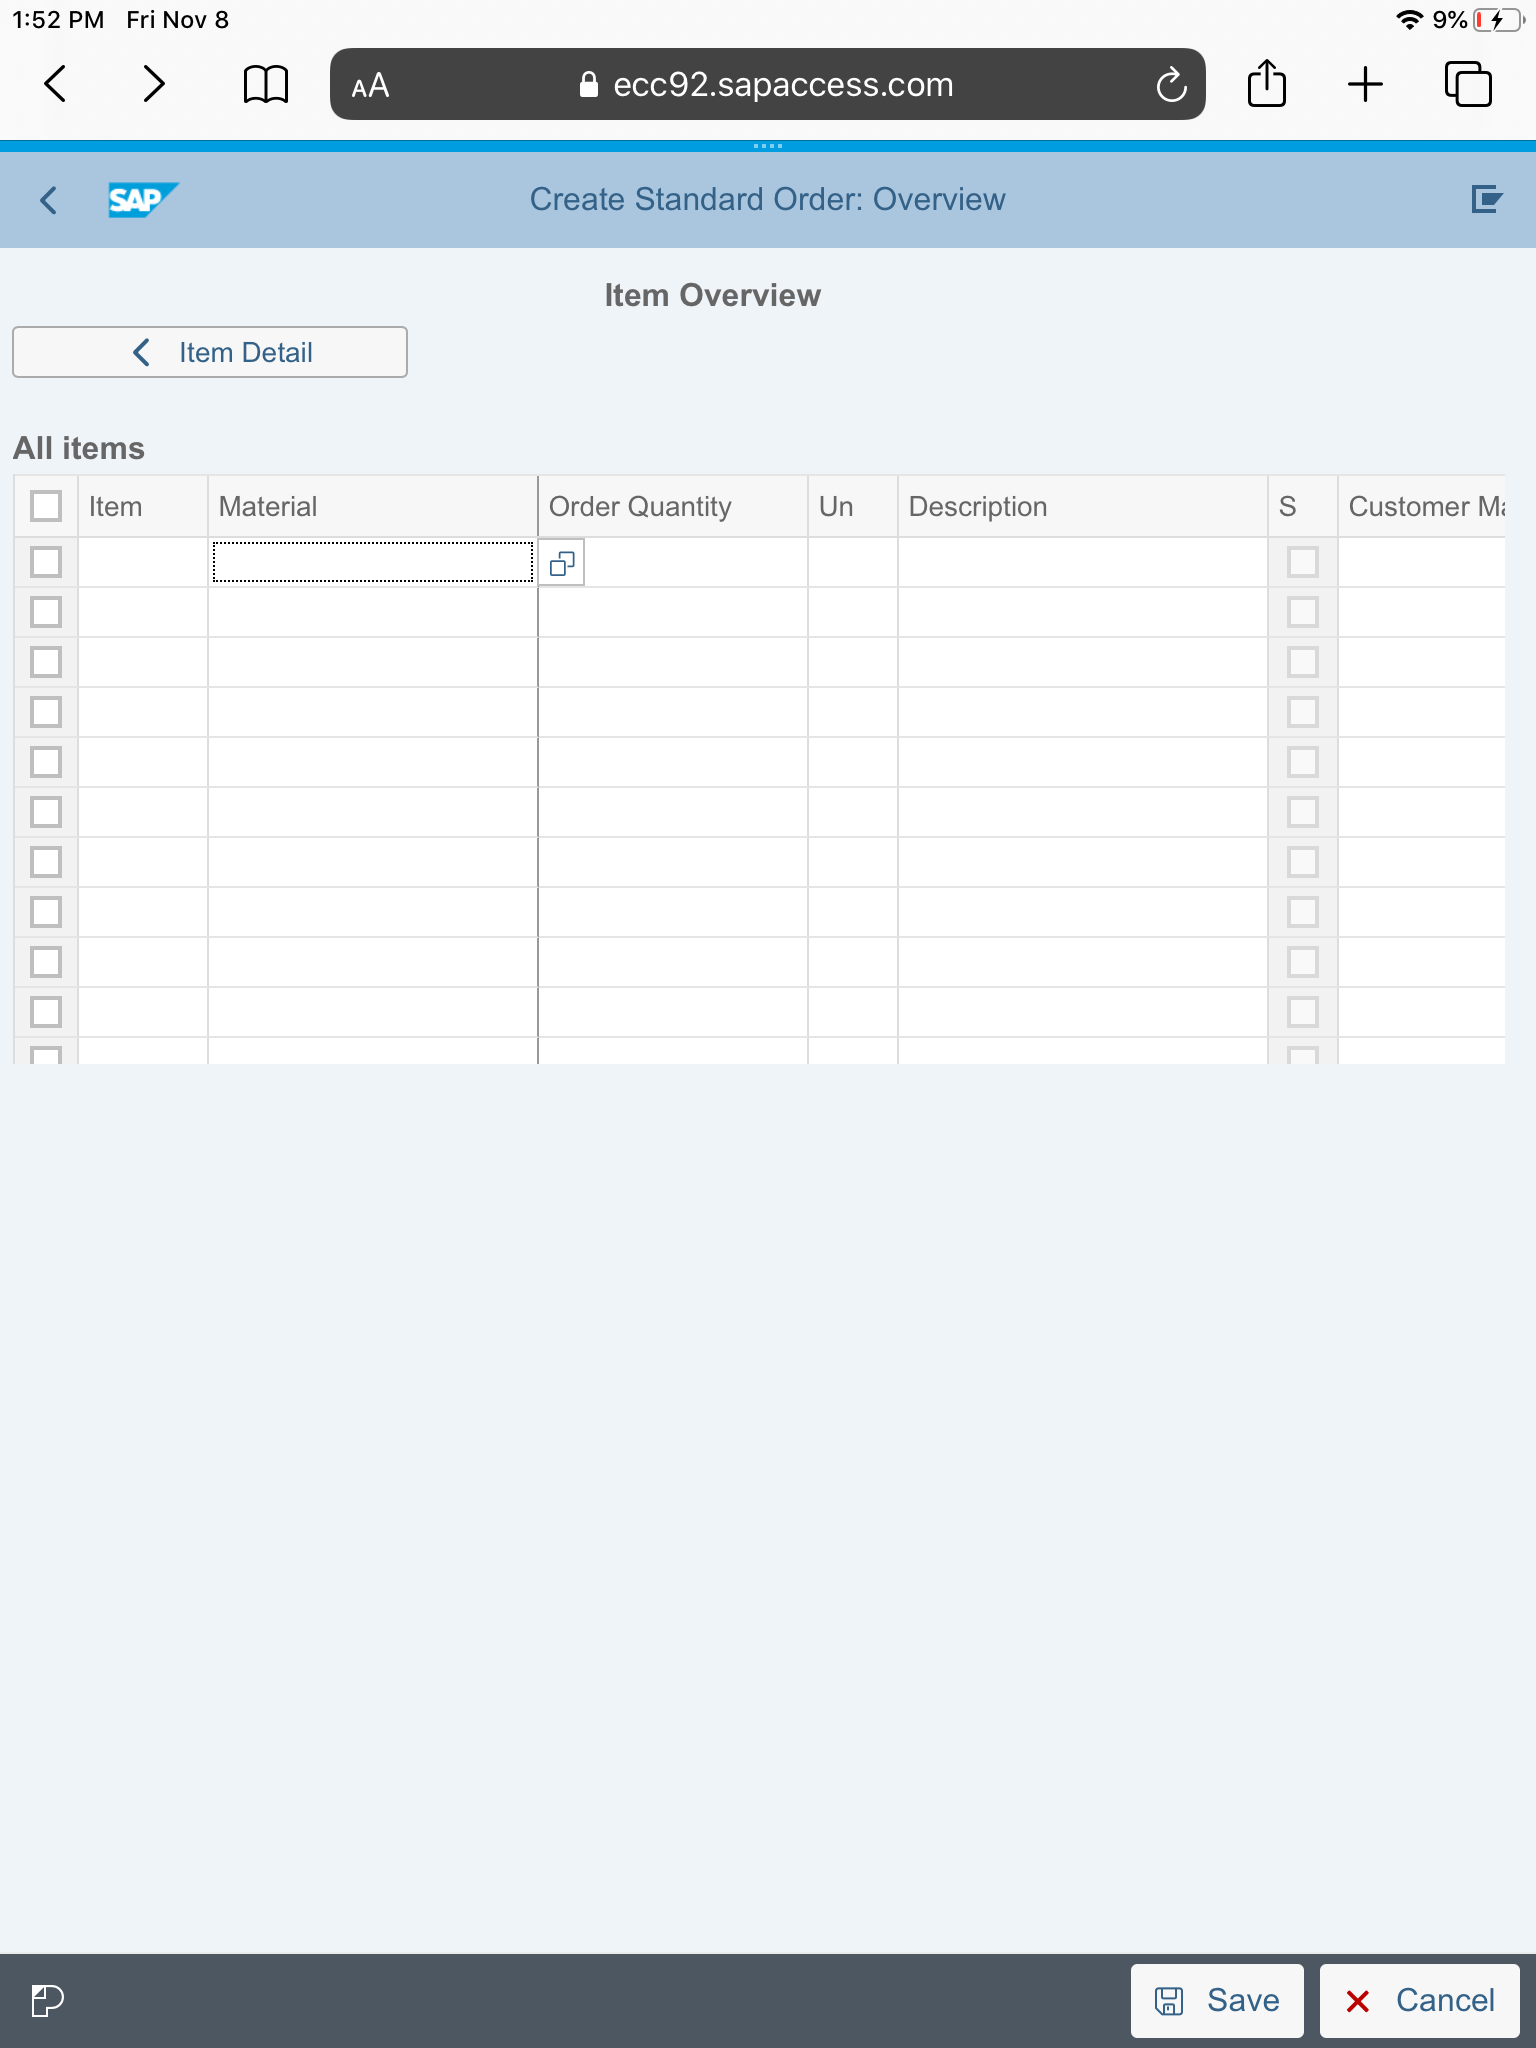
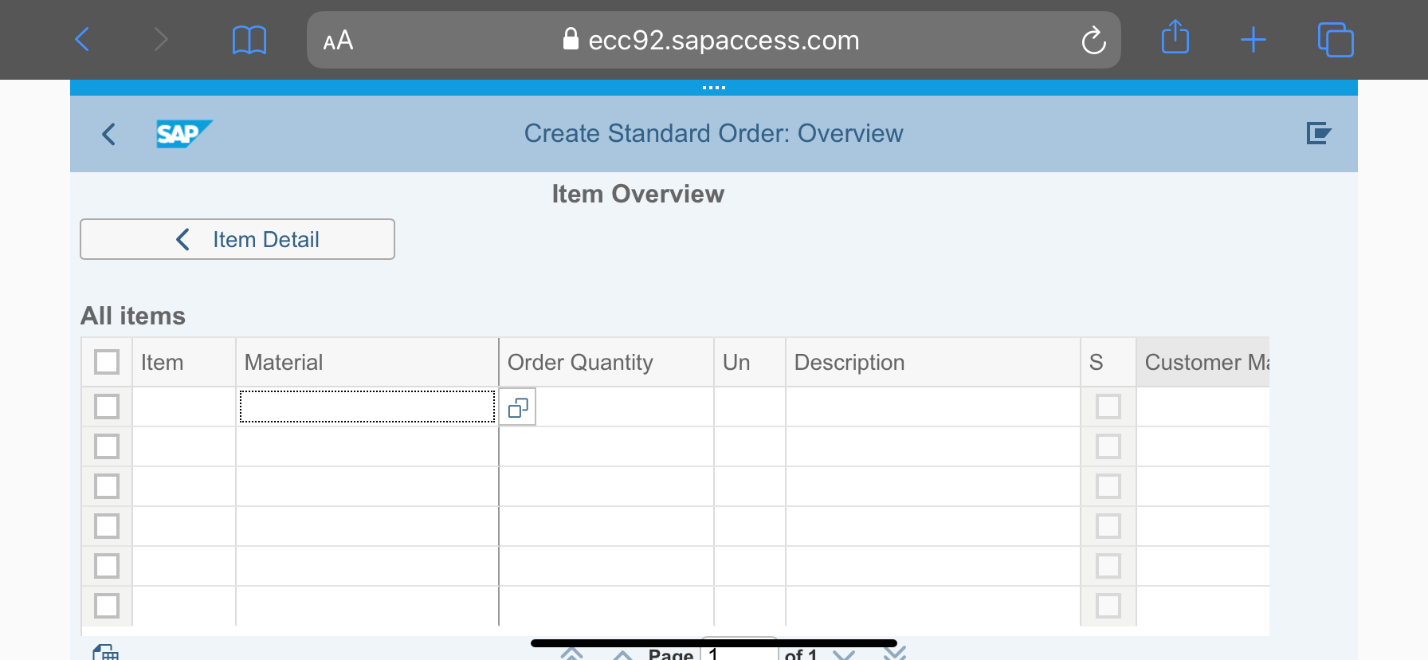
As stated above, we have intentionally left the Item Overview tab off of our phone portrait mode Adaptive Flavor. We did this because the Item Overview tab is a tableview of the current sales items. Tableviews can sometimes be difficult to view and navigate in portrait mode, and are much more suitable to being viewed in landscape mode.
To allow a mobile phone to view VA01 in landscape mode, we will now construct an additional Adaptive Flavor, this time with a minimum width of 720 pixels. When we construct the 720 Adaptive Flavor, we will include all of the original iPhone (360 pixels) screens and layouts, and additionally create a fourth and final screen for the Item Overview tab.
This now brings us to some important features of Viewports and how they behave when there are multiple Adaptive Flavors involved.
Viewports and Different Adaptive Flavors
The rules….
- When a Parent Flavor creates a Viewport, each child automatically inherits that Viewport as well.
- Each child Flavor can maintain its own version of each Viewport.
- This means the layout and buttons are unique to each child Flavor. Including a button in one Flavor does not necessitate the inclusion in another.
- Implementation of each Viewport is optional. If a particular Flavor does not have use for one or all of the Viewports, the Flavor creator can simply not include navigating button to the Viewport
We will take advantage of the above facts to implement an intuitive and adaptive 720 pixel Flavor, that will serve as both the portrait display for tablet devices and the landscape display for mobile phones.
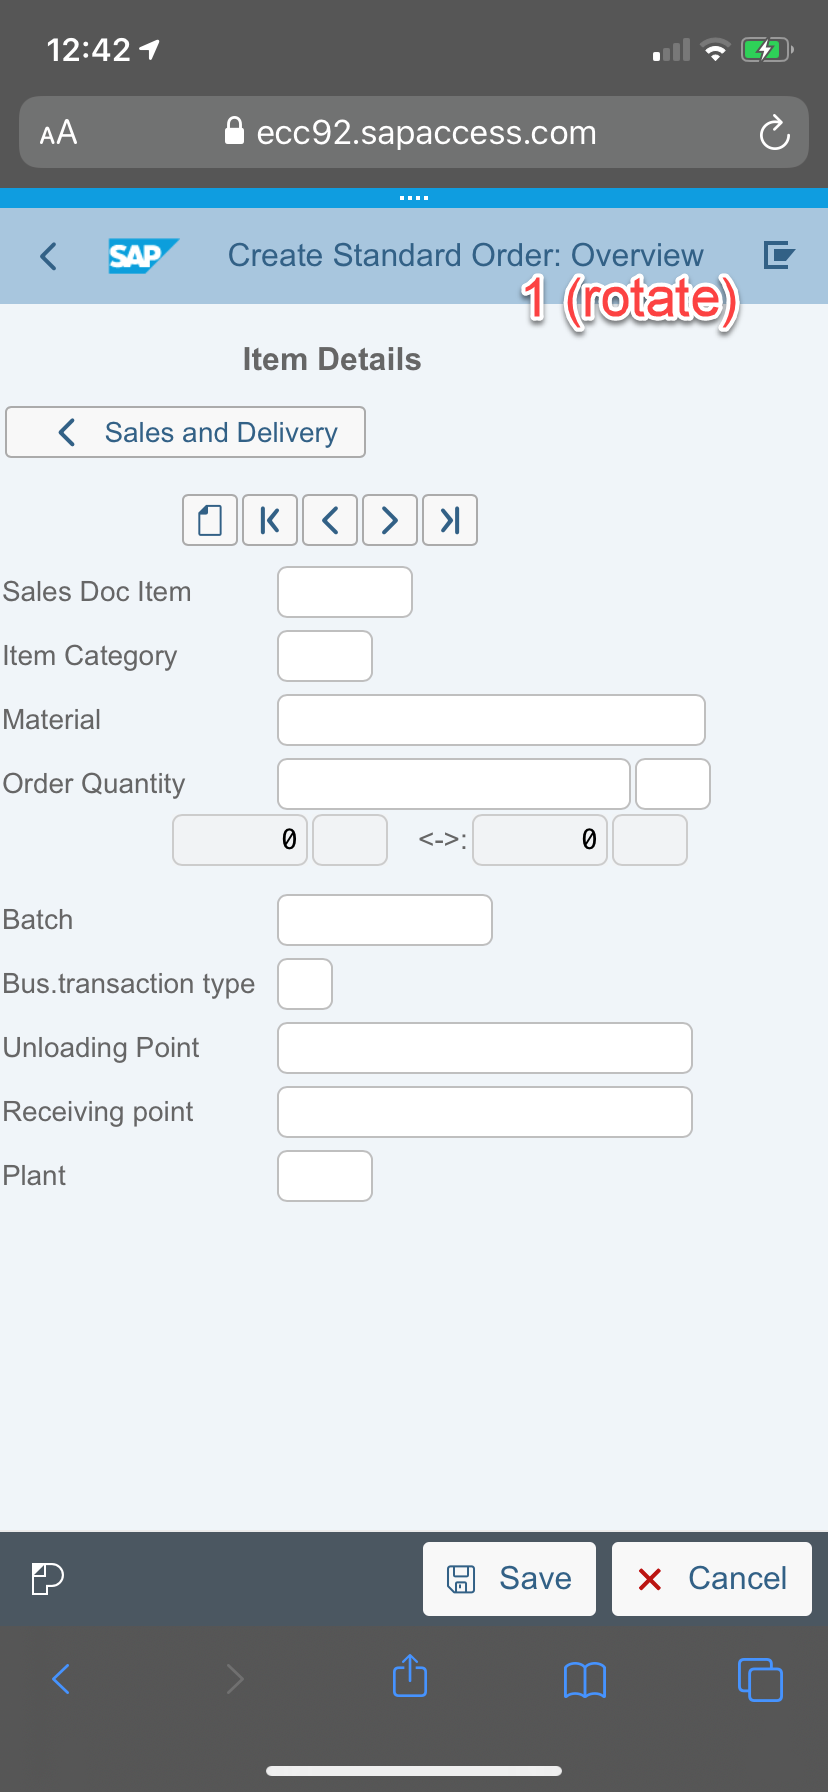
First, we will just recreate the 360 pixel screens for the 720 pixel display, making minor adjustments for the screen width. We will also make a minor adjustment to the Item Details tab, adding the additional button that allows navigation to a fourth Viewport screen. Below is the final result, as viewed from an iPad…

In addition to copying the original Viewports, we also create another Viewport to hold the Item Overview screen….
Beyond just allowing a better experience for tablet users, this additional Adaptive Flavor allows iPhone users to access the Item Overview tableview on their devices as well. How? well portrait mode phone users who wish to see the Item Overview screen simply must navigate to the item details tab, flip their devices sideways, and the option automatically becomes available!
WAIT FOR IT…..
This allows the screen to adapt to the user’s viewing mode and provide flexibility, while still preventing them from becoming frustrated with the Item Overview screen while in portrait mode.
Summary
We have learned that a viewport in SAP Screen Personas is a view on part of your Adaptive Flavor. You can use viewports to break complex screens into multiple parts, which improves the performance and loading time of the flavor, and gives the end user a modernized UI while requiring a minimal level of effort.
In the next and final blog of this series, we will walk through the steps required to integrate our newly created Personas Flavors directly into the Fiori Launchpad.
Cheers and Thanks for reading!