 Anthony Cecchini is the President of Information Technology Partners (ITP), an SAP consulting company headquartered in Pennsylvania. ITP offers comprehensive planning, resource allocation, implementation, upgrade, and training assistance to companies. Anthony has over 17 years of experience in SAP R/3 business process analysis and SAP systems integration. His areas of expertise include SAP NetWeaver integration; ALE development; RFC, BAPI, IDoc, Dialog, and Web Dynpro development; and customized Workflow development. You can reach him at [email protected].
Problems with ABAP output and why using the ALV Toolbar can help
In the last post, we examined why using the ALV Grid as an output was far superior to the standard ABAP Classical lists created using ABAP statements like WRITE, POSITION, or FORMAT, etc…etc.
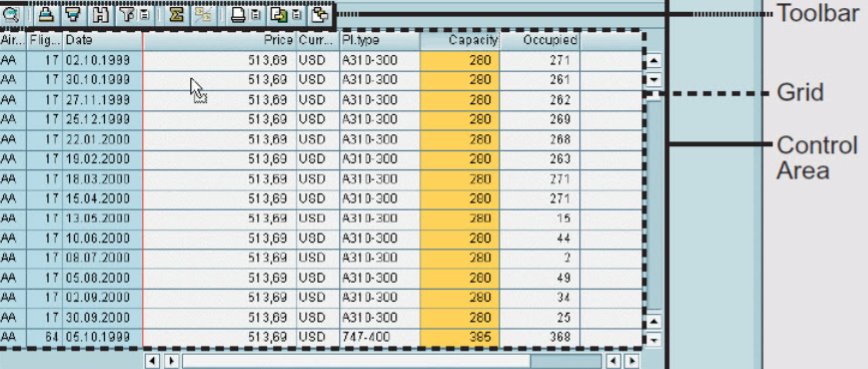
In this post we will add some needed functionality to our base ALV report created in the previous post. A TOOLBAR! Well actually we will add FUNCTIONS. We already have a toolbar, its just empty. see the screen shot below.

Remember how in the last post we saw that developers devise their own methods for common list handling activities such as headings, sorting, filtering, rendering subtotals, and the like when ALV Grid’s are NOT USED. Well using the Integrated ALV Tool Bar functionality solves this problem.
Before we get into the how-to, lets dig a little deeper into the UI of the ALV and Toolbar.
ALV Grid Baseline Functionality
Take a look at the screen shot below; it shows an ALV Grid and its integrated toolbar, which enables mouse-oriented access to a variety of list handling functions. Remember, because we are using the SALV Classes, we are developing in ABAP OO ALV.
Users can invoke functions that refer to a selected column (like hide, search, or filter) directly via a context menu. (The selection of columns and rows complies with the Microsoft standard, which means that users can do things like use the CTRL key to select rows or columns that are not adjacent.)
Let’s take a closer look at the toolbar. See the screen shot below for an overview of the generic functions of the toolbar
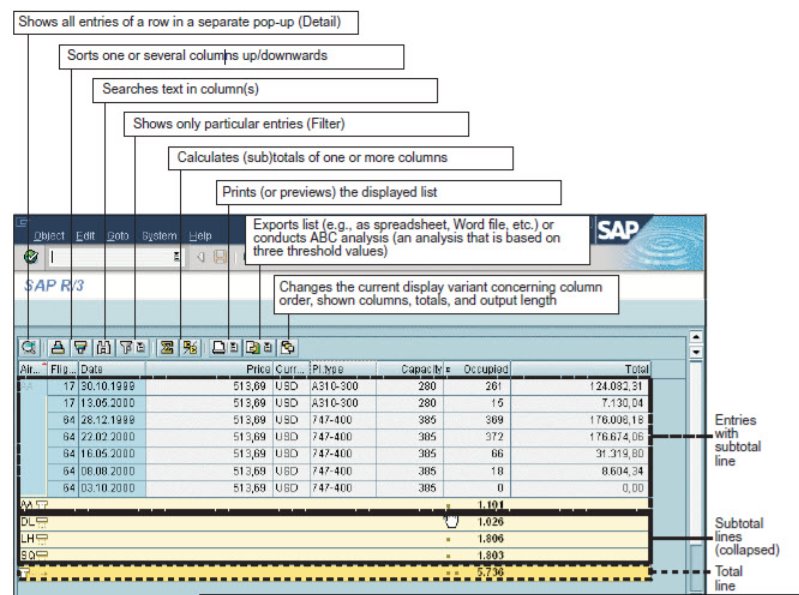
The user can sort the list by one or more columns, filter entries (e.g., display only data of one day), and calculate totals and subtotals. Users can determine column order and column length to retrieve needed information in a more convenient fashion.
Developers can allow these settings to be saved in a display variant that can be saved as the default setting, such that the user’s preference for settings is loaded before the list is displayed.
Some of the functions made available in the toolbar are there to provide better visualization of lists that either have a lot of columns or a lot of rows. The Detail function, for example, allows users who are working with a list that has a lot of columns to view values of a line in a separate pop-up window.
For lists that are very long, a user can calculate subtotals, then collapse all subtotal levels by clicking on the little buttons of the total line. Particular subtotal lines can be collapsed or expanded, too. Users will also find functions, like the ABC analysis tool, to facilitate the analysis of data. To print a list, the ALV Grid Control calls the SAP List Viewer. Alternatively, users can export a list to MS Word or MS Excel. For those who usually work with Excel, the ALV Grid Control offers a function to switch between Grid and Excel inline display.
Now that you have seen the standard list handling functions that become available to users via the ALV Grid. let’s talk about integrating this with your applications.
Integrating the ALV Tool bar Functions
OK, so in the last post – Using The SALV OO Class for Quick and easy Table displays, I gave you the base code for a simple 2D display using the ABAP OO SALV class. We will be adding to this base code throughout the entire series. So lets start by adding the CL_SALV_FUNCTIONS class. Create the object reference variable.

Next we add code to receive the object using the GET_FUNCTIONS method of the GR_TABLE object. Then we call the method SET_ALL to force the ALV grid to show all standard functions by passing the ABAP Boolean literal ABAP_TRUE.
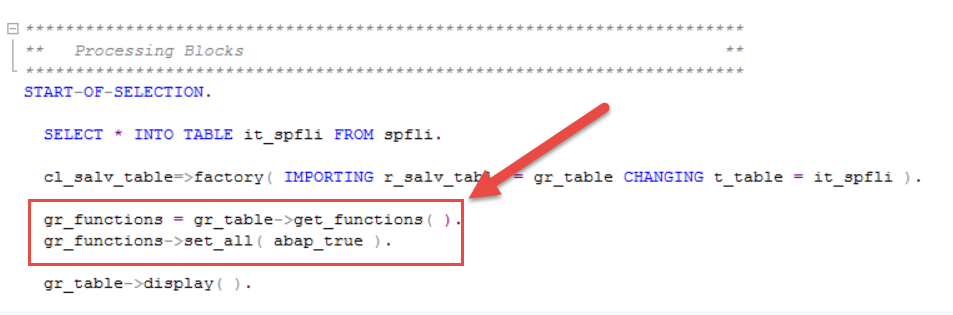
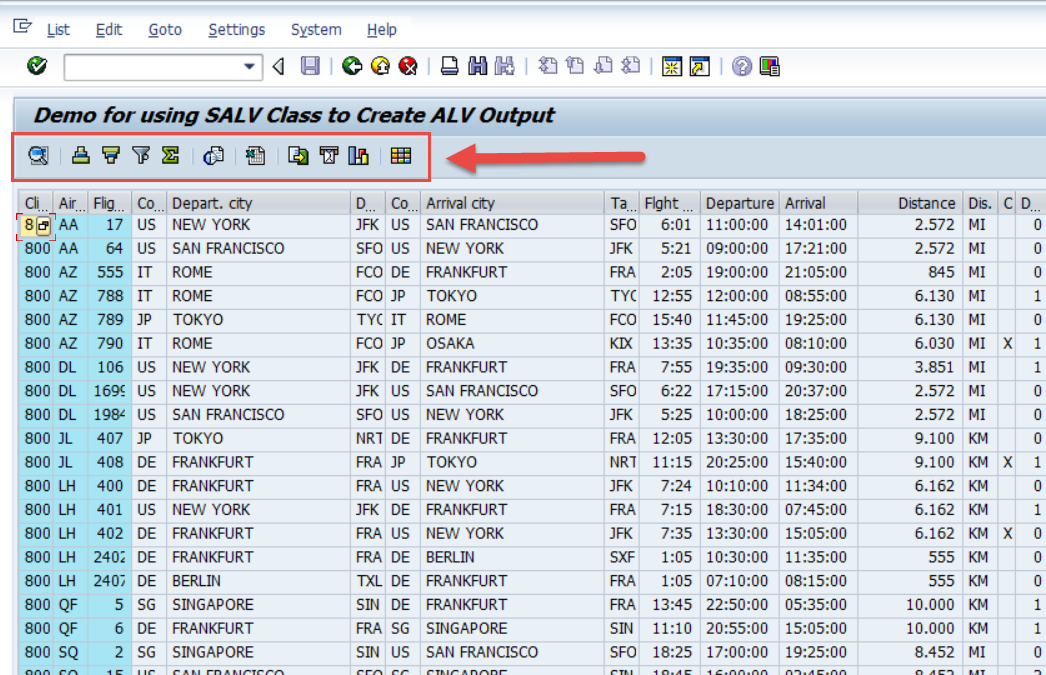
That’s it! Run the program and should have a tool bar with all the standard functions. (see below)
In Summary
We learned how to quickly add the Standard Functions to our Applications Tool Bar using the SALV OO class CL_SALV_FUNCTIONS. A few more Method calls (again just two calls…lol) and viola we have a loaded Tool bar.
Below is the full code for you to COPY & PASTE.
REPORT zalvom_demo1.

 ************************************************************************
 **   Global References for Classes                                    **
 ************************************************************************
 DATA: gr_table TYPE REF TO cl_salv_table.
 DATA: gr_functions TYPE REF TO cl_salv_functions.

 ************************************************************************
 **   Data Declarations                                                **
 ************************************************************************
 DATA: it_spfli TYPE TABLE OF spfli.


 ************************************************************************
 **   Processing Blocks                                                **
 ************************************************************************
 START-OF-SELECTION.

   SELECT * INTO TABLE it_spfli FROM spfli.

   cl_salv_table=>factory( IMPORTING r_salv_table = gr_table CHANGING t_table = it_spfli ).

   gr_functions = gr_table->get_functions( ).
   gr_functions->set_all( abap_true ).

   gr_table->display( ).